This 'Multi-Pitch Trad Climbing' article is part of the book - Trad Climbing Basics.
A multi-pitch route is one that is split into two or more pitches. This may be because it is longer than your rope. Or it could be a wandering route that would involve a lot of rope drag if climbed as a single pitch.
Multi-pitch climbing combines many skills: placing gear on lead, building belays, route-finding, rope management and (often) abseiling down after you reach the top.
Due to the length and complexity of multi-pitch routes, you should develop your problem solving and self-rescue skills before embarking on this kind of adventure.
Multi-pitch: What To Bring
Extra Climbing Gear
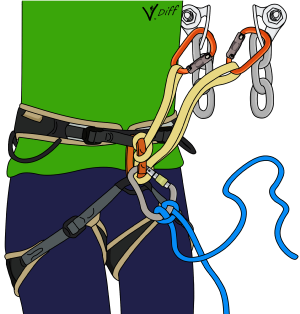
You’ll need two anchor kits for a multi-pitch route. Make sure you bring:
- Two cordelettes/ long slings
- At least six screwgates
- Two belay devices
If the descent from your route involves abseiling, make sure to bring ATC style belay devices and prusik cords.
Food and Water
If your multi-pitch is likely to take more than a few hours, consider bringing food and water to snack on at the belays.
Many routes have luxury belay ledges, so if you're not in a rush, why not have a vertical picnic?
Clothes
Any comfortable all-cotton clothes will suffice for single pitch cragging, especially venues with a short approach. For multi-pitch routes, or for any climbs with a long approach, wearing synthetic clothing is a better choice. Synthetics insulate much better than cotton in wet or cold environments.
If you expect cold temperatures, bring a pair of gloves so you can belay with warm hands and then take them off to climb. A thin hat that fits under your helmet is a very lightweight way of keeping you warm too. If the descent is long, it's nice to bring a comfy pair of shoes.
A warm/waterproof jacket, or even a thin wind-proof layer, can make multi-pitches more comfortable when it gets windy and the sun disappears, especially for the belayer.
Down jackets are a poor choice unless you’re climbing in dry climates below freezing. Most down jackets will repel a small amount of moisture, but the feathers will clump together in a storm and you’ll freeze. They also tend to rip very easily on rock.
First Aid Kit
A small first aid kit can be useful, along with a pocket knife for cutting anchor webbing or stuck ropes. Make sure the knife has a folding blade which is impossible to accidentally open when attached to your harness.
Route Description
On a single pitch, it's easy to remember where to climb. However, on a multi-pitch you may have forgotten the details by pitch six.
Bringing the whole guidebook is a bit excessive. But a route description (or topo), neatly folded in your pocket, will help show you the way.
Another option is to take photos of the topo on your phone. Make sure you don’t run out of battery though.
Take descriptions from adjoining routes too, as this can help you figure out where you are.

Extra Rope
You’ll need to bring a second rope if your route involves an abseil descent where the anchors are more than half of your rope’s length apart (i.e: you can only abseil 35 meters with a 70 meter rope). You will also need a second rope if climbing as a team of three.
Headlamp
Headlamps are essential on long multi-pitches. Finishing a climb, or trying to descend in the dark can be incredibly difficult and dangerous.
If you take spare batteries, tape them together in the correct orientation, so you can just plug the whole block in at once. This also means you won’t have random batteries floating around your bag and no idea if they are full or empty.
Backpack
All this stuff can be put into a small backpack and carried by the second.
Alternatively, the load can be split between climbers so neither climber has a particularly heavy bag.
Depending on the route and your tolerance of suffering, you may not need any of it. For routes that are difficult to return to the base, you'll need to bring everything. Plan before you go.
Multi-pitch Anchors
If the leader falls on a single pitch route, the belayer is often pulled up off the ground when they hold the fall. On a multi-pitch, the belayer would instead be pulled out of position.
This could potentially pull out part, or all, of the anchor if it was built to only hold a downwards force.
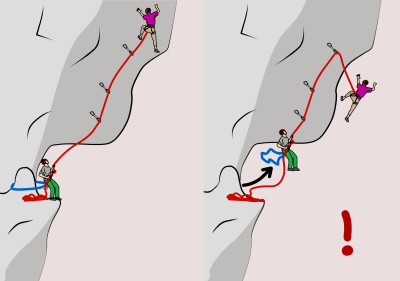
For this reason, you should build multi-pitch anchors with both an upwards and a downwards pulling aspect.
If the last pitch traverses into the belay or the next pitch traverses away from it, the anchors could get loaded with a sideways pull. Build the anchor to be strong in any conceivable direction of pull.
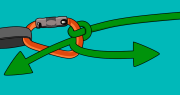
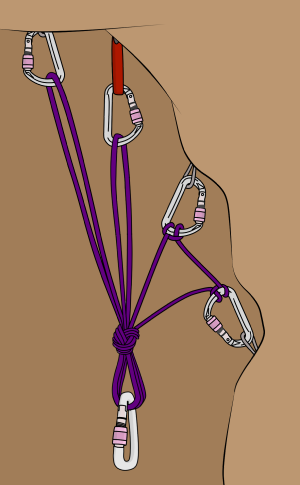
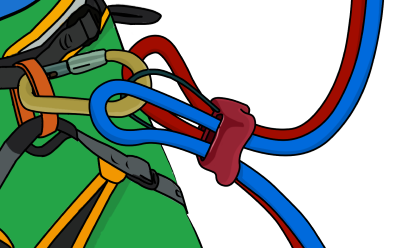
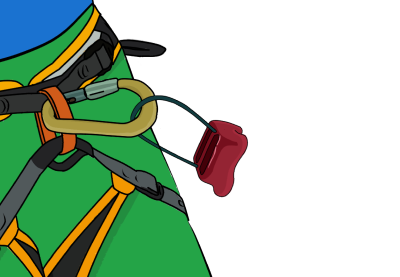
If the best upward-pulling gear is just below the downward-pulling anchor pieces, you can incorporate it into the anchor with some cordelette craft to make it multi-directional.
There are many variations to this. One is to tie clovehitches on the lower two pieces as shown.
Multi-pitch Belay Changeovers
Efficient belay changeovers will speed up your ascent, making you less likely to get benighted or stranded in a storm.
Sometimes the more experienced climber will lead every pitch. Other times, each climber will choose which pitches they prefer.
A common tactic is to swing leads (lead alternate pitches). Be aware that easier pitches may be runout.
Swinging leads is the most efficient. The rope is already stacked with the new leader’s end on top and the gear from the previous pitch will be racked on their harness.
It’s much more efficient if both climbers can go hands-free during the changeover. How you do this depends on who will lead the next pitch. Two methods are described below.
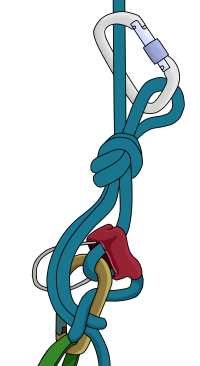
Method 1: Tie-Off Your Belay Device
If alternating leads, the easiest method is to tie-off your belay device. When the leader is ready to climb, simply unfasten the knot and they will be on belay immediately. This works well if there is a small ledge to stand on. If not, you may prefer to choose method two.
Method 2: Attach to the Central Point
If the same person is leading every pitch, the second will have to attach to the central point, in the same way as the leader.
Use separate screwgates to attach the second's rope to the central point(s). When they are attached, they can be taken off belay.
The leader will need to be put on belay before they detach from the anchor.
Method 3: Using Guide Mode
If belaying with Guide Mode and swapping leads, you'll need to change from Guide Mode to normal belaying when the second has reached the anchor.
To do this, put the second on belay as normal with another belay device, then remove the Guide Mode setup. It's better if the next leader removes the Guide Mode setup so the belayer can keep both hands for belaying.
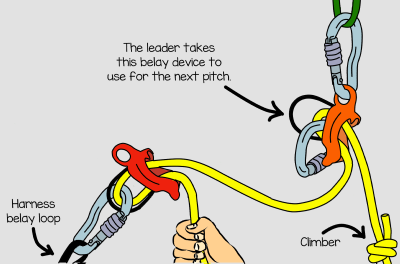
Multi-pitch: Leaving the Belay
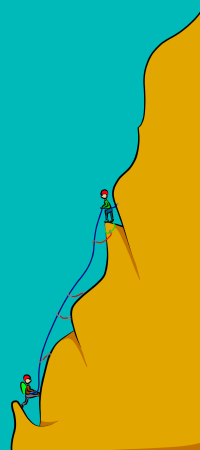
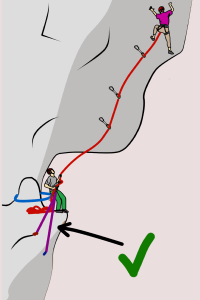
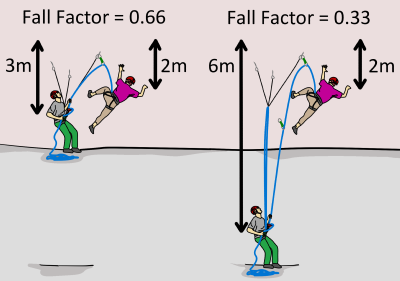
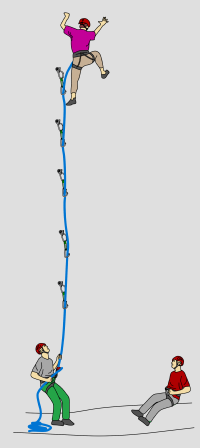
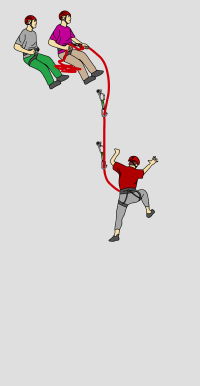
It's a good idea for the leader to clip a high point of the belay as their first piece of gear. This eliminates the chance of a factor two fall should they fall before finding protection on the next pitch.
It's also much easier for the belayer to hold a fall this way.
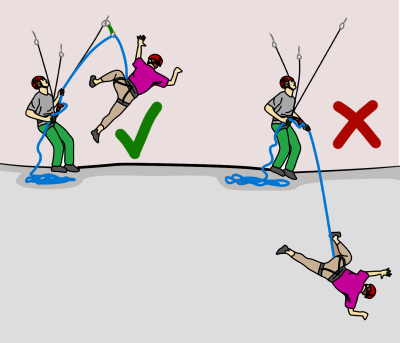
You can reduce the fall factor further by extending the belayer's anchor attachment.
This puts less force on the first pieces of gear if the climber falls.
Where To Belay
Recommended belay stations will be described in the guidebook. You don’t have to belay there, but they are usually the best spots.
Experienced climbers often stretch pitches to the full rope length to reduce the number of belay changeovers and therefore speed the climb up.
Teams with an inexperienced partner may do shorter pitches so they can communicate more clearly.
When looking for a belay, choose a place which:
- Has cracks for solid gear placements
- Has protection from rockfall (especially if there are climbers above)
- Does not cause the rope to run across loose rocks
- Allows communication between partners
- Provides a comfortable stance for belaying, if possible
Hanging Belays
If there is no belay ledge, you will have to create a hanging belay. Try to create this in a place which at least has some good footholds.
It can be unnerving at your first few hanging belays, because you must completely trust your anchor and lean all your weight on it.
The key points are making sure the anchor is bomber and having the central point at chest level or higher so you can lean out comfortably.
For long belays, keep moving your feet around to stop your legs from going numb, or stand in a sling to get the weight on your feet if there are no footholds.
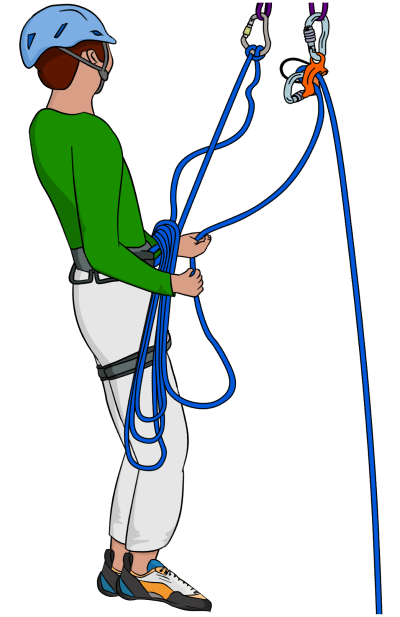
Rope Management
Stacking or coiling the rope neatly so it doesn’t tangle is important on multi-pitches.
If the belay ledge has a flat area, simply stack the rope onto it in a place where it won’t slide off. If there isn’t a suitable belay stance to put the rope, you can stack it in neat coils across the rope which goes between your harness and the anchor (lap coils).
Alternatively, stack it through a sling. Either way, the first coils should be the longest, with progressively smaller coils added on top. This ensures the rope feeds out well on the next pitch.
If it is windy or there are bushes or loose rock below you, make sure to keep the coils short enough so they don’t get stuck.
If climbing with half ropes, treat them as one rope and stack them together in the same way.
Time Budget
Make a realistic estimate of how long the route might take. Figure out what time you need to have finished the route (to avoid thunderstorms or darkness etc..) and then work backwards from there.
Break the climb down into pitches and figure out how long each one will take. Remember to add time for approaching and descending the route and for belay changeovers.
Be conservative with your estimations – it’s much easier to lose time than gain it.
Retreat Options
As part of your time budget, it’s smart to figure out places where you can switch to an easier route if you are running low on time, or places where you could easily descend without leaving most of your rack behind.
Teams of Three
In most situations, a pair of climbers is faster than a team of three. But having someone to chat with at the belay makes climbing as a three more social.
It also means you have an extra person to help carry the gear and lead some of the harder pitches.
There are many ways to connect three climbers to the rope. Two popular methods are described here.
Caterpillar Style
Step 1
The leader climbs a pitch with one rope.
Step 2
The second climber follows on that rope, but trails another rope (Both ropes are tied into the harness tie-in points).
The second climber unclips the gear from the first rope and clips it to the second rope beneath them.
This ensures the third climber is protected from a swinging fall if the pitch traverses. If the pitch is straight up, the second climber could remove the gear.

Step 3
When the second climber has reached the belay, the third climber starts up.
The third climber removes the gear as they follow on the second rope.
Double Rope Style
Note
This technique is often employed with half ropes. However, half ropes are not designed to be used individually when following a pitch. For this reason, it is recommended to use two single rated ropes instead.
Step 1
The leader climbs with both ropes. They clip gear alternately to each rope.
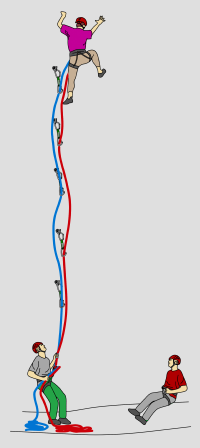
Step 2
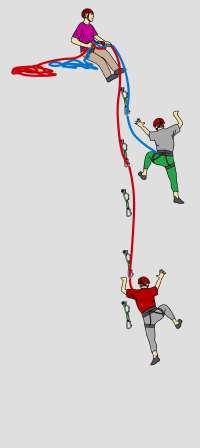
The second and third climbers follow, keeping around 5 meters apart from each other, while the leader belays them both at the same time.
It is highly recommended to belay with an auto-blocking belay device directly from the anchor, such as an ATC in guide mode.
When communicating, finish the command with the rope colour, so the belayer knows which rope you mean (e.g: slack on red rope).
Common Mistake
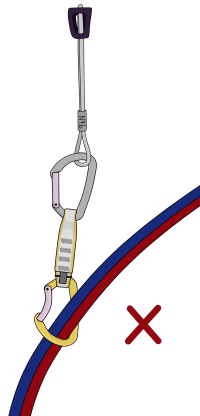
Clipping both ropes into a carabiner causes the ropes to rub against each other if a climber falls while leading or following.
This could damage your rope or even cut through the sheath.
It also reduces the ropes impact absorbing capabilities, and therefore puts a lot more force on the gear. This makes the gear less likely to hold the fall.
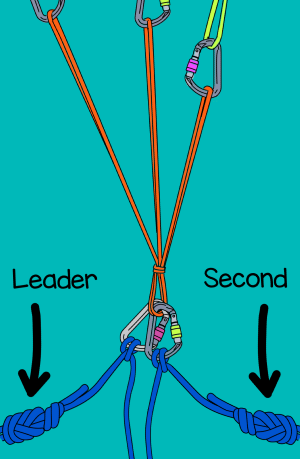
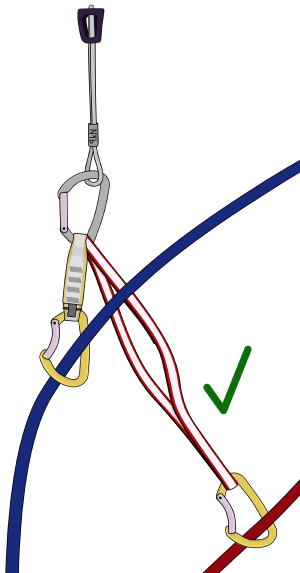
If you need to clip both ropes to a piece of gear (e.g: to protect both followers on a traverse), use two quickdraws of different lengths as shown.
These quickdraws are then removed by the third climber.
Attaching to the Anchor
After abseiling, attach to the next anchor as described here.
For bolted anchors, make sure to attach to both bolts independently.
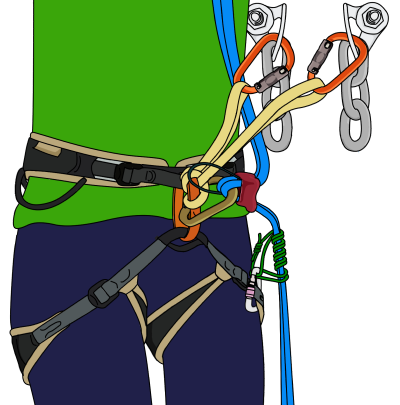
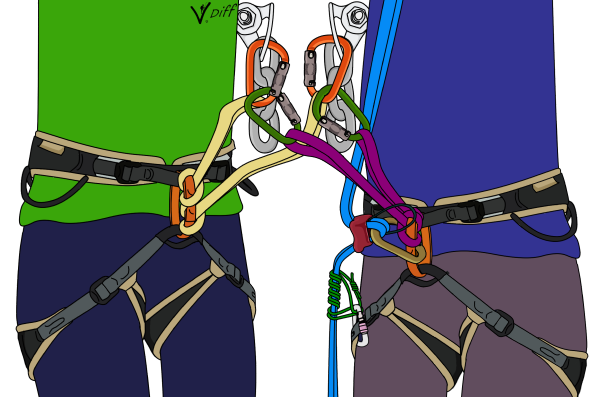
If there is only space for one climber to attach, the other climber can clip directly into their partner’s screwgates as shown.
However, this means that the climber who descended last must descend first on the next abseil.
Removing Your Belay Device
Once securely attached to the next anchor, you can remove your belay device as follows:
Step 1
Unfasten the screwgate. Unclip the device’s cable and both ropes from it.
Step 2
Re-clip the cable. This ensures that you can’t drop it.
Step 3
Pull the ropes out of the device.
Threading Ropes Through the Next Anchor
Thread the rope through the next anchor and tie a stopper knot in it before you pull it down.
Tie the stopper knot big enough so that it cannot fit through the main abseil point. This ensures that you cannot lose your ropes.

Alternatively, tie the rope to yourself so it cannot be dropped.