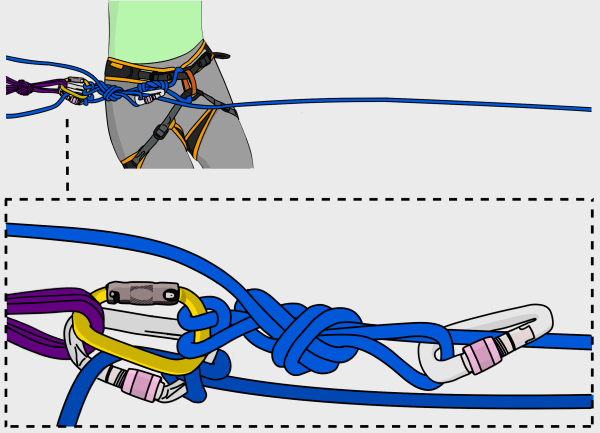
Advanced Trad Anchors > Part 3 of 5 > The Quad Anchor

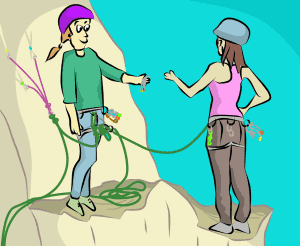
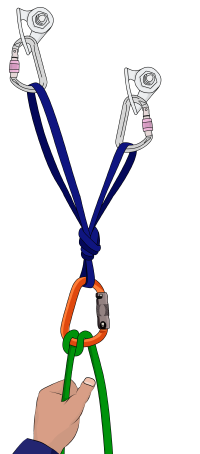
The 'Quad Anchor' is an anchor system which self-adjusts to keep an equal force on each anchor point. It can be better than other methods of equalizing in certain situations.

Self equalizing quad anchor

Advantages

- Distributes the load equally between the anchor pieces. This puts less force on each piece, therefore decreasing the likelihood of anchor point failure.

- Provides two independent attachment points for the belayer and climber. This helps to prevent carabiners from jamming up at the same master point.

- The two attachment points adjust laterally, meaning that the anchor remains equalized even when different directions of pull are applied at the same time. This is useful during multi-pitch belay changeovers, or if the route traverses in or out from the belay.

- On multi-pitch routes where you have bolted anchors that are approximately the same, you can speed up your anchor building by keeping the quad tied.


Disadvantages

- The quad will extend slightly should either anchor point fail. This can shock-load the remaining piece(s).

- Since the quad needs to be doubled up, it is difficult to equalize anchors where the placements are far apart.


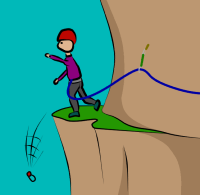
Best Situation To Use The Quad Anchor

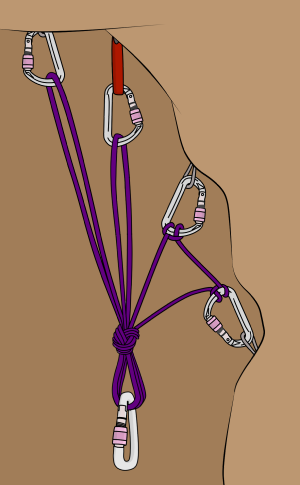
To equalize two bomber anchor points such as a two-bolt anchor.

How To Tie The Quad Anchor

You Will Need:
* 2, 3 or 4 solid anchor points
* A cordelette
* 3-5 screwgate carabiners
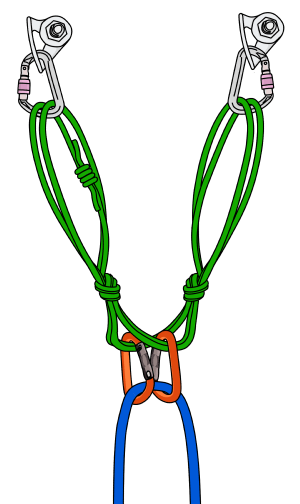
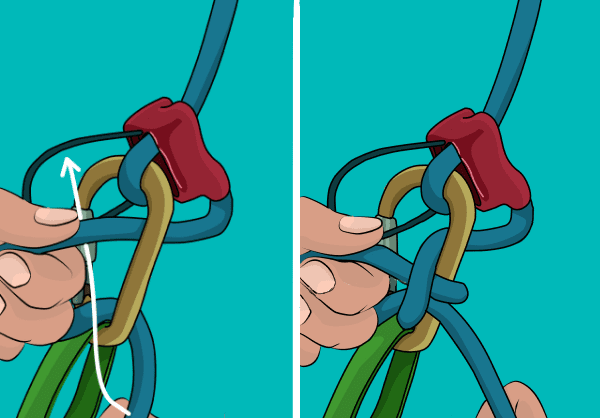
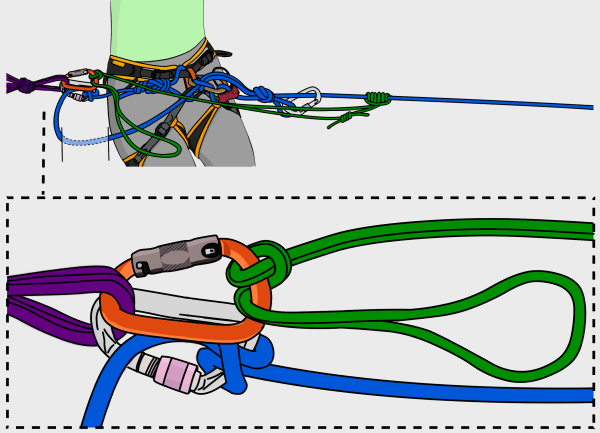
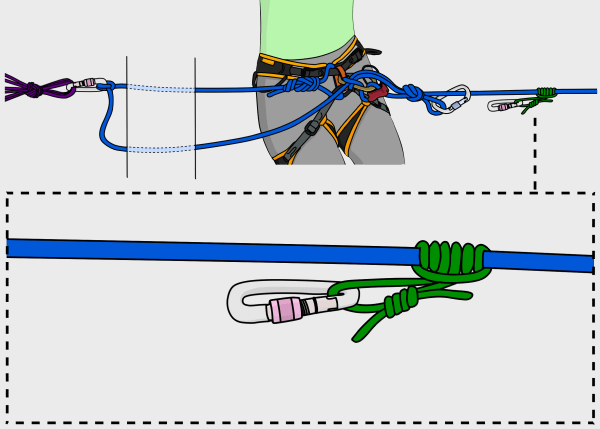
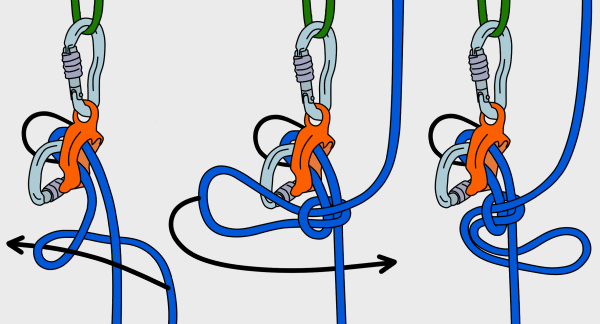
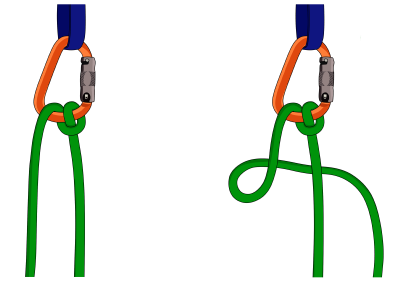
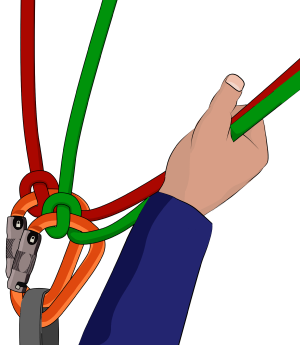
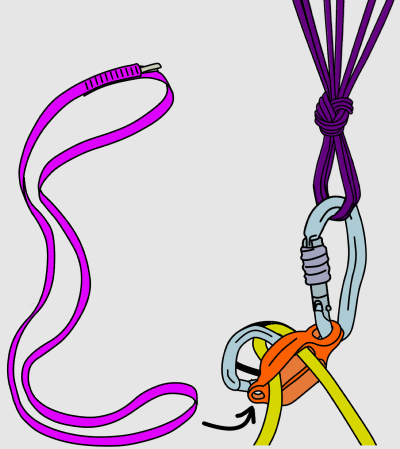
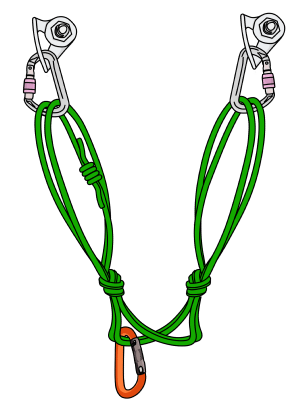
Step 1
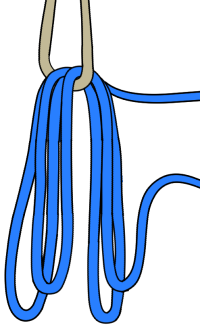
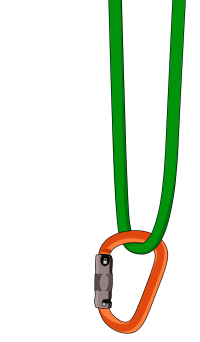
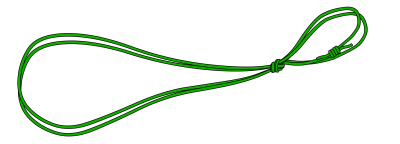
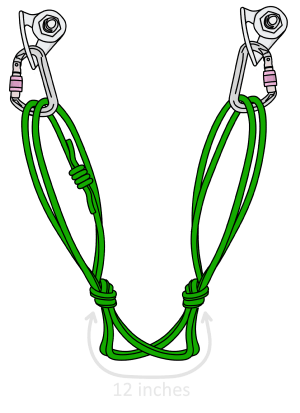
Double over a cordelette so there are four strands of cord. Make sure the double fisherman’s knot of the cordelette is near one end.

Climbing cordelette

Step 2
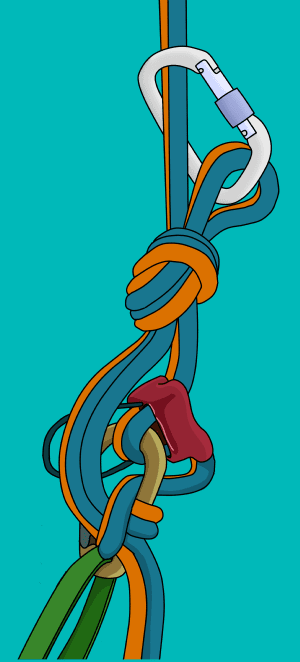
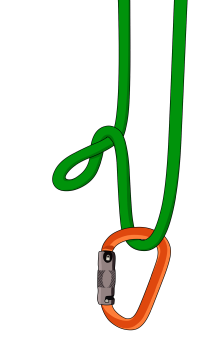
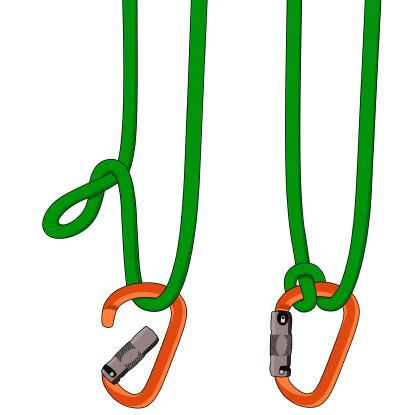
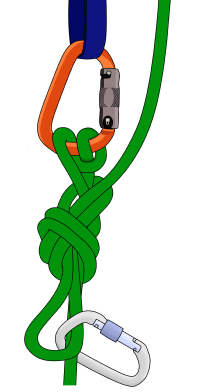
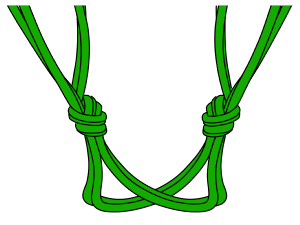
Tie a ‘load-limiting’ knot on one side of the cordelette. This can be either an overhand knot or a figure-8 (The figure-8 is easier to untie after loading. The overhand uses slightly less cord).
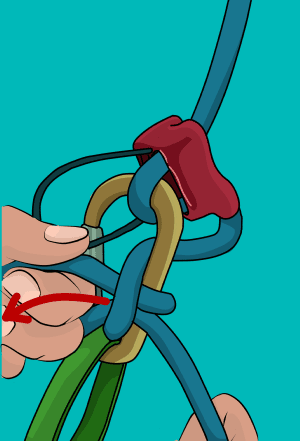
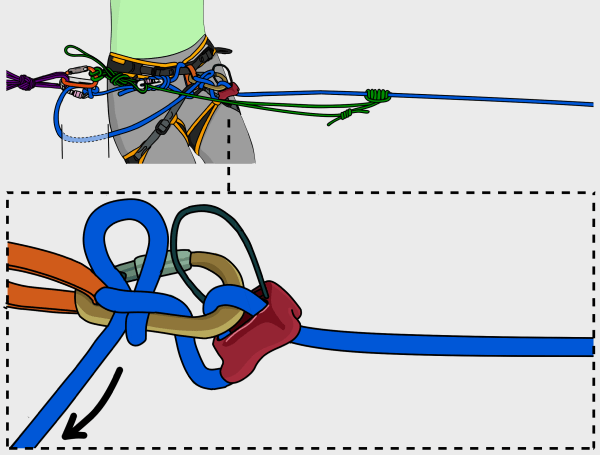
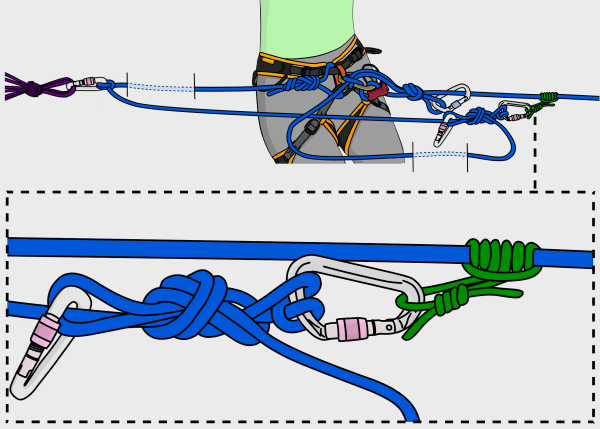
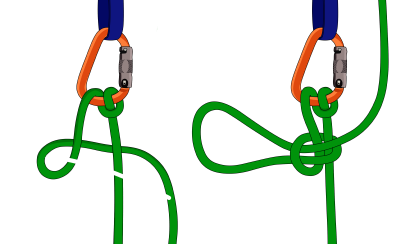
Climbing cordelette

Step 3
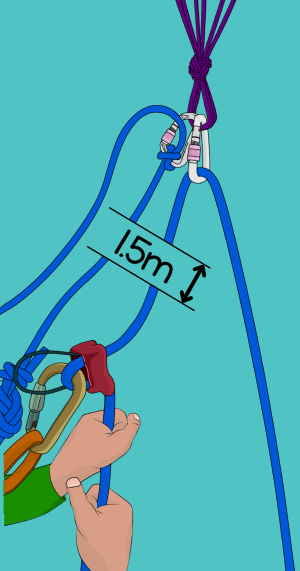
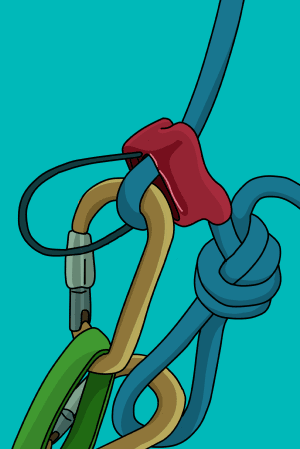
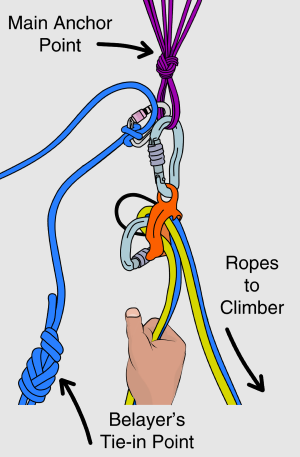
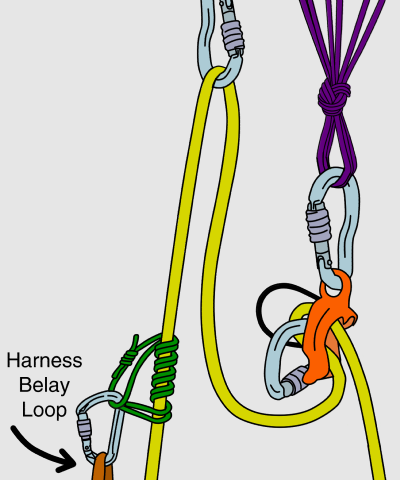
Tie another load-limiting knot on the other side and clip both ends of the cordelette to the anchor points with screwgate carabiners. Make sure the knots are fairly even when the anchor is weighted in the direction of loading. The four-strand ‘master point’ should normally be around 12 inches long.

These load-limiting knots minimize the distance the cordelette drops if one anchor point fails. The closer you tie these knots to the master point, the less shock-loading is applied to the remaining anchor point.

If the strength of your anchor points are difficult to assess (e.g: older bolts), you should move the overhand knots closer together. However, this also reduces the lateral range over which the quad self-equalizes.
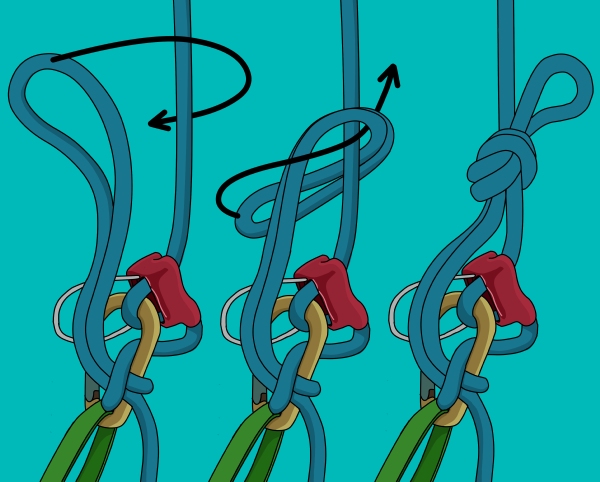
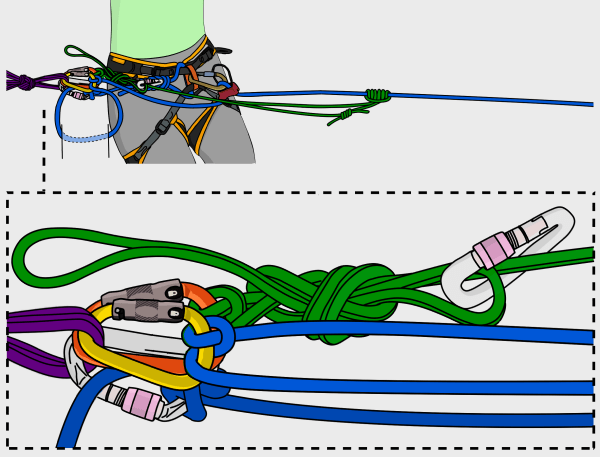
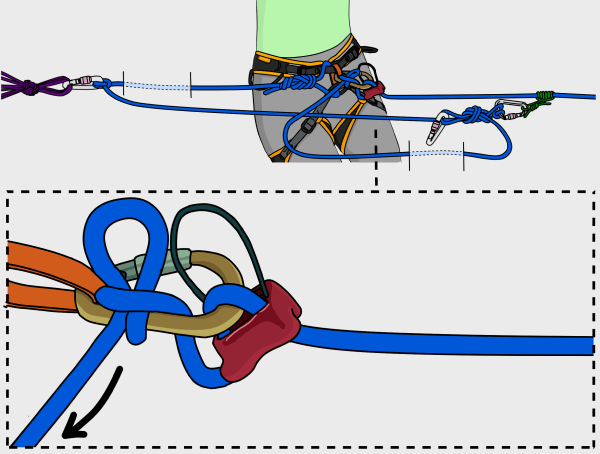
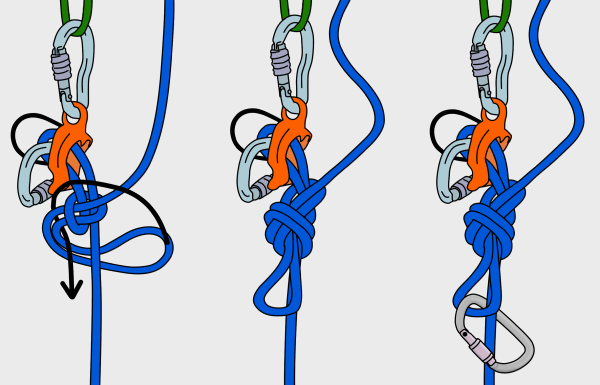
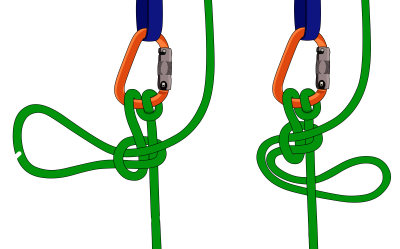
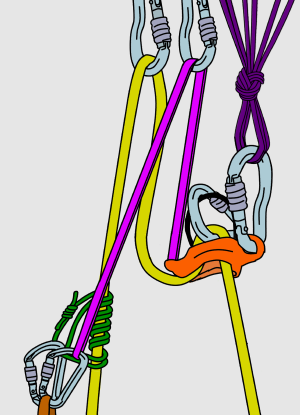
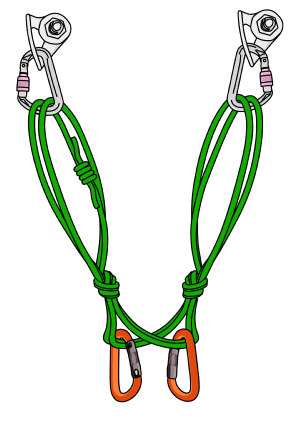
Climbing quad anchor

Step 4
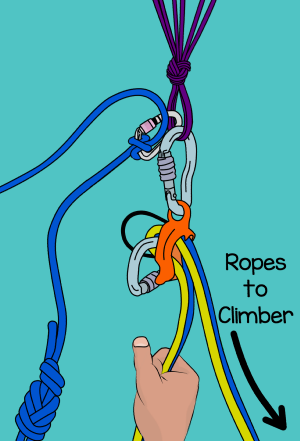
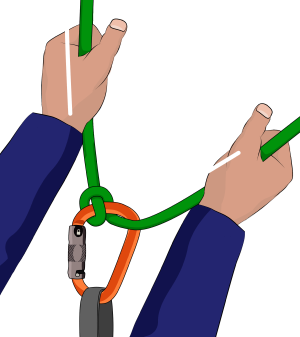
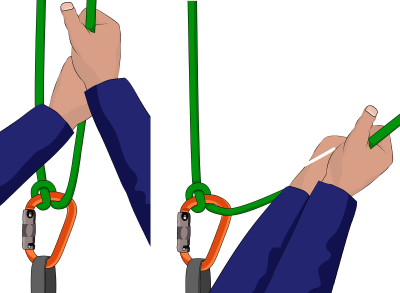
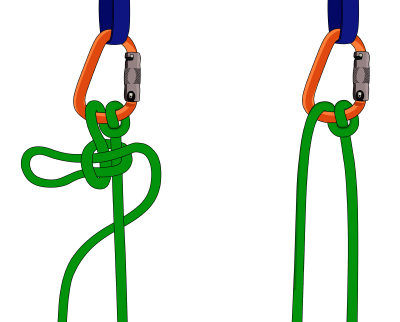
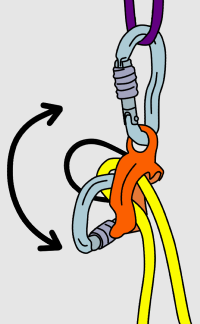
Separate the four strands of the master point into two doubled strands.
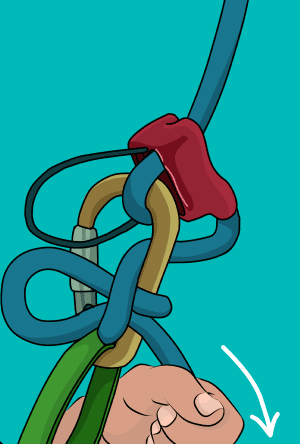
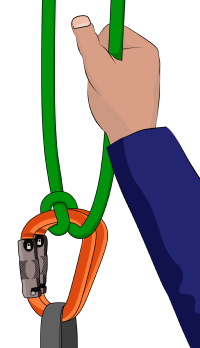
Climbing quad equalizing anchor

Step 5
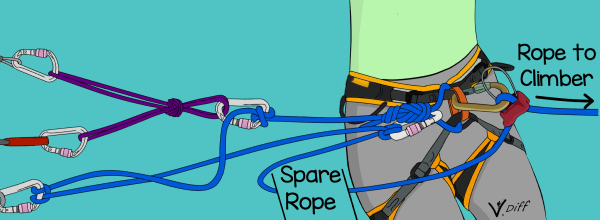
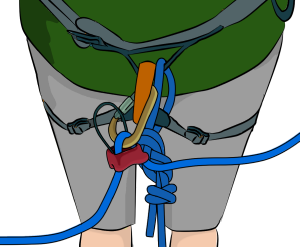
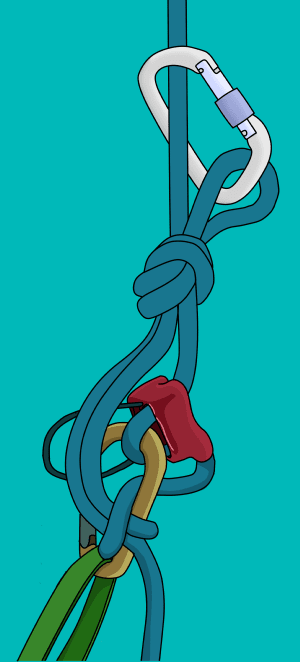
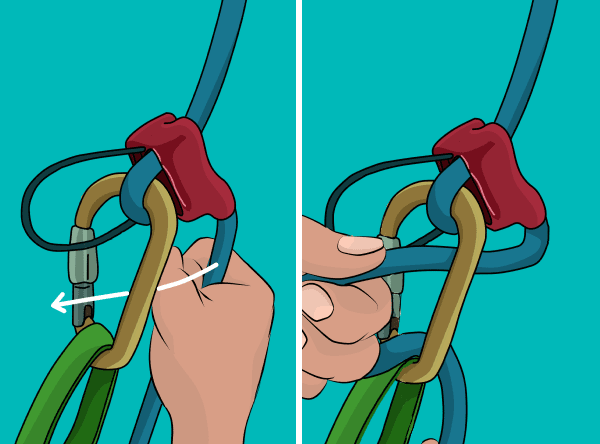
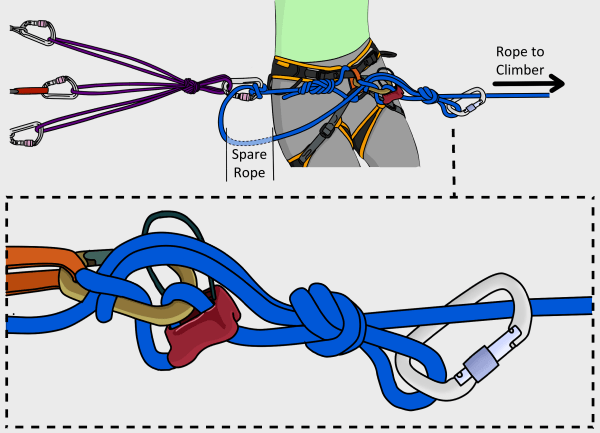
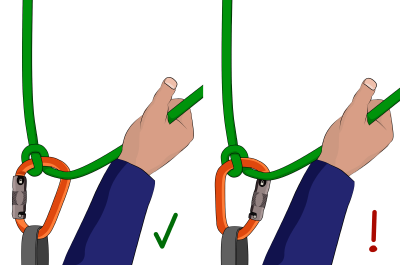
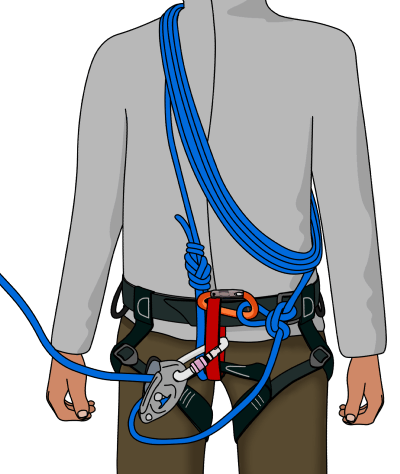
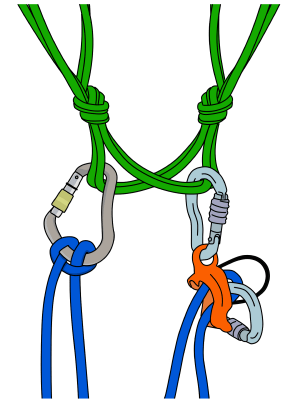
Attach yourself to two of the master point strands (using a clovehitch on a screwgate carabiner).

If belaying in guide mode, attach your belay device to the other two master point strands.
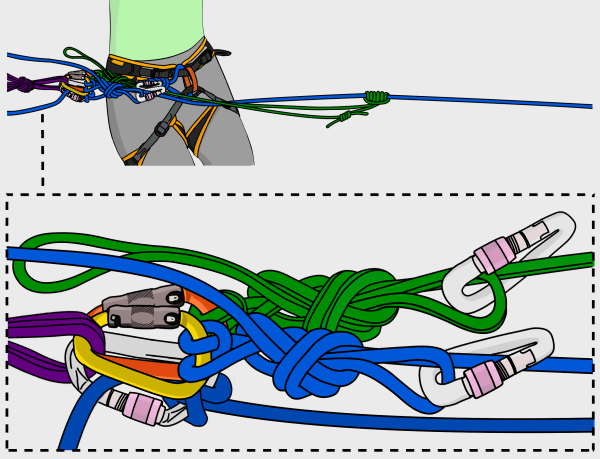
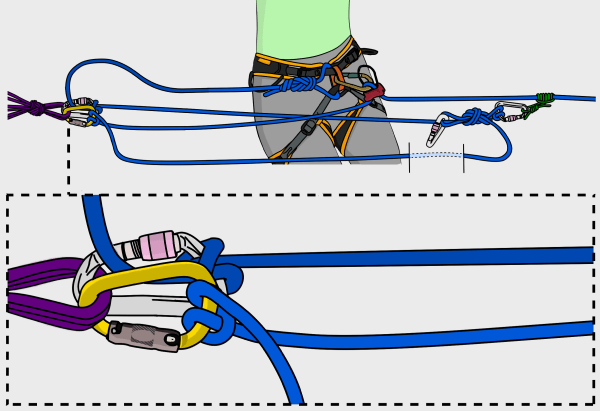
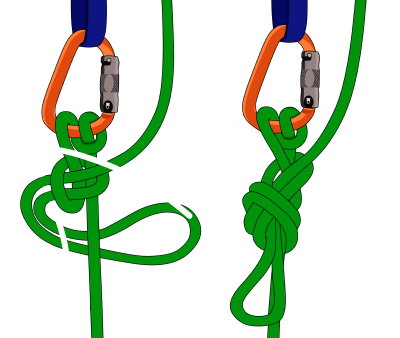
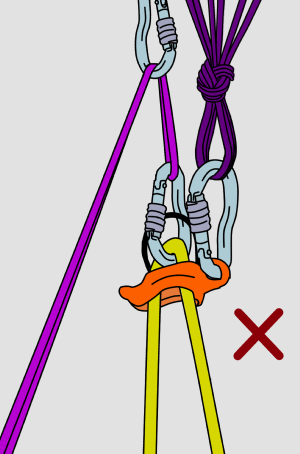
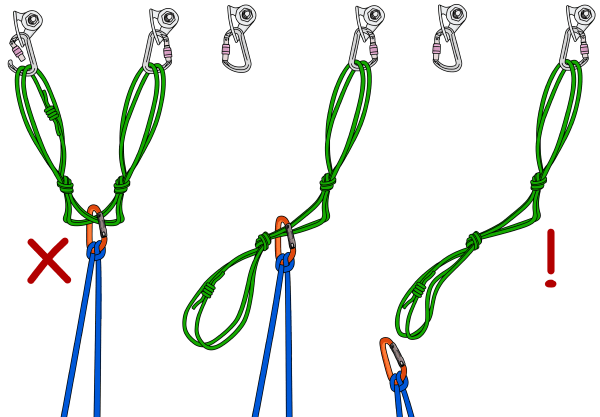
Belaying in guide mode with a quad anchor

Warning!
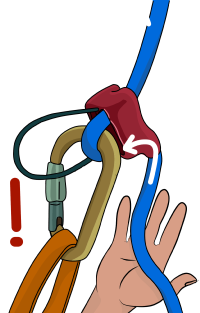
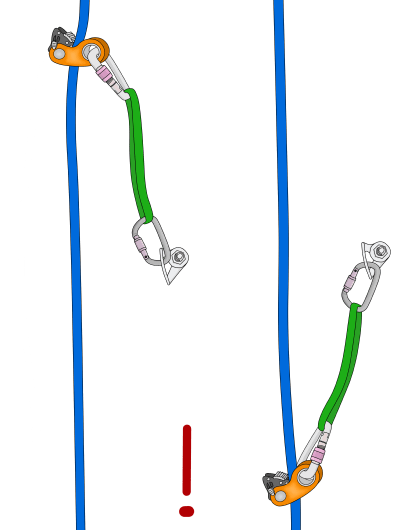
It is important to only clip into two of the master point strands. If you clip into all four, you could become completely detached from the anchor if one point fails.

Dangers of the quad anchor climbing

VDiff self rescue course

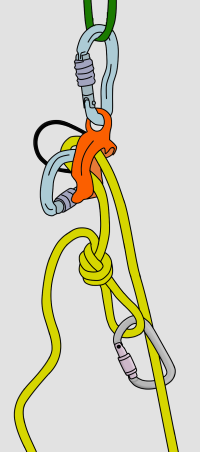
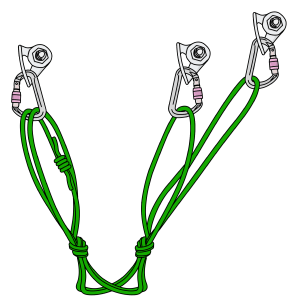
Equalizing 3 or 4 Anchor Points

To equalize three anchor points, simply split one of the double-loops, attaching one loop into each piece. You will need to re-tie the load-limiting knots to equalize these pieces since they will probably be at varying heights.

Do the same with the other side to equalize four points.

Quad anchor rock climbing

Sometimes it can be difficult to equalize three or four points correctly, as this uses up a lot of cordelette. In this case, consider equalizing the furthest away pieces with a sling to create two anchor points. Then attach your quad to those.

Quad anchor with slings and cordelette rock climbing

Using The Quad as a Top Rope Anchor

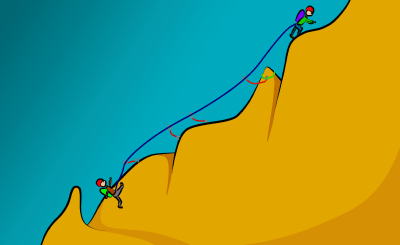
You can use the quad anchor to set up a top rope. This is useful if you want to top rope two different routes which are immediately next to each other, but share the same anchor. The quad will self-equalize for both of them without needing any adjustment.

As always, make sure your anchor meets the requirements of the six point rule before you set up a top rope.
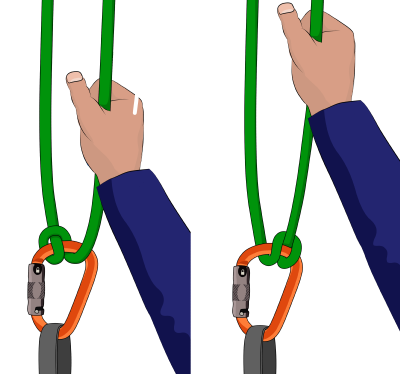
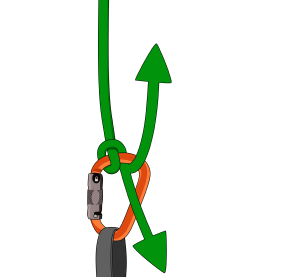
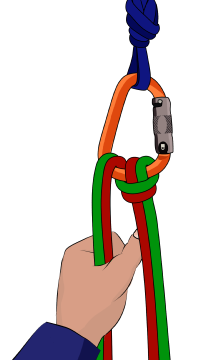
Step 1
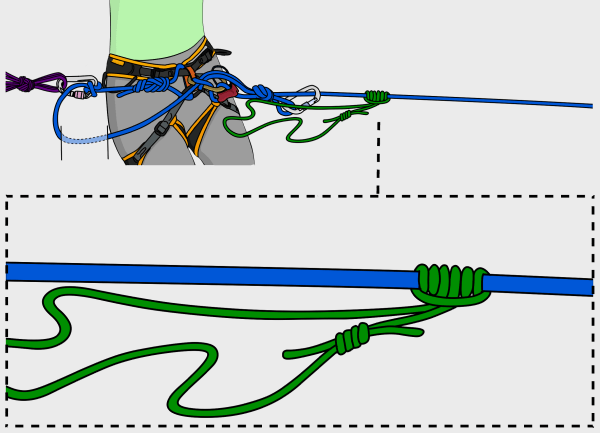
Clip a screwgate carabiner into two of the master point strands.

How to make the quad anchor rock climbing

Step 2
Clip another screwgate into the other two master point strands.

How to equalize rock climbing anchors

Step 3
Clip the rope through the screwgates and fasten them.

It is important not to clip a carabiner through all four strands (see above).

Self-equalizing anchor rock climbing top rope

Trad Anchors – Part 4 of 4 > Belaying the Second

This 'Belaying the Second' article is part of the book - Trad Climbing Basics.

VDiff learn to trad climb e-book book

Belaying from an Anchor

Once you’ve climbed a pitch and built an anchor, you will need to belay your partner up. Pull up all the slack rope in the system until it's tight on your partner, then choose a method to belay them.

Three of the most common belaying methods are described below. It's important to understand the advantages and limitations of each, and be able to adapt these methods to suit any situation.

Method 1: Re-directed Belay

Clip a screwgate to the central point. Run your partner’s rope through this and down to your belay device. You'll be able to belay as you normally would on a top-rope. Your belay device will need to be at least 1.5 meters away from the central point. This reduces the chance of you being pulled into it if your partner falls. Also, make sure that the rope isn't rubbing against your attachment knot at the central point. Consider attaching to the top shelf to avoid this if possible.

Advantages
- Most of the weight of a falling climber is transferred to the anchor, not your harness.

Disadvantages
- It's possible to get pulled into the central point if your partner falls, particularly if they are heavier than you. In this case, there is a real danger of losing control of the brake rope.
- More difficult to set up when using half ropes (you'll need a separate point for each rope)

redirected belay anchor

Best Situation to Use This Method
When you have a nice ledge to stand on and the central point is just above your head.

Method 2: Belaying Directly from your Harness

Attach your belay device to either your belay loop or rope loop. This can be set up so the brake rope comes out of either the top or bottom of the belay device – choose whichever way is easier to lock off the brake rope.

In most situations, the weight of a falling climber will pull down from you, not up. Because of this, you will need to lock off upwards not downwards.

Advantages
- You can use this method for almost every belay situation.

Disadvantages
- If your partner falls, it's possible that their weight will pull uncomfortably on your harness or over your legs.

Best Situation to Use This Method
If you have used your rope to equalize the anchor.

belaying from harness at anchor

VDiff trad climbing book

Method 3: Belaying in Guide Mode

Some belay devices have a guide mode function - they can be set up in a way which locks automatically if a climber falls. They can be used as a normal belay device too.

You can set up guide mode as shown, with one rope or two.

Simply pull the brake strands through as the climber moves up. If they fall, the device will lock by itself almost instantly. Even though guide mode belay devices are auto-locking, you should always keep hold of the brake rope.

Before you use guide mode, you should understand how to lower a climber (see our guide mode article).

guide mode belay anchor

Advantages
- The weight of a falling climber isn't on your harness, which is much more comfortable!
- You can bring up two climbers at the same time (on two different ropes) - great if climbing as a team of three.
- Because you are not directly attached to your belay device, it is easier to detach yourself from the system in an emergency.

Disadvantages
- Time-consuming to lower a climber, even a short distance.

Best Situation to Use This Method
When climbing as a team of three.

Rope Loop or Belay Loop?

You can belay either from your belay loop or from your rope loop. In some situations, using the rope loop can be more comfortable - it allows you to transfer the weight of a fallen climber onto the anchor, rather than having their weight pulling on your harness.

Remember that if you used two ropes in the anchor, you'll need to belay from both rope loops. If you are unsure, just use your belay loop.

belaying from rope loop or belay loop

Where To Put the Spare Rope

There are basically two options. Either stack it into a neat pile somewhere or stack it through a sling.

For the sling method, start by pushing a long loop of rope through the sling. Continue doing this, making smaller loops each time (bigger loops are more likely to get tangled into each other when you are belaying the leader on the next pitch).

However you choose to stack the rope, make sure it is within reach and that you can do it one-handed; you'll need to belay at the same time!

stacking a climbing rope

How To Be a Better Belayer

'How To Be a Better Belayer' is part of the book - Sport Climbing Basics.

VDiff learn to sport climb e-book book

Just as people pick up ‘bad habits’ after they pass their driving test, climbers often get lazy with belaying once they have learnt the basics. Here are some tips to keep your climbing partners alive.

Watch and Listen

Keep an eye on the climber so you can brace yourself if they fall, or give slack at the exact same time as they are clipping a high piece. If you can’t see the climber, listen for commands from them and watch for movements in the rope.

Pay special attention when the leader is clipping the rope into a quickdraw. The extra bit of slack you have out makes the leader vulnerable to a longer fall if they slip just before making the clip.

You cannot give complete attention to the climber if you are talking to someone else. Likewise, avoid starting a conversation with someone who is belaying, and walk well around them so you don’t compromise their belay.

How to be a better belayer rock climbing

Don't Let Go of the Rope

Sounds obvious, but it's amazing how many experienced climbers let go of the brake rope for a brief moment while belaying. Letting go of the brake rope is like letting go of the steering wheel while driving on a fast country road. Avoid the temptation to loosen or release your grip, even just for a second.

Use your other hand to wave to friends, get something out of your pocket or scratch your butt. Or better yet, just wait until you’ve finished belaying.

This is a common problem with assisted-braking belay devices, where people get comfortable using them and forget that they do not always auto-lock.

The bottom line: If the climber falls while the belayer’s hand is loose or off the rope, they probably won’t catch the fall.

Bad belaying

VDiff sport climbing book

Be Ready

You should stand in a "ready" position, so that if your climber falls or needs some help, you can react quickly to the situation.

Inform

Let the climber know about any dangers or mistakes they are making. Look out for back-clips, if their leg is around the rope or if they should extend a quickdraw.

Keep an Appropriate Amount of Slack

When lead belaying, the rope should always travel outwards and upwards from your belay device to the first piece of gear. Lazy belayers often give too much slack so they can wait longer before having to deal with the rope again.

This can be incredibly dangerous for the leader. Take and give slack as your climber moves to maintain the correct arc in your rope.

When top rope belaying, keep the rope fairly tight on the first few moves so the climber doesn’t hit the ground if they fall.

How to belay better

Close the System

If you are not certain how long a pitch is, or how long your rope is, you should tie into the bottom end of the rope. This ‘closes’ the system.

When the climber is tied to one end, and the belayer is tied to the other, it is impossible to lower the climber off their end.

Alternately, tie a knot in the free end of the rope.

Close the system climbing

Communicate

At a busy crag, the climber and belayer should call each other by name. This confirms that any shouted commands are actually meant for them.

You won’t always be able to see or hear your partner very well. Shout the climbing commands loudly to be clear.

You and your partner should have a pre-arranged signalling system for situations where you can’t hear each other.

One common method is for the leader to give three sharp tugs on the rope to signal they are off belay. The belayer then gives three sharp tugs back to let them know they are about to be taken off belay.

The problem with this method is that it is possible to mistake a leader’s jerky movements or tugs for slack as the off-belay signal. If there’s rope drag it can be even more difficult to decipher these movements in the rope.

Keep the climber on belay until you’re certain they are safe. When you feel the same signal repeated many times, you’ll know what the leader is trying to say.

The bottom line: Never take someone off belay until you’re sure they are off.

Stay in Position

You should stand in a position fairly close to the wall where you can take a few steps forward or backward to give slack or take in while still locked off. Don't sit down, lie down, or face in the wrong direction.

If the climber is to the left of the first piece of gear, you should stand to the right to avoid being hit by rocks, dropped gear or their feet.

How to belay rock climbing

Soft Catches

On steep routes, a ‘soft catch’ is a common technique which makes the fall much more comfortable for the leader and stops them from slamming into the rock when the rope gets tight. The leader will fall further during a soft catch, so make sure to only use this technique on steep, overhanging routes where you are certain the leader cannot hit anything.

To soften a fall, belay with your knees bent. Straighten them during a catch, allowing the weight of the falling climber to pull you upwards slightly. You could even take a small hop just as the rope begins to pull tight.

However, there are many situations where a dynamic belay is unsafe; A lightweight belayer might be pulled upward into a roof or a piece of gear which could disengage a belay device, or the extra rope could cause the leader to hit a ledge or the ground. Watch your partner carefully and learn to recognize how much of a dynamic belay (if any) is appropriate.

Soft catch belaying rock climbing

Weight Differences

If the climber weighs more than the belayer, a fall usually lifts the belayer into the air, naturally softening the fall for the climber. However, if the climber weighs significantly more, a fall could cause the belayer to slam into the rock or be ‘sucked in’ to the first piece of gear. There is a real danger of losing control of the belay if this happens.

To combat this, the lightweight belayer can anchor to the ground. This technique, however, reduces the belayer’s ability to move around the base of the route and give a soft catch.

A good compromise is to attach to a ground anchor with enough slack to move around and give a soft catch if needed, but not so much slack that you would be sucked into the first piece of gear.

Belaying rock climbing

Belaying Runout Routes

On ‘runout’ routes where a fall onto a ledge or the ground is possible, the belayer can run backwards away from the route if the leader falls. Remember to keep both hands on the rope in the locked-off position as you do so. This takes rope out of the system far quicker than pulling slack through a belay device, which means the leader will fall less distance.

This technique is best used on sport routes, rather than trad, since it puts a lot more force on the top piece of gear and could 'pluck' out the bottom piece. It results in an uncomfortable, abrupt fall, but it is far better than hitting the ground.

Routes like these, however, are best avoided.

Belaying a runout rock climb

Before the First Piece of Gear

Before the leader reaches their first piece of gear, you'll need to 'spot' them, just the same as if they were bouldering.

Make sure to have enough slack in the rope so they can climb up to their first piece.

Spotting rock climbing

Belayer Check

Make it a habit to check yourself and your partner before each climb.

rock climbing safety checks

The Mule Overhand Knot > How To Tie-Off a Belay Device

'How To Tie-Off a Belay Device' is part of the book - Trad Climbing Basics.

VDiff learn to trad climb e-book book

When belaying with a standard belay device, you obviously can't let go of the rope. But sometimes it's really useful to have both hands free.

Times when you may need to be hands-free include:
- Switching gear on a multi-pitch
- Sorting out a rope tangle
- Passing a knot when abseiling
- Escaping the belay in an emergency situation

Rock climbers swapping gear at belay anchor

In situations where the rope isn't weighted, a simple overhand knot backed up to your belay loop will work. However, if the rope becomes weighted when using this method (e.g; if the leader falls), it will be almost impossible to release the tie-off.

Overhand knot tied to tie-off a belay device

If there is any chance of this happening, you should instead use the mule-overhand method (described below).

This allows you to tie-off your belay device while the leader is weighting the rope, and also release the tie-off when it's weighted.

Mule Overhand knot

VDiff trad climbing book

Step 1
Pass a loop of the slack rope through your screwgate carabiner with one hand while keeping hold of the rope with your brake hand.

This can be difficult when heavily weighted – you’ll need to pinch the rope tight.

Climbers tie-off belay device

Step 2
Pass a loop from the opposite side through the first loop so that a mule knot is formed around the spine of the carabiner.

Do not tie this knot around the gate of the carabiner.

Climber ties a knot to lock off ATC belay device

Step 3
Make sure the second loop is around 60cm long.

Pull it tight.

Climber ties a mule-overhand to lock off ATC belay device

Step 4
Tie an overhand knot around the tensioned rope as shown.

tie mule overhand knot

Step 5
A carabiner completes the hands-free mule-overhand knot.

Release locked ATC belay device

Step 6 – Releasing Under Load
To release the tie-off with the rope loaded, first untie the overhand knot. Then holding the slack rope securely with both hands, simply pull down to release the mule knot.

You should be ready to expect a few centimetres of rope to slip through. Keep a firm grip so you do not lose control of the belay device.

You can now belay or lower the climber as normal.

Release locked ATC belay device

Top Tips
* If belaying with two ropes (such as half ropes), simply treat them as one rope and follow the same steps.

* Make sure to communicate with your partner so they know not to continue climbing while tied-off.

* We strongly recommend that you practise this technique in a safe environment before doing it in a real situation

Overhand knot tied to lock ATC belay device with two ropes

Self Rescue > Escaping the Belay

The belay escape is a technique whereby the belayer frees themselves from the responsibilities of belaying. This fundamental skill is necessary for many rescue situations.

Situations when you may need to escape the belay include:
- If your partner needs hauling through a crux while following
- If you need to descend to your partner to give immediate first aid
- If your partner falls and is injured while leading
- If you need to detach yourself from the rope to get outside help

The Belay Escape – How it Works

Any safe version of the belay escape involves the same four checkpoints:
- Get hands-free
- Transfer climber’s weight to anchor
- Transfer climber’s belay to anchor
- Remove all excess prusiks, carabiners and knots

The belayer can detach from the rope completely if needed. The end result is a system which can be released under load and can be used again as a belay. Returning to belay mode is often needed once a rescue has begun.

The full belay escape system is described in this article. Depending on the situation, you may not need to complete all of the steps (e.g: the process is much simpler if your partner is able to un-weight the rope). However, it’s important to know the complete system before taking shortcuts.

Three different methods are described. These cover belaying:
1) From your harness (anchor is within reach)
2) From your harness (anchor is out of reach)
3) Directly from the anchor (e.g: using guide mode)

The Belay Escape – First Considerations

Before starting a belay escape, make sure it is the best course of action for the situation. Maybe a much simpler option exists, such as lowering your partner to a ledge, or getting them to prusik up.

Depending on the direction of loading and your course of action after escaping the belay, you may need to make your anchor stronger. Some rescue techniques (such as hauling) exert high forces on the anchor. Beefing up the anchor is straightforward if you are belaying a second and there are protection points available within reach. With some creative sling craft and fine tuning, you may be able to equalize a few extra pieces to the belay.

If you are belaying a leader on a multi-directional anchor where there is only a single piece holding an upwards pull (example shown), you will need to add gear or build a new anchor before escaping the belay.

upwards pulling trad belay anchor

This is very difficult (or impossible) if the leader has the whole rack with them. However, you may be able to adjust the existing anchor pieces and cordelette to hold an upwards pull. Make sure the anchor still protects you from a fall while you are adjusting pieces.

As a last resort, you might be able to rope solo or prusik a short distance to retrieve gear for backing up the anchor.

The Belay Escape – When Belaying from your Harness (Anchor within Reach)

belay escape trad climbing escaping the belay

Step 2
Tie a prusik hitch on the weighted rope with a long cordelette. Make sure the double fisherman’s bend which joins the cord is close to the prusik hitch.

If you don’t have a long cordelette, you could use a short prusik cord attached to a double-length sling.

belay escape trad climbing

Step 3
Clip a screwgate to the master point of the anchor.

Step 4
Tie a munter hitch with the cordelette to the screwgate. Flip the munter so it’s in the lowering position and pull all the slack through.

trad climbing escaping the belay

Step 5
Tie a mule-overhand backup in the cordelette.

Step 6
Slide the prusik along the rope towards the climber to take up any remaining slack in the cordelette.

trad climbing belay escape

Step 7
Carefully release your tied-off belay device and let a small amount of slack through so the climber’s weight is transferred onto the cordelette.

Keep hold of the brake rope for the next 3 steps.

escaping the belay trad climbing

Step 8
Attach a screwgate (yellow carabiner in this diagram) to the master point and tie a munter hitch on it with the brake rope.

Pull most of the excess rope through so there is just enough slack to remove your belay device.

belay escape

Step 9
Keeping hold of the munter’s brake strand, remove your belay device.

Step 10
Pull the extra slack through the munter hitch and flip it so it’s in the lowering position. Finish the munter with a mule hitch and an overhand backup.

escaping the belay

Step 11
Release the mule-overhand from the cordelette and use the munter to transfer the climber’s weight from the cordelette to the rope.

Step 12
Once the weight is fully on the rope, remove the cordelette completely. You have now escaped the belay and can move on to the next step of your rescue.

belay escape trad climbing escaping the belay

Note
The same steps can be followed to escape the system if you are belaying from your harness and using a re-directional through the anchor.

redirected trad belay

VDiff self rescue course

The Belay Escape – When Belaying from your Harness (Anchor out of Reach)

belay escape trad climbing escaping the belay

Step 2
Fasten a prusik on the weighted rope as shown and attach a screwgate to it.

belay escape trad climbing

Step 3
Reach back to your tie-in at the anchor and grab the free end of your tie-in. If you can’t reach, run through the rope stack until you get to it.

Step 4
Tie a munter-mule-overhand on the screwgate with this part of the rope.

trad climbing escaping the belay

Step 5
Slide the prusik down the rope towards the climber to take out excess slack.

Step 6
Transfer the weight onto the prusik by releasing your tied-off belay device. Be prepared for a bit of rope stretch before the prusik takes the weight.

Keep hold of the brake rope for the next 3 steps.

belay escape trad climbing

Step 7
Move back to the anchor and tie a munter hitch to it with the brake strand of rope.

escaping the belay climbing

Step 8
Remove your belay device.

Step 9
Bring in the excess slack and finish the munter with a mule-overhand.

escaping the belay

Step 10
Release the mule-overhand from the rope which is attached to the prusik. Use the munter to transfer the climber’s weight from the prusik to the munter-mule-overhand on the anchor.

Step 11
Once the weight has been transferred, you can remove the prusik and the munter hitch.

belay escape climbing

The Belay Escape – When Belaying Directly from the Anchor

When belaying directly from the anchor with a self-blocking belay device (such as an ATC in guide mode) or an assisted braking belay device (such as a GriGri), you have already escaped the belay.

These belay methods are not completely hands-free – a light hand must be kept on the brake strand while belaying. Therefore, the only step remaining is to back up the device. Simply tie-off the device with a mule-overhand as shown below.

guide mode belaying
how to belay in guide mode

The Munter Hitch – How To Belay Without a Belay Device

This 'Munter Hitch' article is part of the book - The Trad Climber's Guide To Problem Solving.

VDiff trad climbing self rescue book

Uses:
- Belaying without a belay device
- Abseiling without a belay device
- Creating a releasable knot when escaping the belay

The munter hitch tends to 'kink' the rope when used for abseiling or belaying. It can also cause slight abrasion to the rope's sheath, especially if the leader falls.

It is a useful skill to know, but is not intended for long-term use.

drop belay device climbing

How To Tie a Munter (Italian) Hitch

Step 1
Clip the rope through a large, pear-shaped (HMS) screwgate. Smaller screwgates work too, but will make belaying more difficult.

Munter italian hitch rock climbing

Step 2
Twist a loop in the climber's end of the rope as shown.

How to tie an italian hitch rock climbing

Step 3
Clip the loop into the screwgate.

How to tie a Munter hitch rock climbing

Step 4
Clip the carabiner to your belay loop and fasten the screwgate.

Munter hitch belaying

Warning!
Make sure the brake strand is on the 'spine' of the screwgate. If the brake strand is on the 'gate' side, it could rub against the gate and potentially open it.

Italian hitch belaying

Step 5
Test the knot by pulling tight on either end of the rope. The knot should flip through the carabiner easily both ways.

Munter italian hitch rock climb belay

VDiff climbing self rescue book

Belaying With a Munter Hitch

Belaying with a munter hitch is similar to using an ATC: you must keep hold of the brake rope at all times. The main difference is that you 'lock-off' in the opposite direction (see below). This goes against a climber's natural reaction, so make sure to practise this technique well before using it.

When bringing up the second on a munter hitch, it's easier to belay directly from the anchor (if your anchor setup allows), rather than from your harness.

Italian hitch belaying top rope

To Lock Off
The Munter hitch creates a lot of friction. Depending on the situation (rope thickness, weight of climber, rope drag, etc..), it can be locked off in any direction. However, for maximum friction, you must hold the brake rope forward (so that both strands of rope are parallel to each other).

Munter hitch belaying

To Give Slack
Hold the brake rope loosely and pull through slack rope, similar to giving slack with an ATC.

Italian hitch belay

To Take In
Pull the brake rope so that the knot 'flips'. More rope can now be taken in by continuing to pull rope through forwards.

Munter italian hitch rock climb belay

To Lower
Lock the rope off in the maximum friction position described above. Slowly move the rope back and lower as you would with an ATC. It can be tricky to find the 'sweet spot', so make sure to move position slowly.

Munter italian hitch belaying

How To Tie-Off a Munter Hitch - The Munter-Mule-Overhand

Uses:
- Tying off a munter hitch when belaying or escaping the system.

Step 1
Form a loop in the brake-strand of rope as shown.

Munter-mule hitch rock climbing

Step 2
Feed a bight of the brake rope around the climber's rope and through the loop as shown.

Pull the knot tight, either by easing the climber's weight onto the rope if they are weighting it, or by pulling up on the climber's strand of rope if they're not weighting it. The munter hitch is now tied-off, but not backed-up (see next step).

Munter-mule hitch belaying

Step 3
To complete the knot, you must back it up. One way of doing this is to tie an overhand around the climber's strand of rope. To start, wrap the loop around the back of the rope.

Munter-mule hitch

Step 4
Then feed it back through as shown.

Munter-mule hitch climbing

Step 5
A carabiner completes the hands-free munter-mule-overhand.

Munter mule overhand knot

To Release
Unfasten the overhand knot Then pull forwards on the brake strand of rope until the knot pops free.

If the rope is weighted, you can expect a few centimetres of rope to slip through the munter hitch. Prepare for this by holding the brake strand tight with both hands.

Munter-mule hitch release

Munter Hitch Belaying - Top Tips

When using a small diameter rope, it's worth using two carabiners to increase belay friction.

Munter hitch belaying skinny rope

To belay the second with half ropes, you can treat them as one and tie them together in the same munter hitch. If you need to pull one rope through faster than the other, you should use two separate knots (see next tip) instead.

Munter hitch belay two ropes

To lead belay with half ropes, you'll need to use two separate screwgates with a munter hitch on each. This can be difficult at first, especially giving slack on one rope while simultaneously taking in the other. Practice well before you use this technique.

Munter hitch two rope belaying

Abseiling > How To Extend a Belay Device

This article is part of the book - Trad Climbing Basics.

VDiff learn to trad climb e-book book

Extending your belay device before abseiling can be useful in certain situations.

Advantages
- You can use a prusik with less chance of it getting sucked into your belay device.
- Your prusik will be centred, making it easier to use than if you attach it to a leg loop.
- You can transition from abseiling to ascending easily – useful if you abseil too far on a multi-pitch descent.

Disadvantages
- Takes longer to set up.

Best Situation to Use This Method
If you don't know where the next abseil anchor is on a tricky multi-pitch descent.

Extending your Belay Device with a 60cm Sling

Simply girth hitch a 60cm sling through the hard points of your harness (the same points that your belay loop goes through) and clip your belay device to this sling instead of your belay loop.

It's much better to use more durable, thicker nylon slings than thin Spectra/Dyneema for extending your belay device.

You could also girth hitch the sling through your belay loop.

Extending your belay device using a prusik to abseil rappel

Extending your Belay Device with a 120cm Sling

Alternatively, you can use a 120cm sling in a similar way.

Feed the sling through the hard points of your harness, tie an overhand knot in it and then clip both ends of the sling to your belay device.

Extending your belay device with a sling for rappel

VDiff trad climbing book

How To Transition From Abseiling To Ascending

It is possible to ascend the rope with the following setup. This is a useful trick if you have abseiled too far down a steep face and need to go up a short distance in order to reach the next abseil anchor.

First, make sure you are using your autoblocking belay device in the Guide Mode orientation. You'll need to do this before leaving the anchor.

Using guide mode to rappel abseil

Step 1
Fasten a prusik knot (klemheist works well) around both ropes above your belay device with a long piece of 5mm or 6mm cord. This will be your foot loop. If you don’t have a long piece of cord, just use a short one and attach a sling to it.

Extending a belay device and using a prusik to abseil rappel

Step 2
Step into the foot-loop and stand up, taking the weight off your belay device. Make sure to keep hold of both brake ropes as you do this.

Step 3
Connect your belay loop to the auto-block hole on your belay device with a screwgate. Sit your weight onto your now auto-blocked belay device.

Extend a belay device to abseil rappel safely

Step 4
Slide the top prusik up the rope and stand in the foot loop again to take the weight off your belay device.

Extend a belay device

Step 5
Pull the slack rope through your belay device and weight it again. Repeat as necessary.

Extending a belay device to rappel

Abseiling > How To Abseil On Two Ropes With a GriGri

Sometimes you may want both hands free while abseiling to do things like clean a route, free a stuck rope or swing under an overhang. Using a GriGri is a safe way to do this. Or maybe you have a damaged rope and still need to abseil. Here's how to abseil on two ropes with a GriGri:

You can also use bigger knots such as the figure-9 or figure-8 double loop. Either way, make sure the knot is big enough so that it can't be pulled through the chain or carabiner at your main anchor point. To be extra safe, use two opposite and opposed screwgate carabiners.

How to abseil rappel with a gri gri on damaged ropes

You can also abseil in the same way using two ropes.

Instead of joining your ropes with a double fisherman’s, you could also use a bigger knot such as the re-threaded figure-8. Just make sure the knot is big enough so that it can't be pulled through the chain or carabiner at your main anchor point.

abseil on two ropes with a grigri

In the unlikely event that the knot slips through the chain at the main anchor point, you won't be able to pull your ropes down. To solve this problem, tie a prusik knot (klemheist works well) around your descent rope with a long piece of cord. Use this as a foot-loop. Stand in the foot loop and pull the rope through your GriGri. Then rest on your GriGri and slide the klemheist up the rope.

It's a good idea to back up your GriGri by tying a clovehitch to your belay loop with a screwgate carabiner as you go up. It'll be hard work, especially on overhanging terrain, but if you need your ropes to do another abseil, it'll probably be your only option. Make sure to ascend the same rope that you descended!

How to abseil on two ropes with a grigri

VDiff climbing self rescue book

How To Abseil on Two Ropes with a GriGri - Top Tips

- Avoid using this technique on low angled terrain: The extra bulk of a carabiner and bigger knot is more likely to get stuck on something when you retrieve your ropes.
- Make sure you attach your GriGri to the correct side of the rope.
- Always make sure you test the system before you detach yourself from the main anchor point.

How To Belay In Guide Mode

'How To Belay In Guide Mode' is part of the book - Trad Climbing Basics.

VDiff learn to trad climb e-book book

Guide Mode is an auto-locking belay technique. It is a safe way for the leader to bring up the second. Do not use this method for lead belaying.

How To Set Up Guide Mode

Some ATC-style belay devices have a 'guide mode' function - they can be set up in a way which locks automatically if a climber falls. They can be used as a normal belay device too. You can set up guide mode as shown, with one rope or two.

Simply pull the brake strands through as the climber moves up. If they fall, the device will lock by itself almost instantly. Even though guide mode belay devices are auto-locking, you should always keep hold of the brake rope.

Advantages
- The weight of a falling climber isn't on your harness, which is much more comfortable!
- You can bring up two climbers at the same time (on two different ropes) - great if climbing as a team of three.
- Because you are not directly attached to your belay device, it is easier to detach yourself from the system in an emergency.

Disadvantages
- Time-consuming to lower a climber, even a short distance.

How to set up guide mode belay using two ropes

Best Situations to Use this Method
- When it is unlikely that you will need to lower the climber (e.g: climbing an easy slab route)
- When climbing as a team of three


VDiff trad climbing book

How To Lower a Climber in Guide Mode

Before you use guide mode, you must understand how to lower a climber.

Note: The belayer's anchor attachment has been omitted from the following diagrams for clarity.

Lowering a Short Distance
If the climber only needs a few inches of slack, you can wiggle the belay carabiner as they weight the rope. Carabiners with a perfectly round cross-section are not so effective at this.

How to lower a climber in guide mode

Step 2

Girth hitch a sling through the small hole on your belay device (newer devices have a big enough hole to clip a carabiner. If yours does, you can clip a sling to it with a carabiner).

Sling through the hole in guide mode belay plate

Step 3
Redirect the sling through a high point of the anchor with a carabiner, then fasten the sling to your belay loop with another carabiner. This will allow you to use your weight to release the belay device.

You could also stand in the sling to release the belay device, though it's often easier to control when clipped to your harness.

You are now able to lower the climber in a controlled manner. Remember to slide the prusik knot as you continue lowering.

Lowering a climber in guide mode

Warning
Never weight the belay carabiner as shown.

This will disengage the device and cause the climber to fall.

Dangers of guide mode belaying

Tying-Off a Climber in Guide Mode

If you need to go completely hands-free while belaying in guide mode, you can tie-off the device.

Simply form a loop in the brake strand and clip it to the rope. Be aware that if the knot jams up into the belay device, it will be difficult to lower a climber without belaying them up a few inches first. Consider this before you tie them off.

Tying off a guide mode belay

Top Tip
If swapping leads on a multipitch, you'll need to change from Guide Mode to normal belaying when the second has reached the anchor. To do this, put the second on belay as normal with another belay device, then remove the Guide Mode setup. It's better if the next leader removes the Guide Mode setup so the belayer can keep both hands for belaying.

Guide mode belaying

Guide Mode with a GriGri

You can belay directly from the anchor with an assisted-braking belay device in a similar way to the guide mode technique.

This method can be very dangerous if used incorrectly. Learn more here.

belaying with a grigri direct from anchor

Safe Simul Climbing

Simul climbing is a technique where all climbers move at the same time while tied into the same rope. Protection is placed by the first climber and removed by the last.

This technique allows climbers to extend the length of their pitches, without extending the length of their rope. With experience, a simul-pitch can stretch for 300m or more, whereas a belayed pitch is limited by the length of your rope.

Advantages
- Much faster than belayed climbing.

Disadvantages
- Much more dangerous than belayed climbing. If the follower falls, they could pull the leader off too.

Simul climbing on alpine route
Simul climbing on snow

Simul Climbing is Most Useful:
- On long, easy routes when it is safer to move fast (e.g: climbing pitch-by-pitch would result in getting hit by a storm or stranded overnight).
- On a long, exposed approach or descent when a fall is very unlikely, but the consequences would be severe.
- If a pitch is slightly longer than your rope length. A short section of simul climbing can allow the leader to reach a more solid belay.

Simul Climbing is Dangerous:
- If any member of the team might find the route difficult (especially the follower)
- On loose rock
- On runout routes (climbs which offer little protection)
- For inexperienced climbers

Prerequisite Skills
Simul climbing introduces a level of risk that is completely inappropriate for beginner climbers. This section is written for experienced trad climbers who are proficient at:
- Placing trad gear and building anchors
- Route-finding on complex terrain
- Leading long multi-pitch routes
- Self rescue
- Analysing and managing risk

The Basic Simul Climbing System

Step 1
The leader begins climbing. They place gear and are belayed with a GriGri.

Simul climbing on alpine route

Step 2
When the leader has climbed the full length of the available rope, the belayer simply begins climbing (leaving their GriGri attached to their belay loop).

Simul climbing with PCD micro traxion

Step 3
Both climbers continue up, moving at the exact same speed and keeping protection on the rope between them.

Simul climbing route

Step 4
When the leader reaches a suitable anchor, they stop climbing and belay the follower up.

Simul-climbing on alpine route

VDiff self rescue course

Simul Climbing Equipment

What To Take
With both climbers constantly moving, it is easier to stay warm, and so belay jackets could be left behind. With a faster style of ascent, you could take less food and water.

The less you bring, the easier the climbing will feel, and the less chance you will have of getting exhausted or benighted on a long route. However, the decision to leave critical items behind should only be made with lots of experience.

Depending on how long you plan to stretch your simul-pitches, you may want to bring a bigger rack. Having more gear enables you to climb the route in less pitches and therefore spend less time changing over belays.

Gear Distribution
It’s better to distribute the gear fairly evenly between the leader and the follower so that neither climber has an excessively heavy load. Often, the leader will take a little more weight so the follower will be able to stay as light and nimble as possible. Remember that the leader will start the simul-pitch with the whole rack, but the follower will have it all by the end.

Simul Climbing Devices
In addition to the equipment you would normally take on a multi-pitch, these two devices give you more options for simul climbing:
- Progress capture devices (such as the RollNLock or Tibloc)
- An assisted braking belay device (such as a GriGri)

simul climbing roll n lock petzl micro traxion

The Simul Climbing Setup

For most situations, the optimum distance between climbers while simul climbing is around 30m. This is close enough that you can communicate well with each other and manage rope drag, while being long enough to ensure adequate protection between climbers.

Simply using a 30m rope has drawbacks, especially if your route has an involved descent. Shortening a full length rope with coils will give you more options on the route. There are several ways of doing this. A simple setup is described below.

Follower:
- Tied in to the end of the rope with a figure-8.
- 20-30m of rope is neatly coiled over the shoulder, then pulled tight to belay loop with an alpine butterfly.
- GriGri pre-attached to belay loop with a small amount of slack in the rope.

Simul climbing rope coils

Leader:
- Tied in to the end of the rope with a figure-8.
- GriGri pre-attached to belay loop (this allows a quick transition to belaying when needed).

Simul climbing on alpine route with PCD

Optional Rope Coils
The leader could also attach to the rope with coils in the same way as the follower. Each climber takes half the number of coils so the length of rope between them is still the same. This enables the leader to quickly release some extra rope without needing to communicate this to the follower.

Make sure to keep your rope coils tight so they are unlikely to snag on rock features as you climb. Whenever releasing coils, always keep a hand on the brake strand of rope until you either re-tie your coils or reach the end of the rope – GriGri’s are not designed to be hands-free.

Simul Climbing – Understanding Dangers

Falling
The main danger with simul climbing is falling. This isn’t a big deal if the leader falls (assuming they protected the climb well and the follower hasn’t allowed slack into the system). However, if the follower falls, they will probably pull the leader off too. The leader will then be sucked, crotch first, into their last piece of gear.

Simulclimbing on alpine route

The force on that piece of gear is far greater than in a normal climbing situation. This is because:
- There is twice as much weight falling on the piece.
- The second cannot give a dynamic belay because they are falling.

The force generated is much more likely to explode that gear from the rock. For this reason, it is not safe to simul climb on routes that are loose, runout, or that either member of the team may find difficult. Using progress-capture devices reduces the chance of this type of fall.

Awareness
It’s easy to get swept up in the flow of a long simul-lead, and take unnecessary risks.

As a simul-leader, you should:
- Communicate clearly with your partner about your plan.
- Ensure that you protect the climb well when needed.
- Save enough gear to make a solid anchor.
- Be prepared to switch to belayed climbing anytime, even if this involves downclimbing.
- Be aware of your partners position on the route. If there is a tricky section, you should place gear on the rope in front of you just before they climb it, so that you are both protected. Or better, make an anchor and belay them up.

Unroping
On long ridges, there are often stretches of non-exposed hiking between steeper rock sections. A rope which is dragged through hiking terrain is likely to get stuck or dislodge rocks. It may be safer to put the rope away and stay close together, therefore avoiding any self-inflicted rockfall danger, and being able communicate more easily about route-finding.

Make sure you have a solid belay when transitioning back to belaying or simul climbing. Being unroped on exposed and/or difficult terrain is obviously very dangerous.

Climbing at Different Speeds – The Accordion Effect

It is important for both climbers to move at the same pace so there is no unnecessary slack in the system. Having too much slack can result in either an unnecessarily long fall for the leader, or a high loading of the progress-capture device if the follower falls. The follower also risks pulling the leader off the wall if they are not keeping up the pace, or if they have to down-climb.

Keeping the exact same pace all the time is extremely difficult. However, using rope coils makes this much easier.

For example, the leader may stop to place gear, while the follower is in a strenuous or awkward position. Instead of staying there, the follower can move up to a comfortable position while pulling the excess slack through their GriGri. From a resting position, the follower can then belay the slack rope back while the leader climbs up.

Also, if the follower would prefer a real belay for a difficult section, but the leader needs more rope to reach a solid anchor, the follower can release some coils and belay the leader until they find an anchor.

Once the leader has made a suitable anchor, the follower can either tie-off the coils again or continue belaying out the rest of their coils while the leader belays the rope in. This ensures there is never any unnecessary slack in the system. Once all the slack has been taken in, the leader can continue to belay the follower up to the anchor.

Similarly, if the leader encounters more difficult ground, the follower can stop at a good stance and/or make an anchor. The follower can then release their coils and belay the leader. Being able to quickly transition between simuling and belayed climbing allows you to safely navigate crux sections while cruising across the easier terrain.

Using Progress-Capture Devices

The use of a progress-capture device (such as the RollNLock or Tibloc) can protect the leader from receiving too hard of a pull on their rope if the follower falls.

The leader simply attaches a PCD to a piece of gear as shown. In theory, if the follower falls, the device will lock on the rope and hold the fall without affecting the leader.

In reality, there are serious drawbacks, which could make the situation more dangerous if the system is not fully understood.

PCD simul climbing

PCD’s should be attached to bomber multi-directional gear with minimum extension. Clipping one directly to a bolt is the best option, but they can also work well with trad gear if some cunning sling craft is used. Make sure your rope is able to run freely through the device.

The more the device can move up or down, the more the leader will ‘feel’ a tug if the follower falls and therefore have a greater chance of being pulled off. This will also exert a greater force on the rope, increasing the chance of ruining the sheath. Do not extend a PCD.

The leader should place another progress-capture device before the follower removes the previous one, so there is always one in the system.

Simul climbing pcd

Dangers of Progress-Capture Devices

* A high force (such as the follower falling when there is slack in the system, or falling on a ridge traverse) could sever the rope’s sheath.

* On wandering climbs, the PCD may get pulled to one side, causing it to (depending on the type of device) disengage or add rope drag.

* Many types of PCD work poorly on wet or icy ropes.

* If the leader needs to downclimb, the follower cannot take in any of the slack created. In this case, the leader must belay themselves down with their GriGri.

* If the follower needs to downclimb, they will have to remove their coils and self-belay down.

Types of Progress-Capture Device

There are many PCD’s available, but some are more suitable than others for simul climbing.

A device with a ribbed camming style is less harsh on rope sheaths than a toothed device. A PCD with a ball bearing pulley will feed rope through smoother than one without.

A good device is the Climbing Technology RollNLock which features a ribbed cam and a ball bearing pulley.

roll n lock petzl micro traxion

Another commonly used device with a ball bearing pulley is the Petzl Micro Traxion. However, this is a toothed device and so is more likely to damage a rope’s sheath.

Other ribbed devices include the Kong Duck and the Wild Country Ropeman. These do not have a pulley, so do not feed as smoothly as the RollNLock. A much simpler device is the Petzl Tibloc which is cheaper and lighter than the others but is toothed and has no pulley.

Simul Climbing – Summary

Simul climbing does not need to be epic. For example, if after climbing a full rope length, the leader is still 3 meters away from a belay, the follower may be able to safely provide them with enough rope by removing their belay and walking 3 meters across a ledge. This may be much safer than the leader attempting a desperate downclimb.

The techniques discussed in this section are for advanced, experienced climbers who are looking for creative ways to solve problems and climb faster. Make sure you fully understand the dangers and only apply simul climbing techniques to situations when it is safe to do so.