The Figure-8: How to Tie In to a Climbing Rope

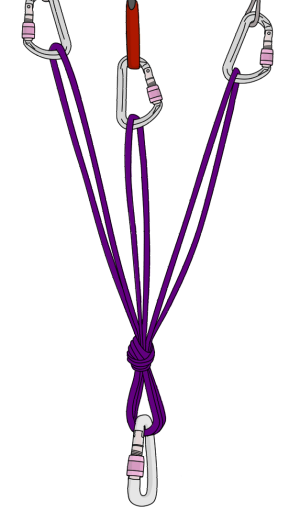
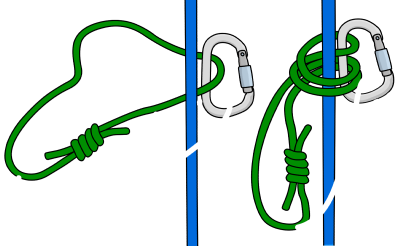
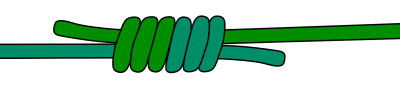
This article about the figure of 8 knot is part of the book - Rock Climbing Basics: The Beginner's Guide.

VDiff learn to climb e-book book

Unless you are bouldering, you'll need to tie the end of the rope to your harness before you climb. The best way to do this is using a rethreaded figure of 8 knot. It's important that you do it correctly, as this knot connects you to the whole climbing system and keeps you safe. Try to avoid talking to someone or distracting them while they tie in.

Likewise, once you start tying your figure-8, keep going until you’ve finished before responding to any questions. Accidents have happened because climbers were distracted halfway through tying in and then fell with a half-completed or incorrect knot.

How to tie in to a rope for rock climbing with a figure 8

How To Tie In with the Figure of 8 Knot
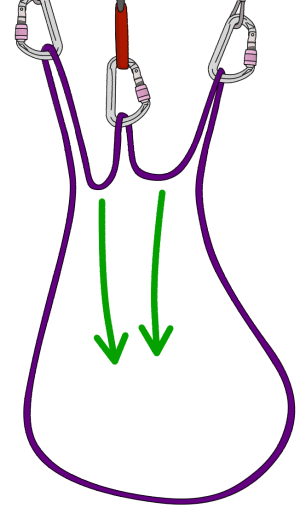
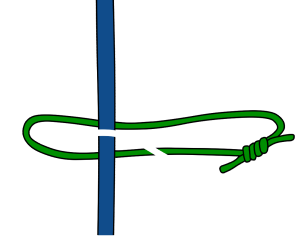
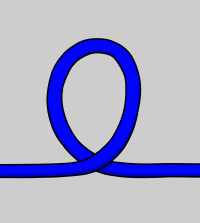
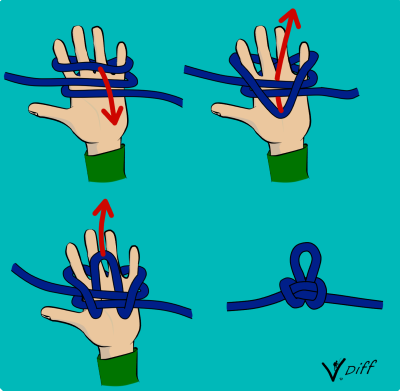
Step 1
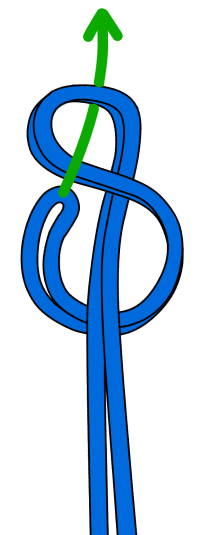
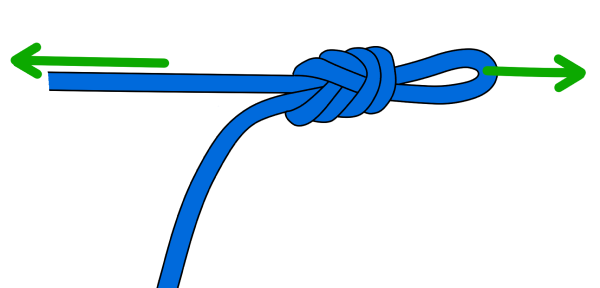
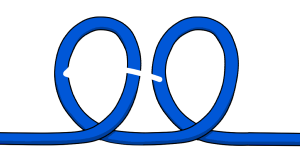
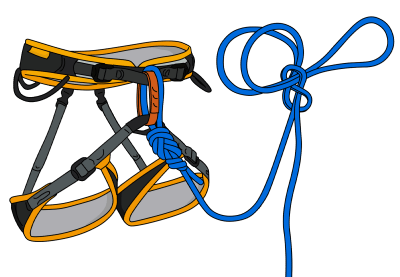
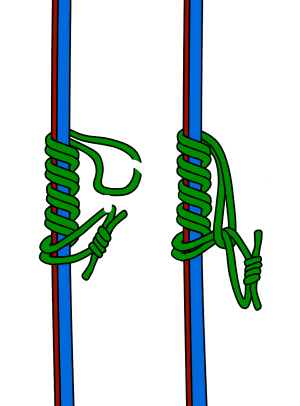
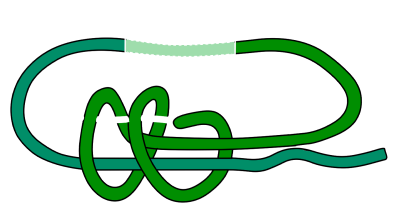
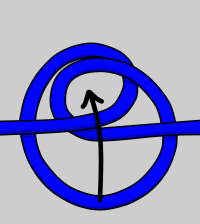
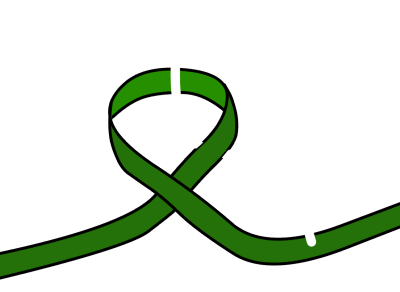
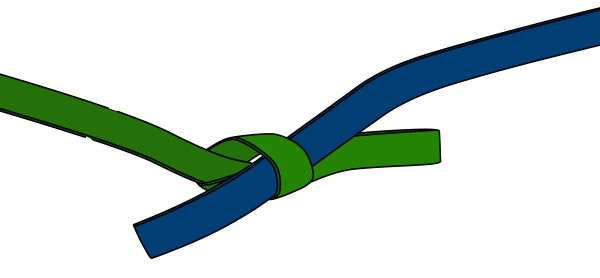
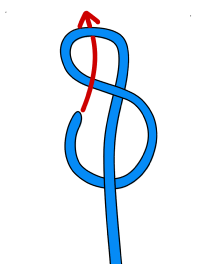
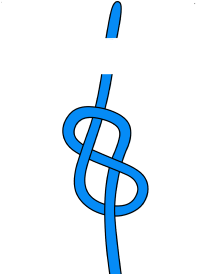
Make a loop about a meter from the end of the rope. Wrap the end of the rope around the base of the loop, then push the end through as shown.
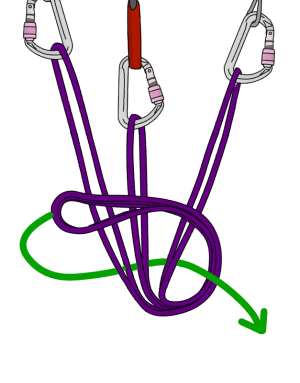
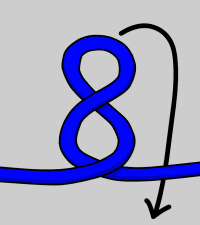
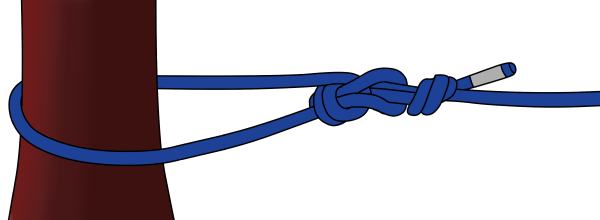
How to tie in to a climbing rope

Step 2
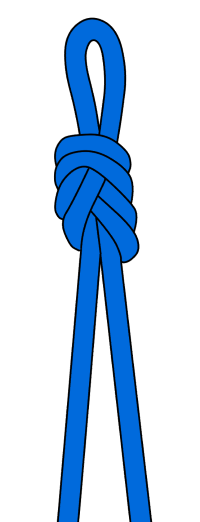
You should end up with an '8'. Make sure the knot is around 90cm from the end of the rope. The exact length varies with ropes of different diameters.
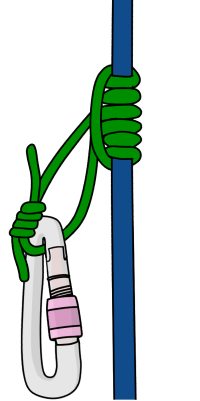
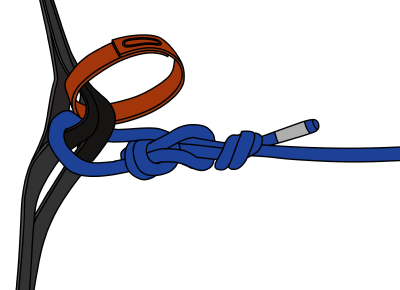
How to tie in to a rope for rock climbing

Step 3
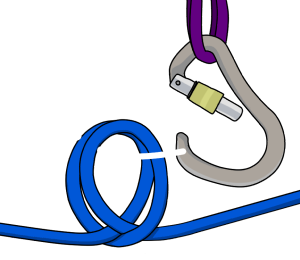
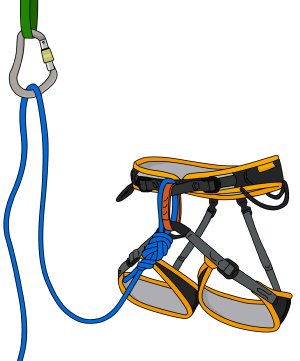
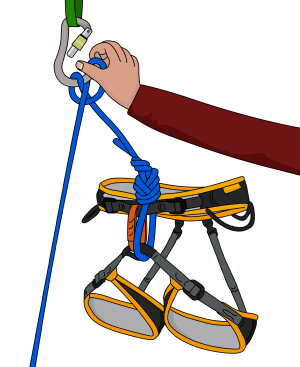
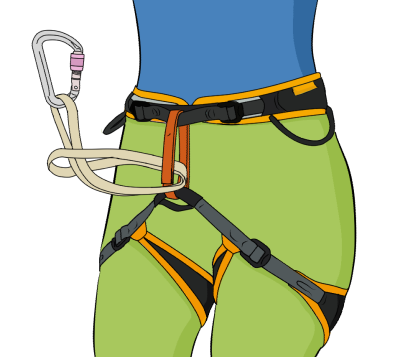
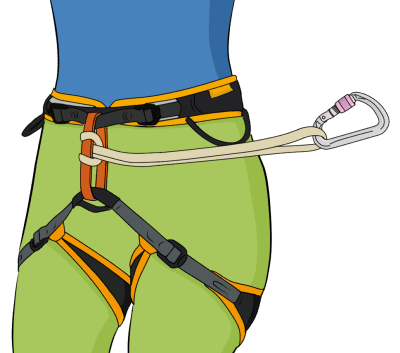
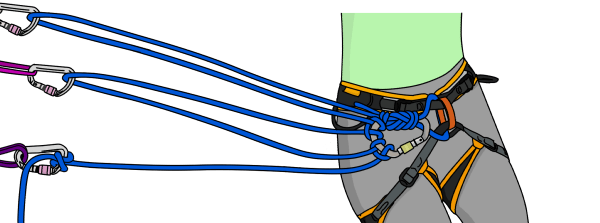
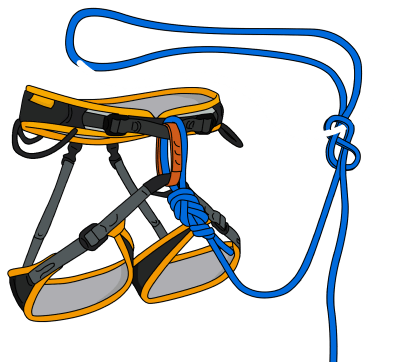
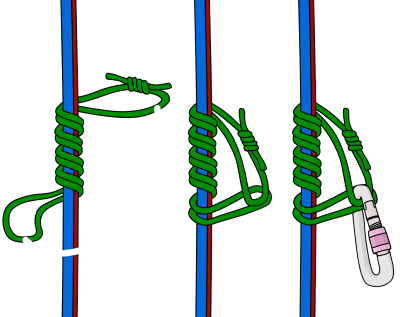
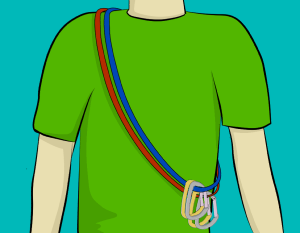
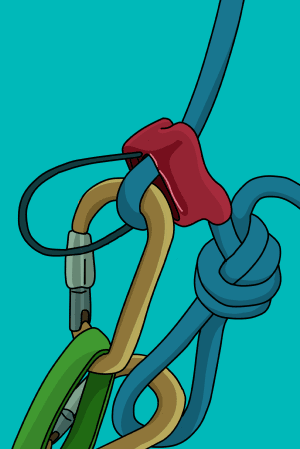
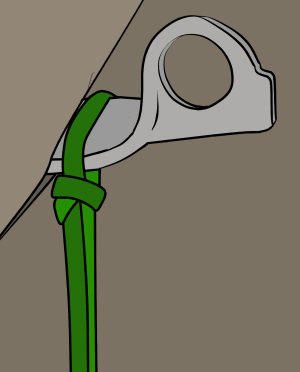
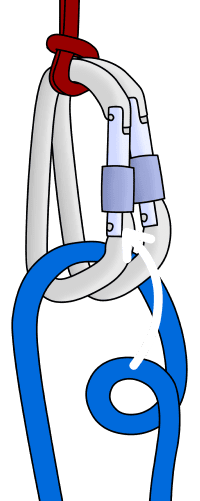
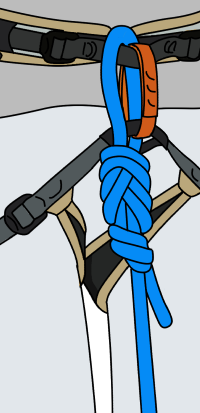
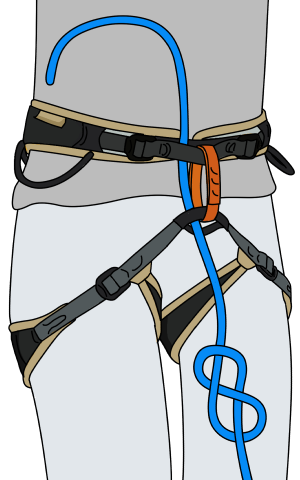
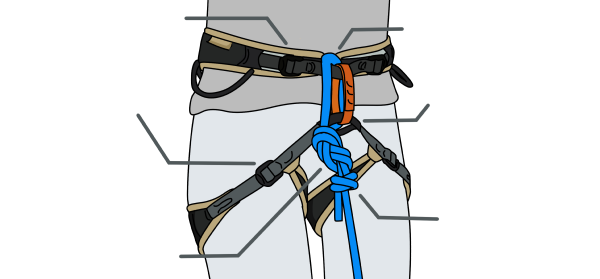
Pass the end of the rope through both of the two points on the front centre of your harness – the same ones your belay loop runs through. It is important that the rope goes through your harness in exactly the same way as your belay loop does.
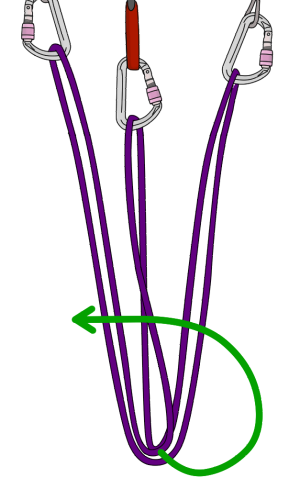
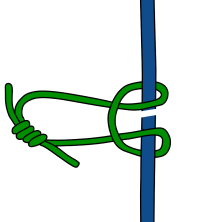
How not to tie a figure of 8 knot to a rope for rock climbing

Step 4
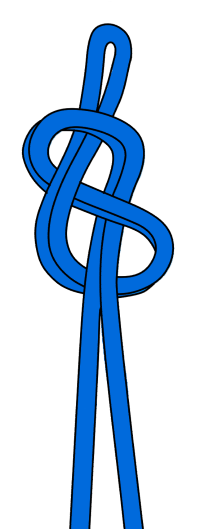
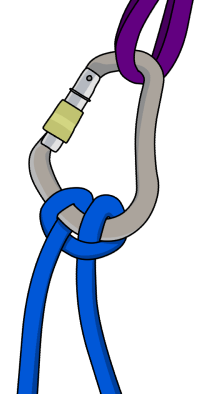
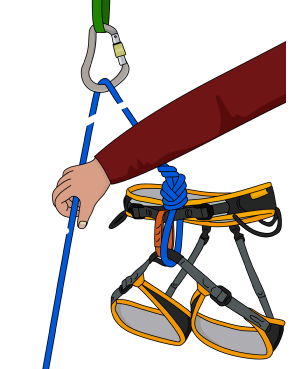
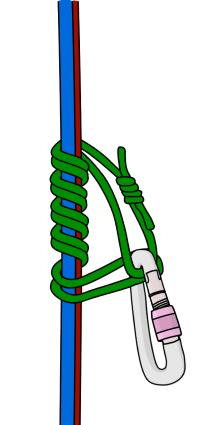
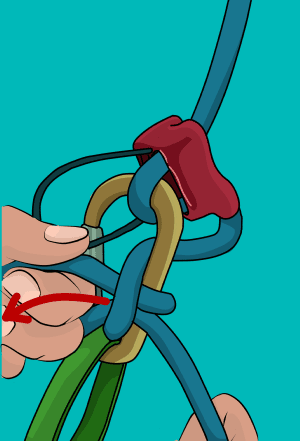
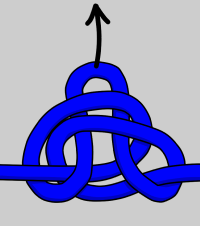
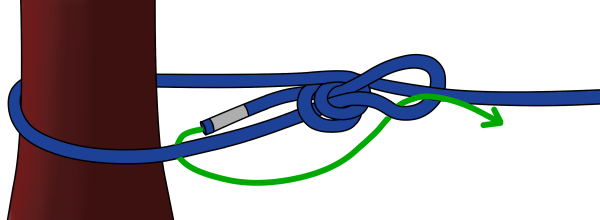
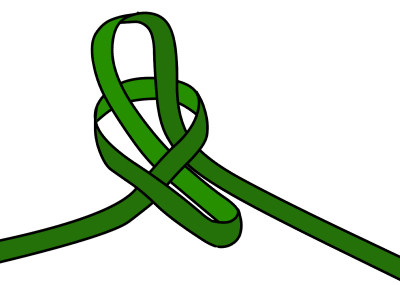
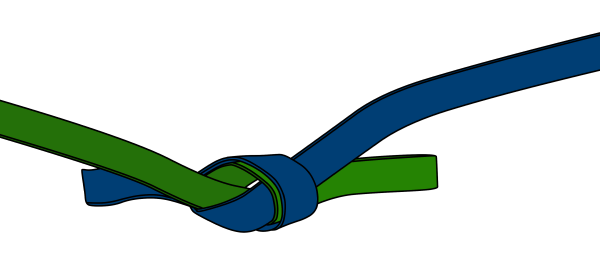
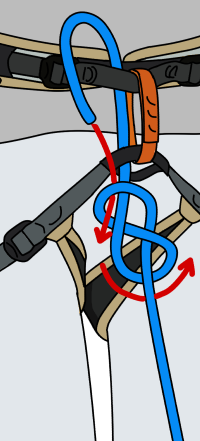
Use the end of the rope to re-trace the figure-8. Follow the twists of the rope starting from where it joins your harness.

How to tie into a climbing rope with a figure eight

Step 5
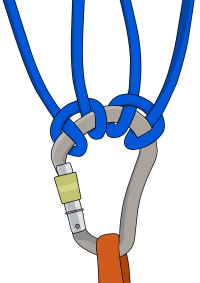
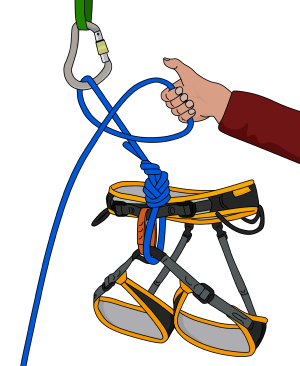
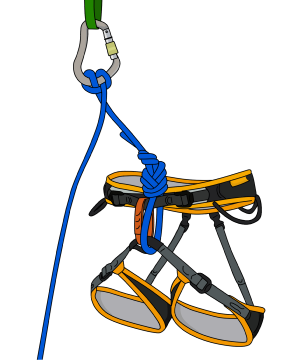
Continue following the twists until you end up back at the start of the knot.

Pull the whole thing tight.
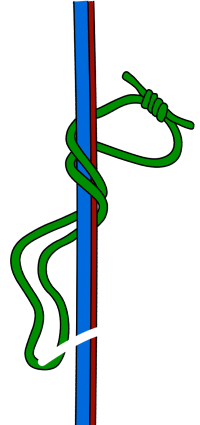
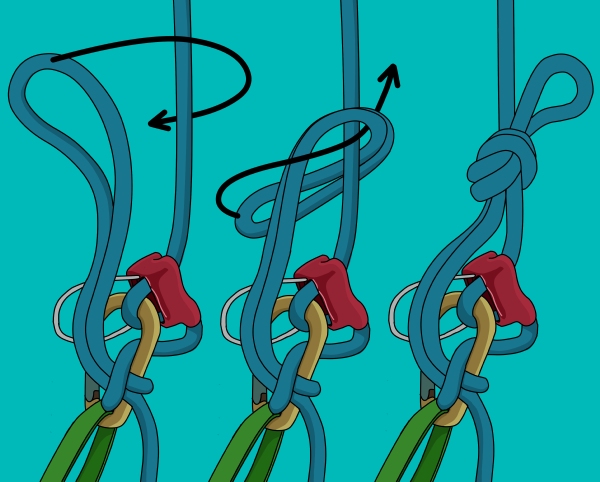
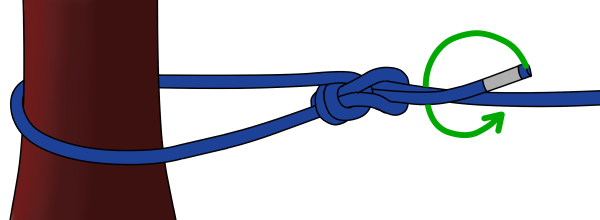
Figure of 8 knot and stopper knot climbing rope

Step 6
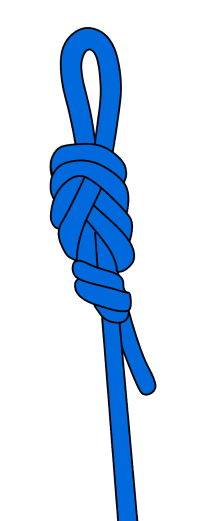
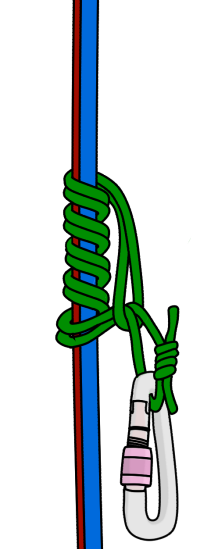
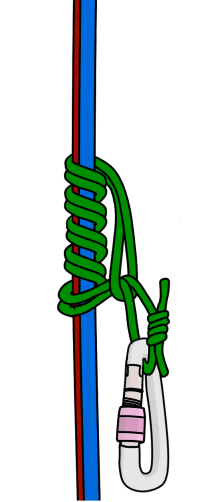
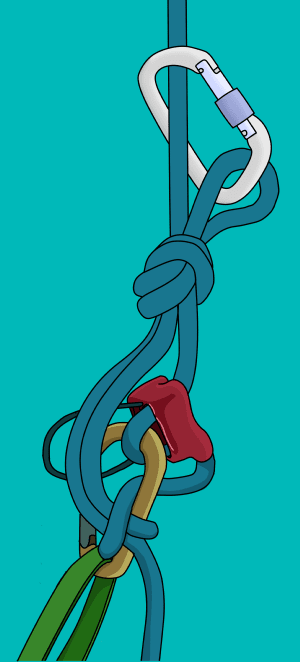
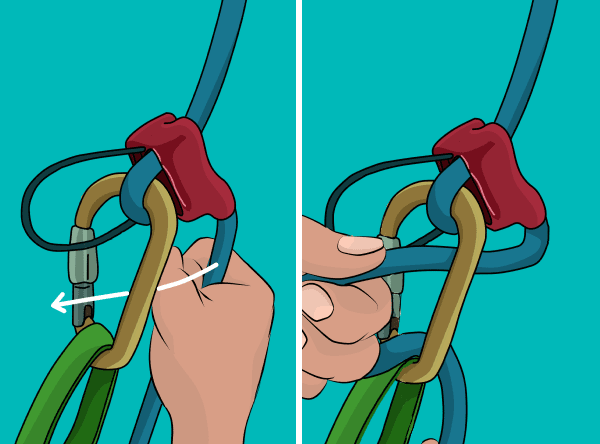
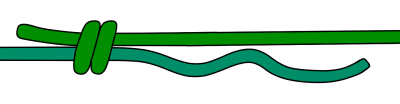
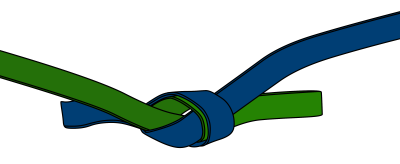
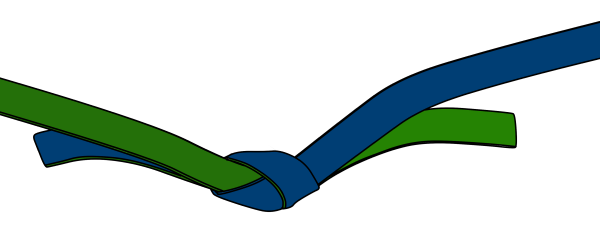
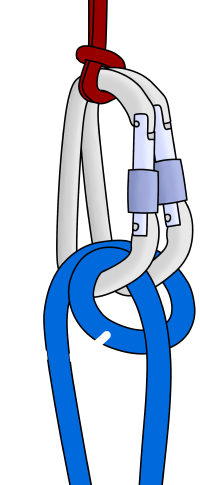
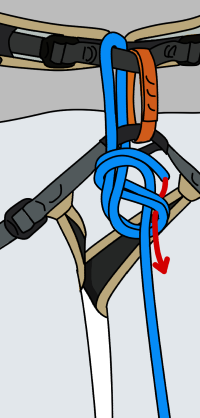
Make sure the end of the rope is around 25cm long. If it is shorter, you'll have to untie and start again. After this, you will need to tie a stopper knot. Loop the short section of rope around the main length.
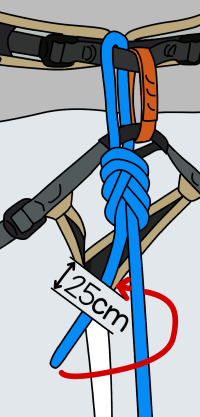
Tie into a rope for rock climbing

Step 7
Do this twice, with the second loop closer to you than the first.
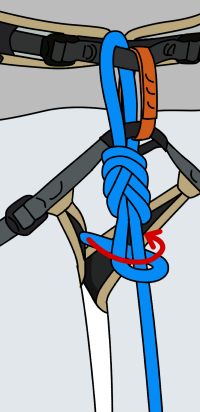
How to tie into a rope with a figure of 8 knot for rock climbing

Step 8
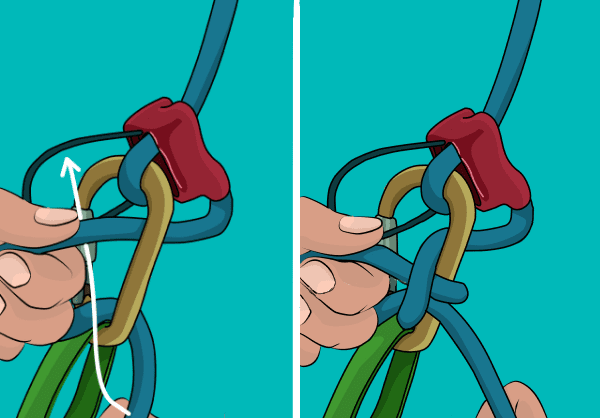
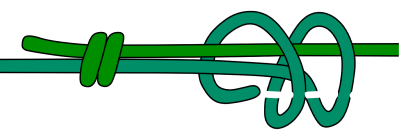
Push the end of the rope through these two loops as shown.
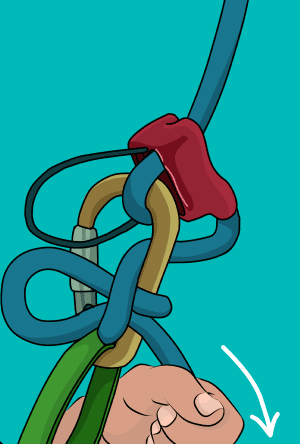
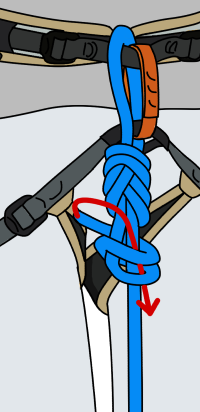
Step 9
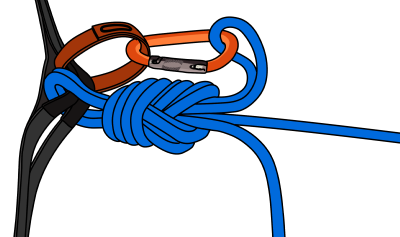
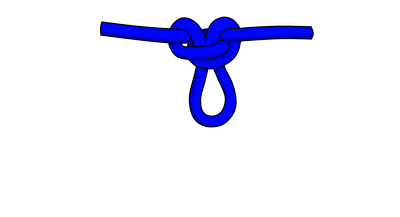
Make sure the stopper knot is pushed right up against your figure-8 knot. Pull it tight.
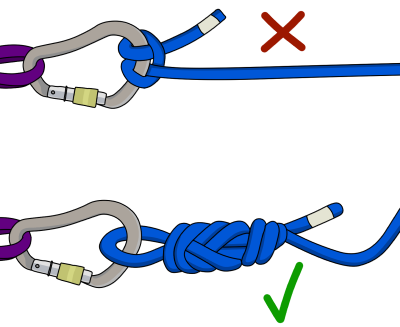
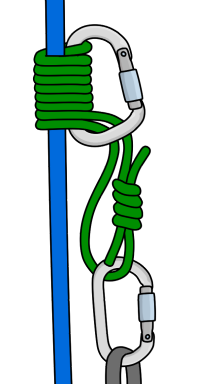
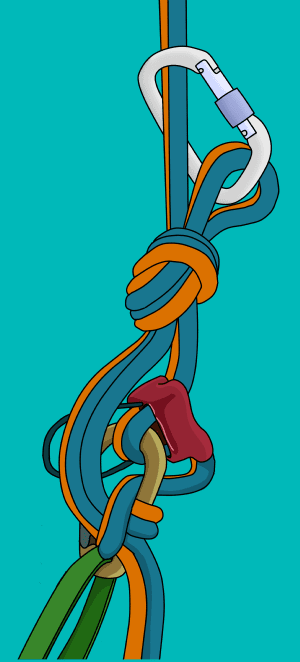
How to tie in to a rope for rock climbing with a figure eight

The Stopper Knot
The stopper knot has no bearing on safety as long as you tied your figure-8 correctly, so don’t panic if the stopper knot starts to unravel as you climb.

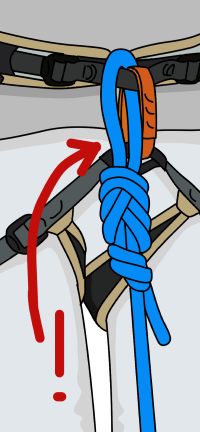
The purpose of the stopper knot is to ensure that you have left enough tail to stop the figure-8 failing – a short tail could slip through the knot.

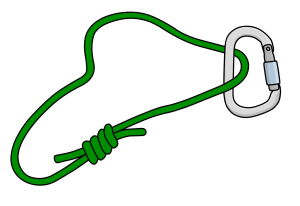
Also, if you left a long tail dangling without a stopper knot, it could be mistaken for the main rope when clipping quickdraws, or the anchor. Always tie a stopper knot for these reasons.

If you didn't have enough rope left to tie a stopper knot, you'll need to retie the figure-8 so that you do.

How to tie in to a rope for rock climbing with a figure 8

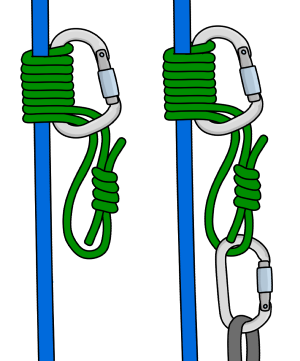
Tying In To a Climbing Rope: Common Mistakes
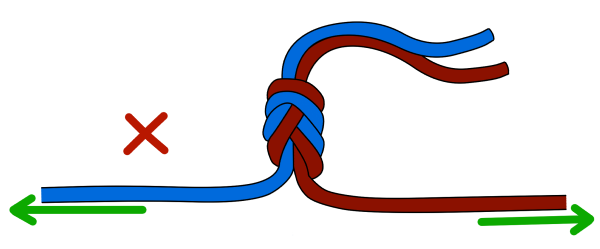
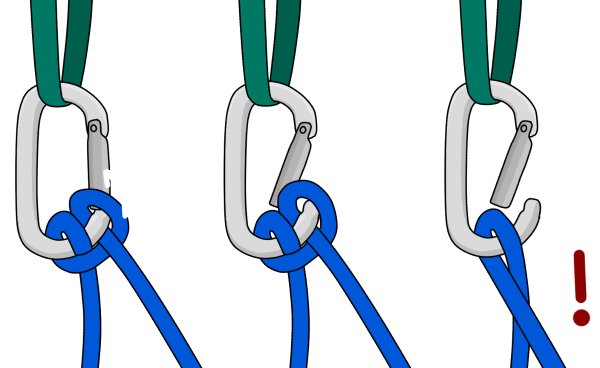
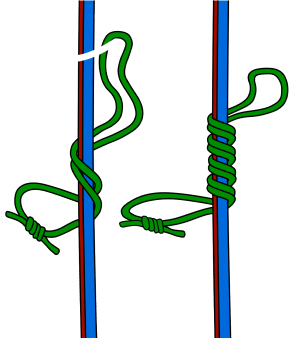
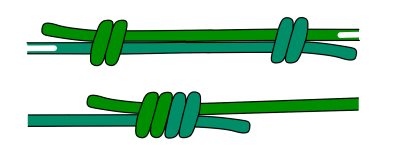
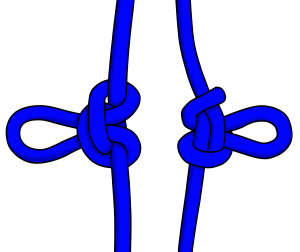
Incorrect 8 shapes

tie to a rope for rock climbing with a figure eight

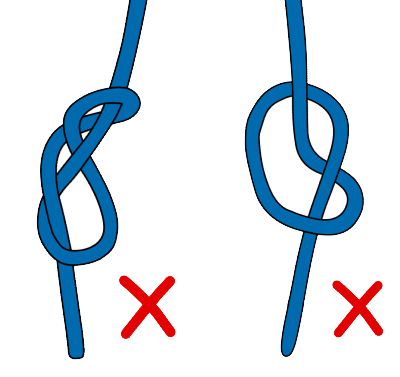
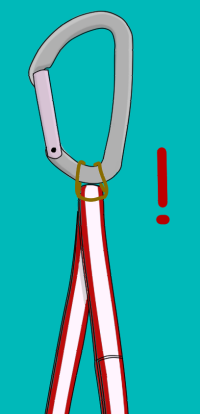
Only threading rope though one part of the harness.

tie to a climbing rope with a figure eight

VDiff climbing book

Safety Check: Have You Tied In Correctly?

Rock Climbing Infographic: Have you tied in to the rope correctly?

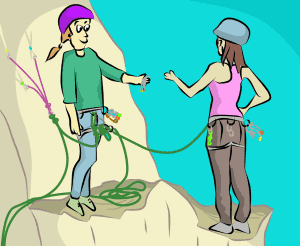
Visually inspect your knot, and your partner’s knot, before every climb.

If someone asks you a question or distracts you when you are tying your knot, wait until you have finished before answering. Do nothing else until the knot is complete.

Figure-8 on a Bight

'Essential Knots: Figure-8 on a Bight' is part of the book - Sport Climbing Basics.

VDiff learn to sport climb e-book book

The figure-8 on a bight is used for:
- Attaching the rope to a belay anchor
- Creating a master point in a cordelette or sling
- Attaching yourself to the rope when cleaning an anchor

how to tie the figure 8 bight

How to Tie the Figure-8 on a Bight

Step 1
Form an ‘8’ shape in the rope as shown.

how to tie the figure 8 on a bight

Step 2
Push the end of the rope through the top part of the 8.

figure 8 on a bight

Step 3
Pull it tight.

tie figure-8 on a bight

Stopper Knot
Make sure to add a stopper knot when tying a figure-8 in the end of a rope.

tie figure-8 on a bight

VDiff sport climbing book

Warning:
Figure-8’s are designed to be end-loaded (pulled along the line of the knot).

tie figure-8 on a bight climbing

If you load the loop in two opposing directions, the knot can roll over itself and lose strength or fail completely. For this reason, you should never use the figure-8 to join ropes for abseiling. Use the overhand knot instead.

tie figure-8 on a bight climbing

Tying Into the Middle of a Rope

You can use a variation of the figure-8 to tie into the middle of a rope. Tie in to the rope with a figure-8 as normal, but use a bight of rope instead. Clip the final loop into your belay loop to complete the knot.

tie to middle of rope

The Overhand Knot

'Essential Knots: The Overhand' is part of the book - Trad Climbing Basics.

VDiff learn to trad climb e-book book

The overhand knot is useful for:
- Creating a master point in a cordelette or sling
- Joining ropes for abseiling (rappeling)

Overhand knot rock climbing

How to Tie the Overhand Knot

Step 1
Clip the sling to both bolts and pull the strands down so they are equal.

Tying an overhand knot rock climbing

Step 2
Pull the bottom of the sling around to form a loop.

tie slings rock climbing

Step 3
Push the end of the sling through the loop as shown.

fasten sling rock climbing

Step 4
Pull the knot tight and clip a screwgate carabiner to the central point.

Tying an overhand knot rock climbing

VDiff trad climbing book

The same technique can be used to join three or more strands of sling or cord together.

Pull each strand down evenly.

tie overhand knot

Pull the bottom of the sling around to form a loop.

tie Overhand knot rock climbing

Push the end of the sling through the loop.

Overhand knot

Pull the knot tight and clip a screwgate carabiner to the central point. You could also clip into the top shelf to free up space at the central point.

How to tie the overhand knot rock climbing

The same knot is commonly used to join ropes for abseiling.

Abseil rappel with overhand knot

The Clovehitch

'Essential Knots: The Clovehitch' is part of the book - Trad Climbing Basics.

VDiff learn to trad climb e-book book

The clovehitch is a useful knot for attaching the middle of the rope to an anchor, among many other things. They can take a significant load without slipping and are super easy to adjust.

How To Tie a Clovehitch

Step 1
Make two identical loops in the rope. Put the rear loop over the top of the front loop.

How to tie a clovehitch rock climbing

Step 2
Clip a screwgate carabiner through these two loops.

Always use a screwgate - it's possible for one of the loops to be pulled through a snapgate carabiner when it is loaded. The knot will fail if this happens.

clovehitch rock climbing

Step 3
Pull it tight and fasten the screwgate.

clovehitch on carabiner rock climbing

VDiff trad climbing book

Top Tip
If you need to fit two clovehitches on the same carabiner, you can easily fit them both on a wide 'HMS style' screwgate.

How to tie a two clovehitches on carabiner rock climbing

One-Handed Clovehitch

It’s often more secure to attach to an anchor while holding onto it with one hand, particularly during a crevasse rescue.


Step 1
Clip a screwgate to the anchor and spin it so the gate faces outwards.


Step 2
Hold on to the anchor with one hand so the carabiner is held steady and clip the rope through the carabiner with your other hand.

one handed clovehitch rock climbing

Step 3
If the gate of the carabiner faces right, use your right hand for this step. If it faces left, use your left hand. Reach over the rope at the front and grab the rope at the back with your thumb pointing downwards.

one handed clovehitch

Step 4
Bring the rope forward and twist it so your thumb is upwards.

one handed clovehitch climbing

Step 5
With an extra little twist, push it through the gate of the carabiner...

one handed clove hitch

...and pull it tight.

tie clovehitch with one hand

Clovehitch Limitations

Attaching the End of a Rope
Never use the clovehitch to anchor the end of a rope. If it slips, the tail could pull through the knot, untying it.

To anchor the end of a rope, use the more secure figure-8 on a bight.

clovehitch figure 8 knot rock climbing

Tying Clovehitches on Snapgates
Part of the clovehitch could easily snap through the gate, making the knot useless. Never tie clovehitches on snapgate carabiners. Use a screwgate, or two opposite and opposed snapgates instead.

clove hitch rock climbing

The Girth Hitch

'Essential Knots: The Girth Hitch' is part of the book - Sport Climbing Basics.

VDiff learn to sport climb e-book book

The girth hitch (Larksfoot) is used for:
- Attaching slings to your belay loop
- Attaching slings together


Step 1
Feed a sling through your belay loop.

Girth hitch knot rock climbing

Step 2
Put one end of the sling through the other.

Girth hitch rock climbing

Step 3
Pull it tight.

how to tie a girth hitch rock climbing

VDiff sport climbing book

Strop Bend
You can also link two slings together using these same steps. Arrange the girth hitch as shown to create a strop bend. This is basically a neater version of the girth hitch.

larksfoot knot rock climbing

Advanced Trad Anchors > Part 4 of 5 > The Equalizing Figure-8

This article about the 'Equalizing Figure-8' is part of the book - The Trad Climber's Guide To Problem Solving.

VDiff trad climbing self rescue book

In Trad Climbing Basics, we described methods of building an equalized anchor without the use of slings or a cordelette – great if you’ve used them all during the pitch. Many variations are possible. Two simple methods are shown below, along with the more advanced equalizing figure-8. These methods use up quite a lot of rope, so you might not have enough on those long pitches.

Rope Anchors – Simple Methods

Advantages
- Can equalize pieces which are very far apart.

Disadvantages
- Often uses a lot of rope.
- Must belay directly from harness.
- Difficult to get perfect equalization.
- Very difficult or impossible to escape the belay in an emergency situation.
- Not great for multi-pitch belays if the same person is leading every pitch. To attach to the anchor, the belayer will have to clip each piece in the same way as the leader did. This is time consuming and can be a bit awkward.

using rope in trad anchor

Tying an alpine butterfly knot as shown will use less rope, but still has the same disadvantages as the previous method.

trad anchor using rope

VDiff climbing self rescue book

Rope Anchors – The Equalizing Figure-8

The ‘equalizing figure-8’ is a rarely used knot which could be useful in some belay setups.

Advantages
- Creates a master point in the rope so you can belay directly from the anchor in guide mode.
- Much easier to escape the belay than the previous two methods.

Disadvantages
- Difficult to equalize anchor points which are very far apart.
- Difficult to adjust belay position once set up.
- The equalizing figure-8 is not redundant. If one piece fails, the whole anchor shifts down. Only use this method with bomber gear, such as bolts
- In the unlikely event that one rope loop is cut, the whole anchor could fail.

equalize rope in trad anchor

How To Tie the Equalizing Figure-8

Step 1
Tie a figure-8 with a large loop.

using rope to equalize trad anchor

Step 2
Pass the loop back through the figure-8 as shown.

equalizing figure 8 trad anchor

Step 3
This creates three new loops. Clip each loop into an anchor piece and adjust them as necessary.

equalizing figure 8 knot climbing

Alternatively, collapse one loop for clipping into two pieces.

equalizing figure 8 knot trad anchor

Step 4
To create a master point, tie a figure-8 loop in the rope just below the equalizing figure-8.

You can belay in guide mode directly from this.

equalizing figure 8 knot

Prusik Knots: Different Types Explained

This article about prusik knots is part of the book - The Trad Climber's Guide To Problem Solving.

VDiff trad climbing self rescue book

A prusik (also known as a friction hitch) is a short piece of cord which can be wrapped around your climbing rope to add friction. They can slide up and down easily, but lock around the rope when weighted.

They are most commonly used for abseiling but are also incredibly useful in a variety of emergency situations such as ascending a rope or escaping the system.

Four types of prusik knot (friction hitch) are described below:
- Classic
- Autoblock (French)
- Klemheist
- Bachmann

prusik knot

Prusik Cord: Size

The diameter of your cord should be 60% to 80% of the rope’s diameter, whether you are using the prusik on one rope or two. If you use a cord that is too thin, it will tighten easily around the rope and will be difficult to move freely. If you use a cord that is too thick, it won’t have enough friction to lock up when you need it to.

In general, 6mm cord works well on 10mm ropes, whereas 5mm cord is better for 8mm ropes.

The cord length should be 1.2m - 1.5m.

Prusik Cord: Material

Prusiks are usually made out of nylon cord, tied together with a double fisherman's bend.

If the cord is too stiff, it won’t lock properly around the rope. The stiffness may also make it difficult to create the knot itself. Test your cord before you take it climbing so you can be sure that it works.

If you are planning to use your prusiks frequently, you should consider buying some pre-sewn prusik loops. These come in a variety of forms, either without a bulky knot or with the knot sewn together and covered by a plastic sleeve.


VDiff climbing self rescue book

Prusik Types: The Classic

Advantages
- Very secure when loaded
- Locks in both directions

Disadvantages
- Often difficult to release when tightly loaded

Best Uses
- In situations where you don’t need to keep sliding the prusik (e.g; escaping the system)

classic prusik knot

How To Tie the Classic Prusik

Step 1
Pass the cord around the rope and through itself as shown, making sure the double fisherman’s bend is at the end.

classic prusik knot

Step 2
Pass the cord around the rope and through itself again.

how to tie a prusik knot

Step 3
Make at least three wraps around the rope, pull the cord tight and clip a carabiner through the loop. Make sure the knot is neat.

tie prusik knot

Step 4
Pinch the knot to loosen it. This allows you to move it up or down the rope. Weight the knot in either direction to lock it. If the knot gets stuck, you can push some cord in from the center of the knot to loosen it.

prusik knot classic

Prusik Types: The Autoblock (French)

Advantages
- Easy to tie and untie
- Can be released under load

Disadvantages
- Tends to slip when used to ascend ropes

Best Uses
- As a back-up when abseiling

autoblock prusik knot

How To Tie the Autoblock Prusik

Step 1
Wrap the prusik neatly around the rope a few times as shown.

autoblock prusik knot

Step 2
Clip the ends together with a carabiner. More wraps will create more friction around the ropes, though four wraps are generally enough. Make sure the autoblock is neat and the double fisherman's knot is away from the ropes.

auto block prusik knot

Step 3
Pinch the knot to loosen it. This allows you to move it down the rope. Weight the knot to lock it. The autoblock locks in both directions, but the double fisherman's knot tends to wrap itself into the prusik when the direction is switched, making it much less effective.

prusik knot autoblock

Prusik Types: The Klemheist Knot

Advantages
- Easy to release after being loaded
- Can be tied with webbing

Disadvantages
- Only works in one direction

Best Uses
- Ascending a rope

Klemheist knot

How To Tie the Klemheist Knot

Step 1
Wrap the prusik neatly around the rope a few times as shown.

Klemheist knot

Step 2
Pass the rest of the cord through the loop.

Klemheist prusik knot

Step 3
Weight the knot downwards to lock it, or push it upwards to release.

Klemheist prusik

Prusik Types: The Bachmann Knot

Advantages
- Easy to operate when wearing gloves

Disadvantages
- Not good on icy or slick ropes
- Doesn’t grip as well as other types of prusik

Best Uses
Ascending ropes when wearing bulky gloves

bachmann prusik knot

How To Tie the Bachmann Knot

Step 1
Clip the cord through a carabiner.

bachmann prusik knot

Step 2
Wrap the cord around the rope, feeding it through the carabiner each time. Keep the wraps snug to each other.

prusik knot bachmann

Step 3
Allow the end of the cord to hang down through the carabiner. Clip your load to this end. Do not clip your load to the carabiner which functions as the ‘handle’ – this will release the knot!

bachmann knot

Step 4
Push the handle carabiner up the rope to release the knot. Weight the lower carabiner to lock it.

bachmann prusik

Prusik Cord Tips

- Prusiks are not full-strength attachment points. Always have a back-up so you’re attached to the rope ‘properly’.

- Make sure not to wrap the double fisherman’s bend into any friction hitch. This will greatly decrease the knot’s effectiveness.

- The number of wraps should be increased or decreased depending on the cord stiffness, cord diameter and moisture conditions, with three wraps as a minimum. Before using any prusik knot, test it to see that it grips and releases well.

- If you don’t have a prusik cord, you can use a sling instead. Slings don’t work quite as well but it’ll help you get out of a tricky situation. A narrow nylon sling is better than dyneema (spectra). Don’t use a sling for anything except a prusik after using it once as a prusik.

- If using prusiks in conditions where they might fail (e.g; prusiking up a wet or icy rope), it’s better to use two different types of friction hitch (and a full strength back-up, of course). If conditions exist to cause one to slip or fail, the likelihood is that the other prusik would not fail under the same conditions.

- Check your prusik cord for wear and tear regularly. Make sure the double fisherman’s knot isn’t slipping and the cord isn’t abraded. When it’s looking worn, retire it and get a new one – cord is cheap.

Extendable Quickdraws

This 'Extendable Quickdraws' article is part of the book - Trad Climbing Basics.

VDiff learn to trad climb e-book book

Extendable quickdraws (or alpine draws) are usually made from a 60cm sling and two snap gate carabiners. They can be used either as a short draw or fully extended, meaning it's quick and easy to extend your gear to reduce rope drag without carrying extra slings.

Extendable quickdraws for climbing

It's great to carry at least a few of these on trad routes instead of fixed length, shorter draws. You could also opt to only carry extendable draws, particularly for alpine routes.

How To Make Extendable Quickdraws

To make an extendable quickdraw, simply attach both carabiners to the sling, then pass one biner through the centre of the other one, clipping the extra two loops of the sling through it at the other end. This can now be racked on your harness like any other quickdraw.

How to make extendable quickdraws for climbing

When choosing carabiners and slings for your extendable draws, there are a few things to bear in mind. You should have a gear carabiner and a rope carabiner, just like you would with normal quickdraws.

You'll need to pick different coloured carabiners so you can distinguish between them. Keeping them consistent between all your draws is good – try silver for the gear end and your favourite bright colour for the rope end. You could try marking one end with tape, but this could be really hard to see whilst hanging on by one finger, and can easily wear off.

We prefer making extendable draws with thinner dyneema slings (6 or 8mm) as they fold up more neatly than thicker dyneema or nylon, reducing bulk on your harness. They will wear out faster than thicker versions though, so be prepared to replace them more regularly.

Nylon dyneema quickdraws climbing

VDiff trad climbing book

How To Use Extendable Quickdraws

To use extendable quickdraws, clip the draw to your gear, then slip two loops of the sling out of the rope-end carabiner. Pull it out to full extension, then clip the rope in.

Extendable quickdraws for rock climbing
Extendable quickdraws climbing

Occasionally, the sling can become twisted which can result in it being looped around the gear carabiner. It's OK to use it like this if you're really pumped and need to make the clip quickly, but much better to sort it out if you can.

If you fall while the sling is tangled like this, the strands of it will slide over each other, causing it to weaken, just the same as if it was knotted.

Many short draws have a loop of elastic at the gear end to hold the carabiner firmly in place. It's important NOT to use one of these elastics on an extendable quickdraw. If it's twisted in the wrong way it can end up with the sling attached only with the elastic, not clipped through the carabiner. This is easily missed and would be disastrous if you fell on it!

Elastic on climbing quickdraws
Velcro climbing shoes with slings

Top Tip
The velcro on rock shoes quickly kills dyneema slings, so try not to bundle them all into your bag in one big messy heap!

How To Rack Extendable Quickdraws

When following a pitch where your leader has used extendable draws, you can either re-make the draw as you go and rack it onto your harness, or simply sling the whole thing over your shoulder – much easier in a tricky position. Some people prefer to carry them on lead like this too, rather than racking them on their harness.

Wearing climbing slings over shoulder

The Mule Overhand Knot > How To Tie-Off a Belay Device

'How To Tie-Off a Belay Device' is part of the book - Trad Climbing Basics.

VDiff learn to trad climb e-book book

When belaying with a standard belay device, you obviously can't let go of the rope. But sometimes it's really useful to have both hands free.

Times when you may need to be hands-free include:
- Switching gear on a multi-pitch
- Sorting out a rope tangle
- Passing a knot when abseiling
- Escaping the belay in an emergency situation

Rock climbers swapping gear at belay anchor

In situations where the rope isn't weighted, a simple overhand knot backed up to your belay loop will work. However, if the rope becomes weighted when using this method (e.g; if the leader falls), it will be almost impossible to release the tie-off.

Overhand knot tied to tie-off a belay device

If there is any chance of this happening, you should instead use the mule-overhand method (described below).

This allows you to tie-off your belay device while the leader is weighting the rope, and also release the tie-off when it's weighted.

Mule Overhand knot

VDiff trad climbing book

Step 1
Pass a loop of the slack rope through your screwgate carabiner with one hand while keeping hold of the rope with your brake hand.

This can be difficult when heavily weighted – you’ll need to pinch the rope tight.

Climbers tie-off belay device

Step 2
Pass a loop from the opposite side through the first loop so that a mule knot is formed around the spine of the carabiner.

Do not tie this knot around the gate of the carabiner.

Climber ties a knot to lock off ATC belay device

Step 3
Make sure the second loop is around 60cm long.

Pull it tight.

Climber ties a mule-overhand to lock off ATC belay device

Step 4
Tie an overhand knot around the tensioned rope as shown.

tie mule overhand knot

Step 5
A carabiner completes the hands-free mule-overhand knot.

Release locked ATC belay device

Step 6 – Releasing Under Load
To release the tie-off with the rope loaded, first untie the overhand knot. Then holding the slack rope securely with both hands, simply pull down to release the mule knot.

You should be ready to expect a few centimetres of rope to slip through. Keep a firm grip so you do not lose control of the belay device.

You can now belay or lower the climber as normal.

Release locked ATC belay device

Top Tips
* If belaying with two ropes (such as half ropes), simply treat them as one rope and follow the same steps.

* Make sure to communicate with your partner so they know not to continue climbing while tied-off.

* We strongly recommend that you practise this technique in a safe environment before doing it in a real situation

Overhand knot tied to lock ATC belay device with two ropes

The Double Fisherman’s Bend

"Essential Knots: The Double Fisherman's Bend" is part of the book - Trad Climbing Basics.

VDiff learn to trad climb e-book book

The double fisherman's bend is used to tie two ends of equal diameter cord together to make a prusik or cordelette. It can also be used as an alternative to the overhand to join ropes for abseiling.

Step 1
Loop one end of the cord around the other end twice, then push the end through these loops.

double fishermans prusik knot

Step 2
Pull it tight. Make sure the tails are at least ten times the diameter of the cord (5cm tails for 5mm cord).

how to tie double fishermans prusik knot

Step 3
Do the same with the other end of the cord.

double fishermans knot

Step 4
Pull it all tight so that the two knots jam together. It is important that the double fisherman’s bend is fastened tightly.

how to tie a double fishermans knot

VDiff trad climbing book

Triple Fisherman's Bend
Some cord or rope may be too slick or stiff for the double fisherman's to work. In this case, try adding an extra loop to each side of the cord to make a triple fisherman's bend.

triple fishermans knot

The Alpine Butterfly Knot

This 'Alpine Butterfly' article is part of the book - The Trad Climber's Guide To Problem Solving.

VDiff trad climbing self rescue book

The alpine butterfly knot is used for:

- Equalizing a two-bolt belay.
- Isolating a damaged section of rope.
- Forming a fixed loop in the middle of a rope. This provides a clip-in point which can be loaded in 2 or 3 directions.

Alpine butterfly knot for climbing

How To Tie an Alpine Butterfly Knot

Step 1
Form a loop in the rope.

How to tie a butterfly knot for climbing

Step 2
Twist the loop so it becomes two loops. Then pull the top of the upper loop behind and underneath the line of the rope.

Tying a butterfly knot for climbing

Step 3
Push the now lower loop through the original first loop.

How to tie an alpine butterfly knot

Step 4
Pull it tight.

Tying alpine butterfly knot

You should end up with this:

Alpine butterfly knot front and back

An alternative way to tie the alpine butterfly is to wrap it around your hand three times as shown below. Pull the top wrap down over the other two, then back up behind them.

How to tie the butterfly knot over hand

VDiff climbing self rescue book

Using the Alpine Butterfly Knot

Equalizing a Two-Bolt Belay
Tie a large-looped alpine butterfly to one screwgate and a clovehitch to the other.

You can adjust the size of the loop once the alpine butterfly is tied. Then adjust the clovehitch to fine tune the equalization.

This is useful for fixing ropes, such as on a big wall.

Equalize belay with alpine butterfly knot

Isolating a Damaged Section
This is useful when using your rope as a fixed line or in a situation where the rope will not pass through any carabiners.

Obviously, you will not be able to lead climb with a knot in your rope!

Alpine butterfly knot tied over core shot damaged rope

The Double Bowline

'Essential Knots: The Double Bowline' is part of the book - Sport Climbing Basics.

VDiff learn to sport climb e-book book

The double bowline is commonly used to secure the end of a rope around a large object such as a tree. It can also be used to tie the rope into your harness.

How to Tie the Double Bowline

Step 1
Wrap the end of the rope around a tree or other suitable object. Form two loops in the rope as shown.

Double bowline climbing knot

Step 2
Push the end of the rope up through the two loops and around the back of the main strand. Then push the end of the rope back down through the loops.

Double bowline climbing knot

Step 3
Pass the end around the back of the knot and push it up through the new loop as shown.

Double bowline climbing knot

Step 4
The double bowline is now tied, but needs a stopper knot to be complete. Tie a half fisherman's by passing the end of the rope around the main strand twice.

Double bowline climbing knot

Step 5
Finish the stopper knot to complete the knot.

Double bowline climbing knot

VDiff sport climbing book

Warning
The double bowline is great for tying around a tree or boulder as part of a top-rope anchor.

Some sport climbers also use the double bowline for tying in because it’s easy to untie after multiple falls. However, it has been known to untie itself, especially if the rope is stiff. This is due to lots of movement in the rope as you climb. We recommend the figure-8 as a much safer alternative for tying into your harness.

Double bowline climbing knot

The Slip Knot

'How To Tie a Slip Knot' is part of the book - Trad Climbing Basics.

VDiff learn to trad climb e-book book

The slip knot is useful for tying off pitons, tree stumps or other poor gear in order to reduce leverage.

how to tie a slip knot for climbing

How To Tie a Slip Knot

Step 1
Form a loop in a sling (thin Dyneema works better than nylon).

how to tie a slip knot

Step 2
Pull a bight through this loop as shown.

how to tie a slip knot for rock climbing

Step 3
Slip this bight over the piton.

slip knot for climbing

Step 4
Cinch it tight and push it as close to the rock as possible to reduce leverage.

tie a slip knot for rock climbing

VDiff trad climbing book

The Water (Tape) Knot

'How To Tie a Water Knot' is part of the book - Trad Climbing Basics.

VDiff learn to trad climb e-book book

The water (tape) knot is useful for joining flat or tubular webbing of equal width.

how to tie climbing slings together

How To Tie the Water Knot

Step 1
Tie a loose overhand knot near one end of the webbing.

how to tie climbing webbing together

Step 2
Thread the other end into the knot as shown.

tie climbing webbing together tape knot water knot

Step 3
Retrace the original knot, making sure it lies flat at all times.

how to tie a tape knot

Step 4
Cinch the knot tight. The tails should be at least 10cm long.

how to tie a water knot

VDiff trad climbing book

Warning!
The water knot should never be used to join:
- Dyneema webbing
- Any webbing of unequal width
- Rope/cord to webbing

In these cases, the knot is very weak and prone to slipping.

The water knot can untie itself over time with repeated loading and unloading. Make sure the knot is tight and the tails are at least 10cm long each time you use it.

Some climbers duck-tape the tails to keep them neat and to help prevent creeping. If you do this, leave the ends of the webbing in view so you can see them.

The Garda Hitch (Alpine Clutch)

This 'Garda Hitch' article is part of the book - The Trad Climber's Guide To Problem Solving.

VDiff trad climbing self rescue book

The garda hitch uses two parallel carabiners to create a system where a loaded rope can move in one direction but not the other.

Uses:
- As a ratchet pulley for improvised hauling

Step 1
Secure two D-shaped carabiners together with a girth hitch so they lie parallel with the gates on the same side.

garda hitch

Step 2
Clip the rope through both carabiners.


Step 3
Form a loop in the non-loaded strand as shown.

garda hitch alpine clutch climbing

Step 4
Clip this loop through the left carabiner and fasten the screwgates.

alpine clutch climbing

Step 5
Pull the loop back so it sits around the spine of the carabiners.

garda hitch alpine clutch

Step 6
The garda hitch is now complete.

You will be able to pull rope through in one direction only. Make sure you have it the right way around.

garda hitch climbing

VDiff climbing self rescue book

Warning!
* The garda hitch is a one-direction knot – it cannot be released under load. Be careful how you employ it.

* It’s vital that you use D-shaped carabiners. A garda hitch tied on HMS or oval carabiners is prone to slipping down which causes the knot to fail.

* You must girth hitch the two carabiners together. If you simply clip the carabiners through a sling or another carabiner, the garda hitch will not function correctly.