How To Climb a Big Wall – Leading

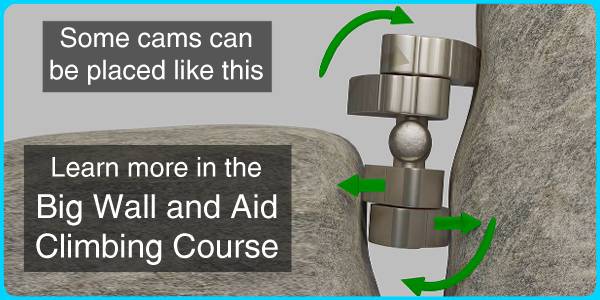
Check out the full big wall video course, or download the e-book.

Step 1 – On Belay
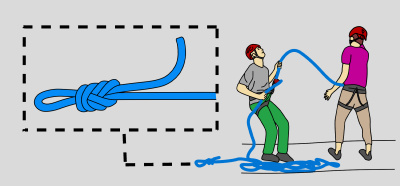
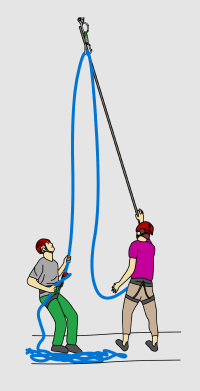
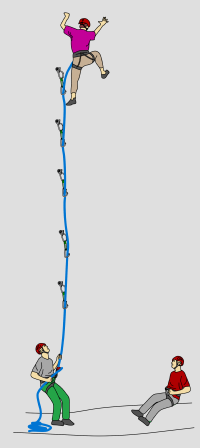
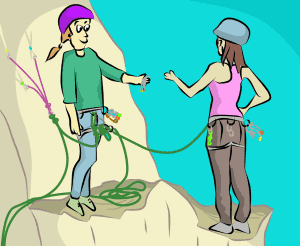
Before you leave the belay (or ground), you’ll need to get set up for the lead. Both climbers tie into the rope and the leader is put on belay, just the same as for any other climb.

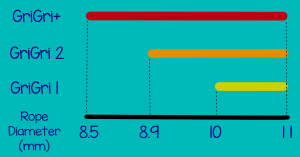
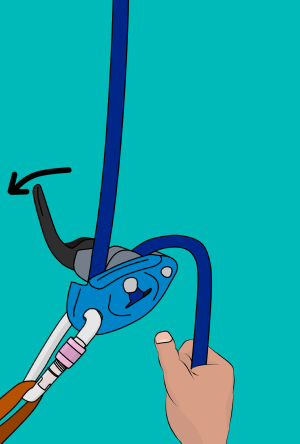
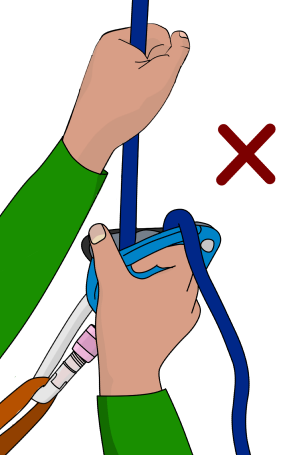
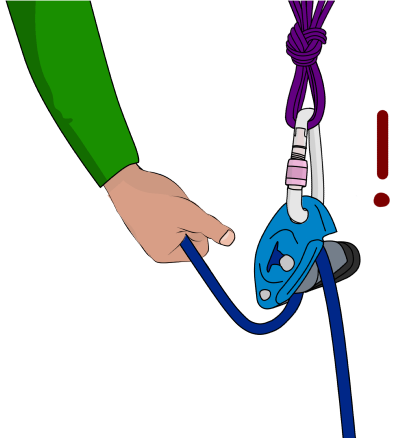
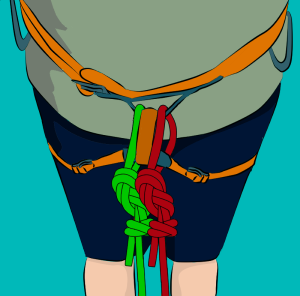
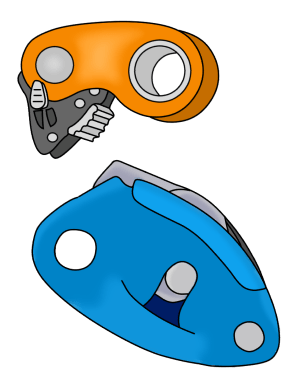
The figure-8 is widely recognised as being the safest knot to tie in with. An assisted-braking belay device (e.g: a GriGri) is highly recommended for belaying.

grigri belaying

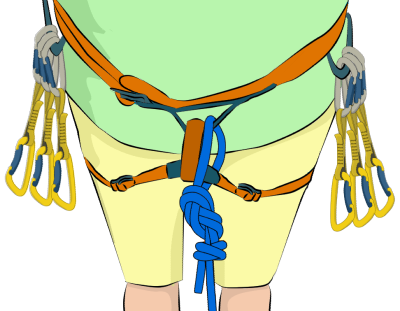
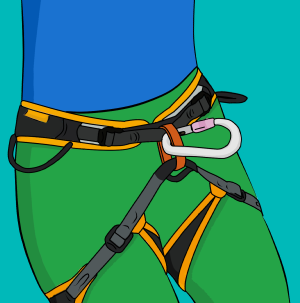
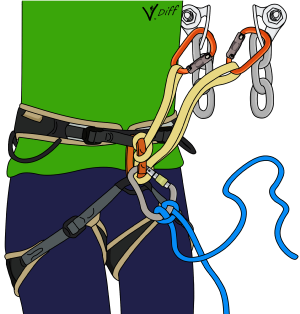
Step 2 – Attach Daisies and Aiders to Harness
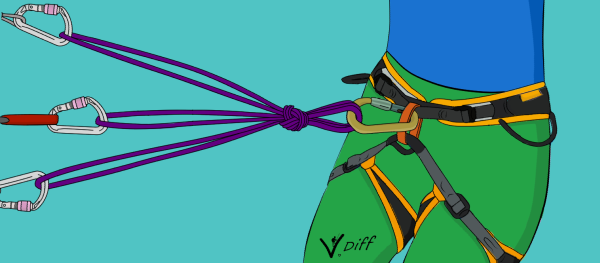
Girth hitch one end of each daisy through your harness tie-in points, or your belay loop. Going through your tie-in points means you can get closer to each aid placement, but it cinches your waist belt and leg loops together.

Going through the belay loop puts you further away but can be more comfortable. Try it both ways to see which suits you.

daisy chains climbing

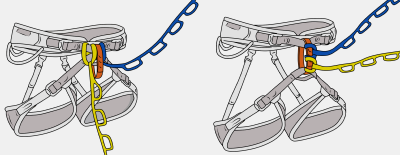
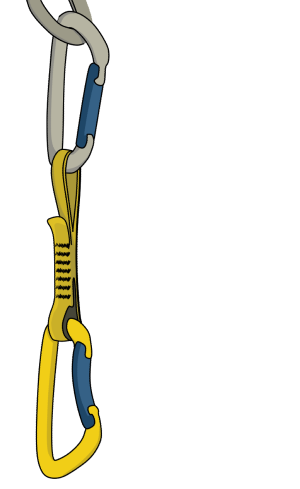
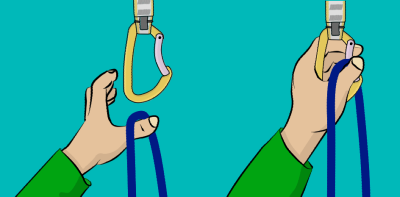
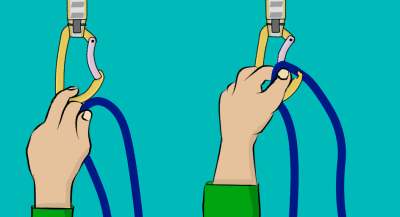
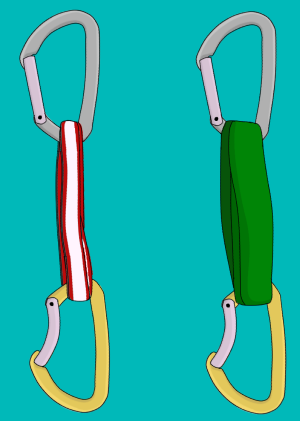
Clip the other end of your daisies to your aiders with a carabiner.

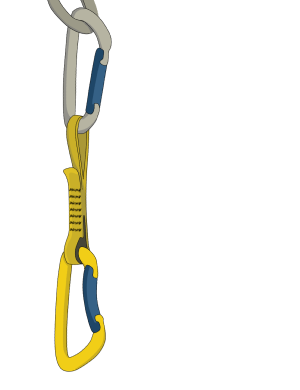
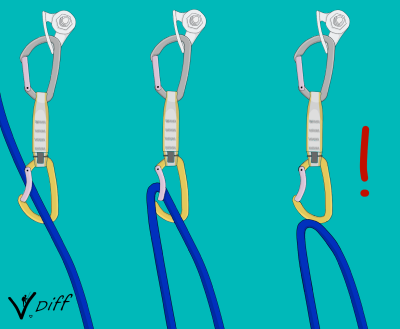
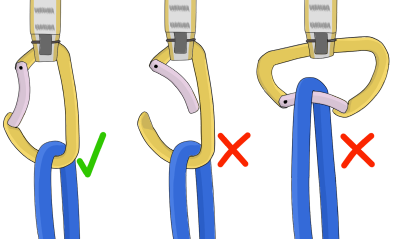
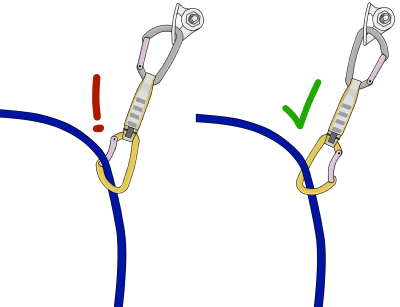
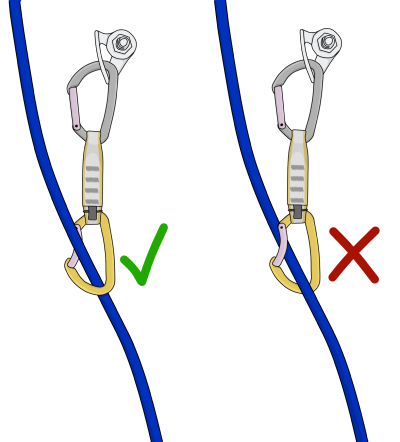
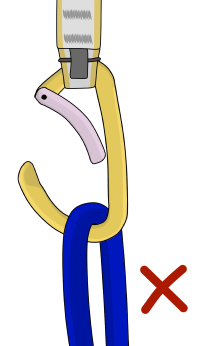
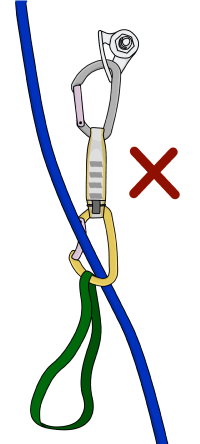
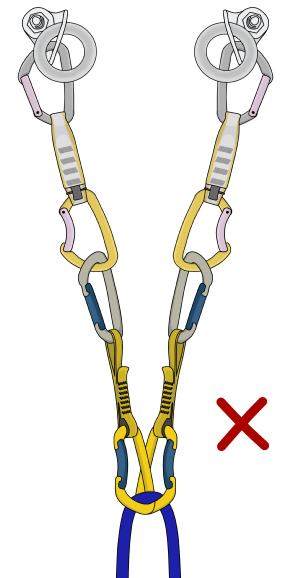
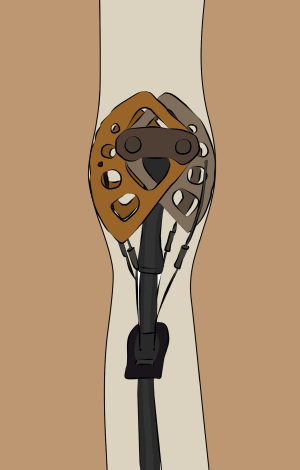
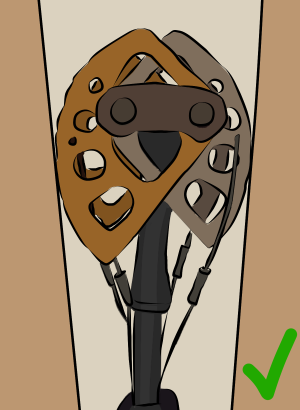
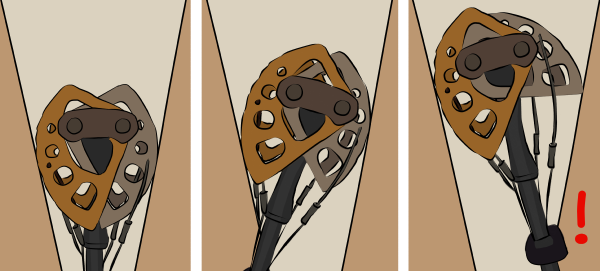
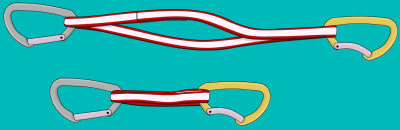
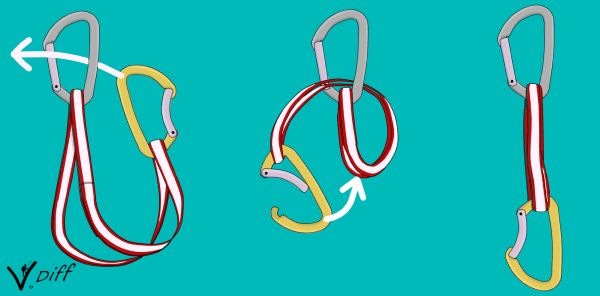
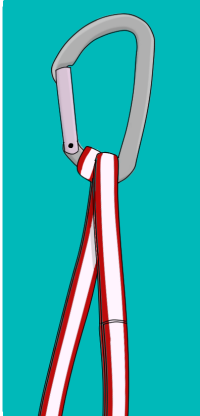
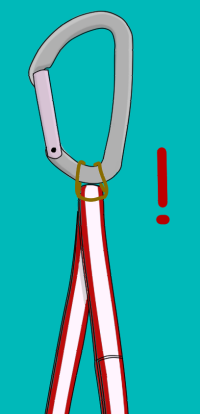
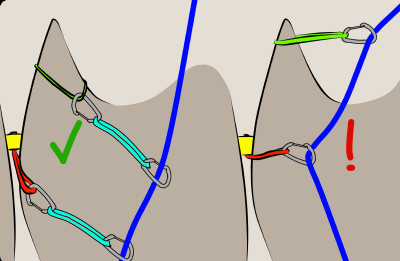
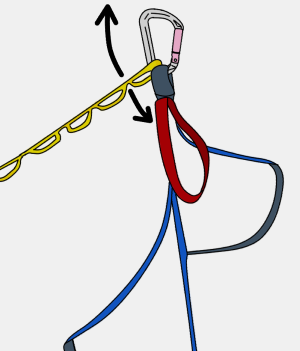
Put your aiders on the 'gate' side of the carabiner, so the daisy is free to move up the back bar when top-stepping. If your daisy is on the gate side, it could get stuck in the gate or unclip (not good!) when you top-step.

dasiy chains and aiders

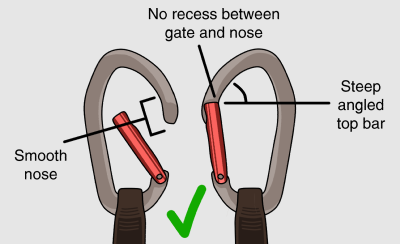
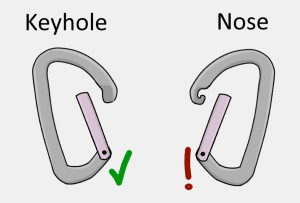
It's better to use a 'keyhole' style snapgate carabiner for your aiders/daisies, as it will be less likely to get stuck on slings and nut wires than a 'nose' style carabiner.


Step 3 – Rack Up
Fill your gear loops with enough rack to get going. You don’t need the whole rack – some things can be passed up later.

keyhole carabiner

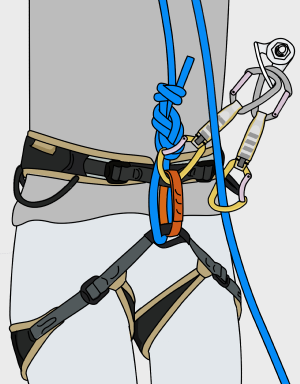
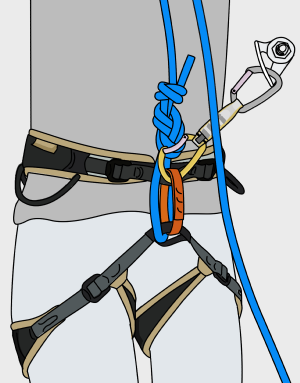
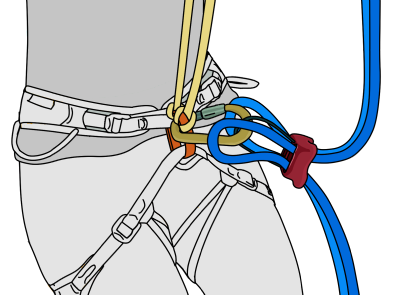
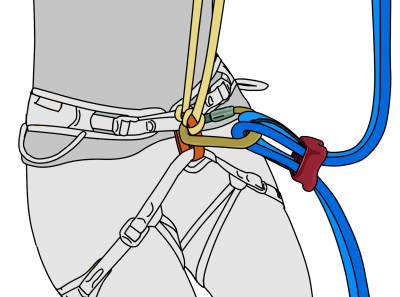
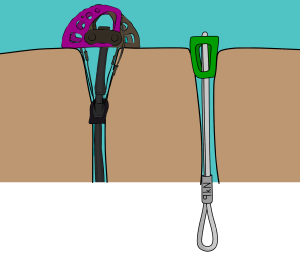
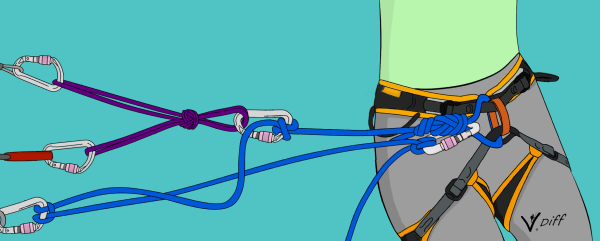
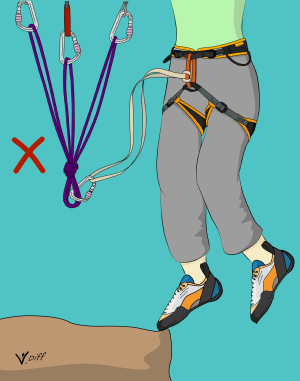
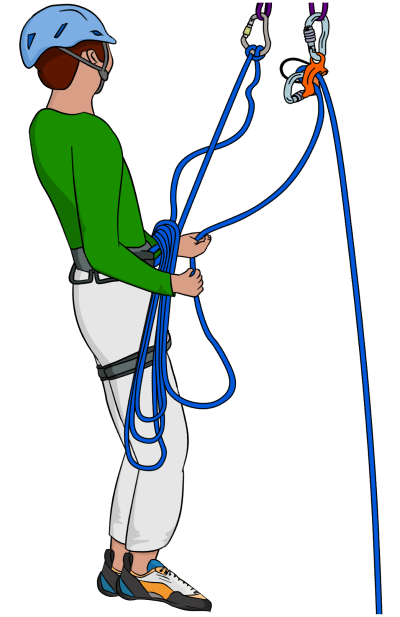
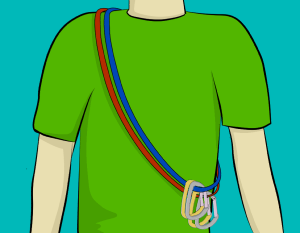
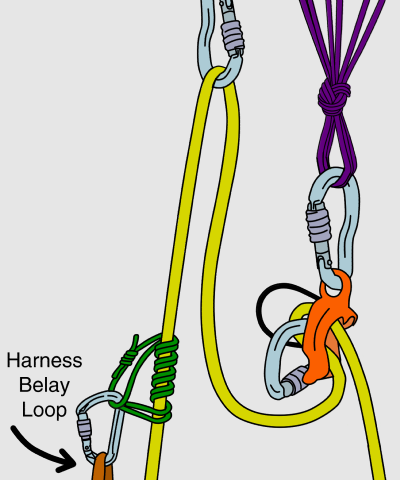
Step 4 – Attach Haul Rope
Clip the haul rope to the haul loop on the back of your harness. If you don't have a haul loop, you can make one by tying a short piece of webbing around the back of your waist belt.

Don't clip the haul rope to a gear loop – they're not strong enough.

climbing harness haul loop

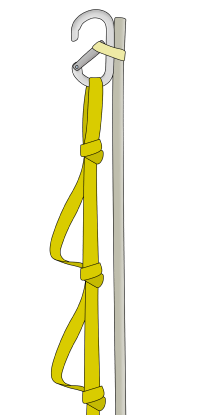
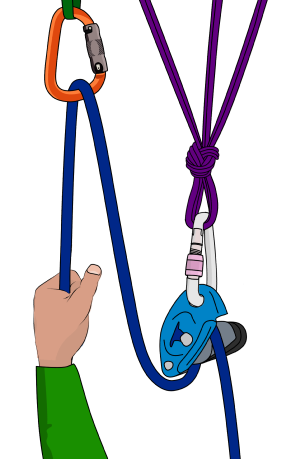
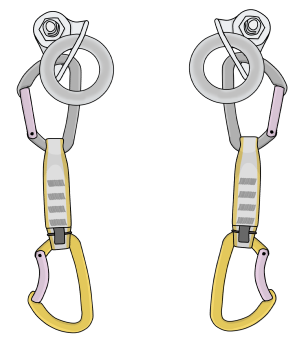
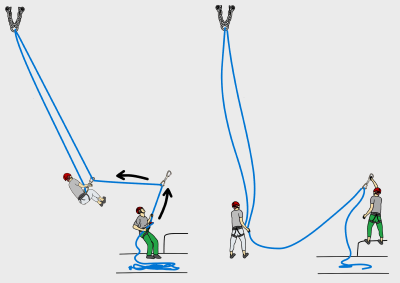
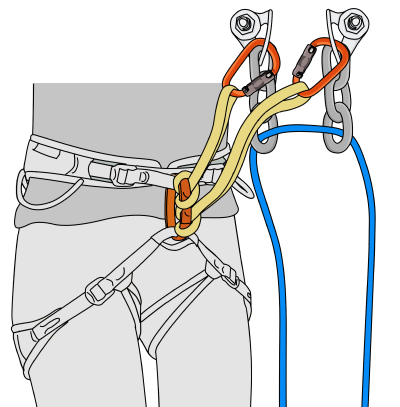
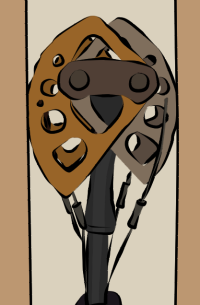
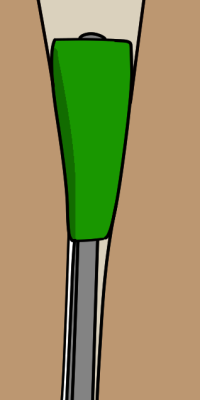
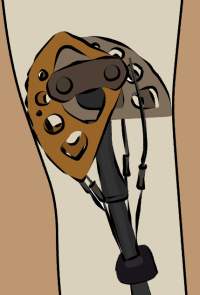
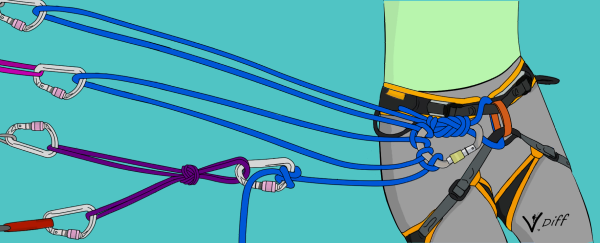
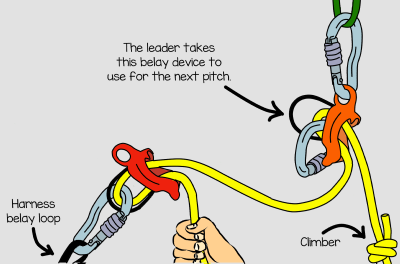
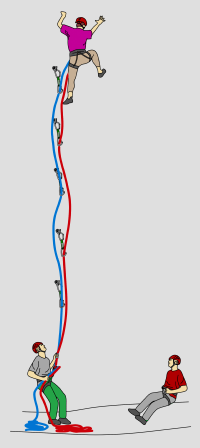
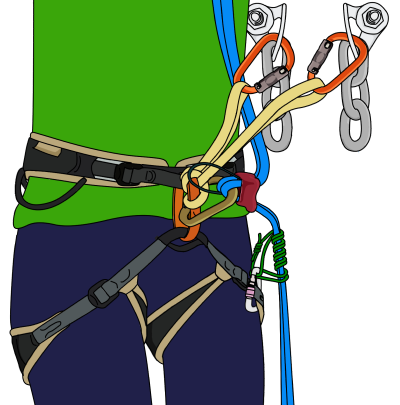
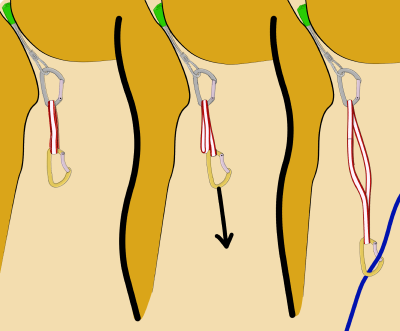
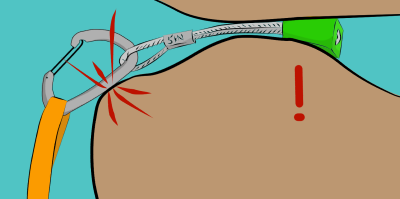
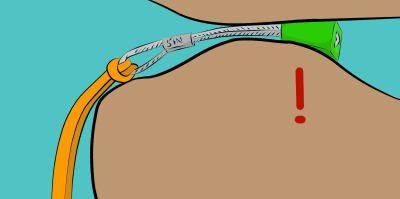
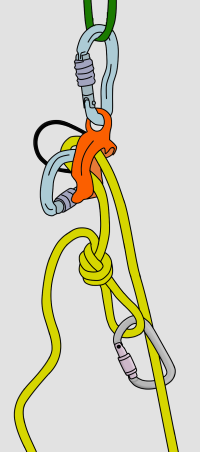
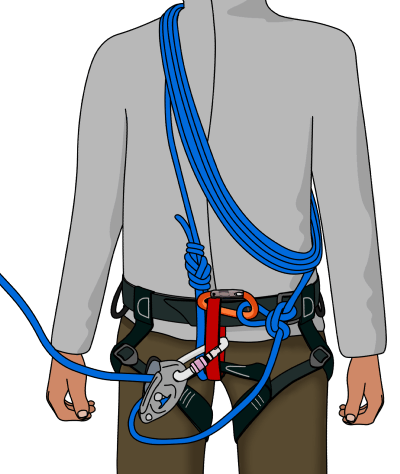
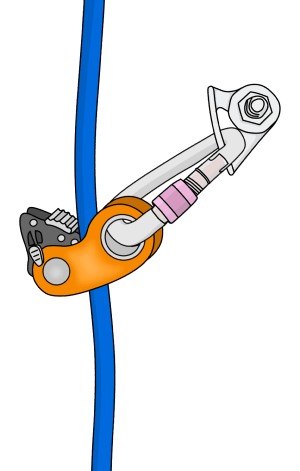
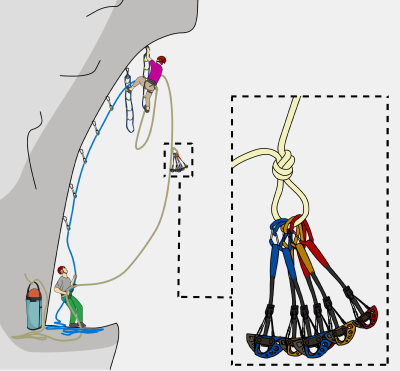
Another method is to trail the haul rope with the hauling device pre-attached as shown.

After leading a pitch, the device can be attached to the anchor before removing the rope from your harness. This means that you can’t drop either the device or the rope while setting up the haul.

harness haul loop

Step 5 – Prepare For Blast Off
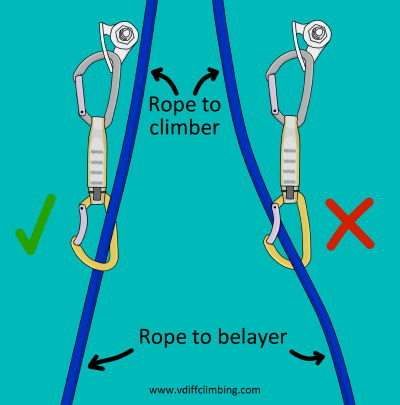
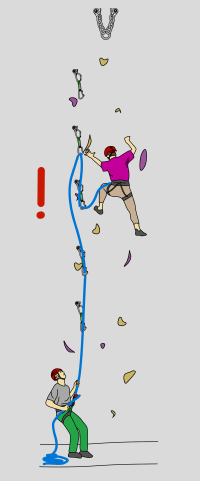
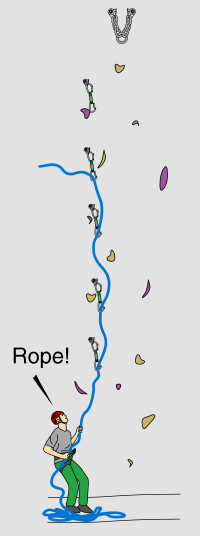
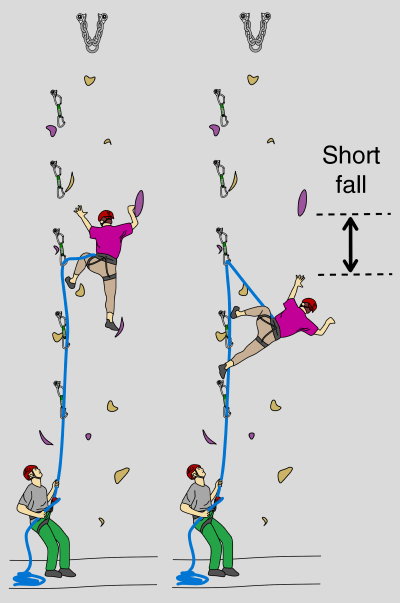
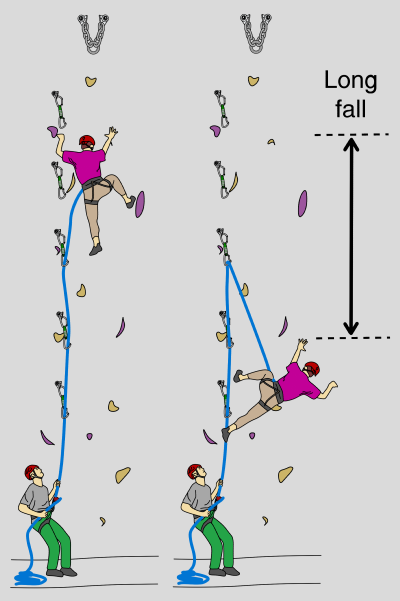
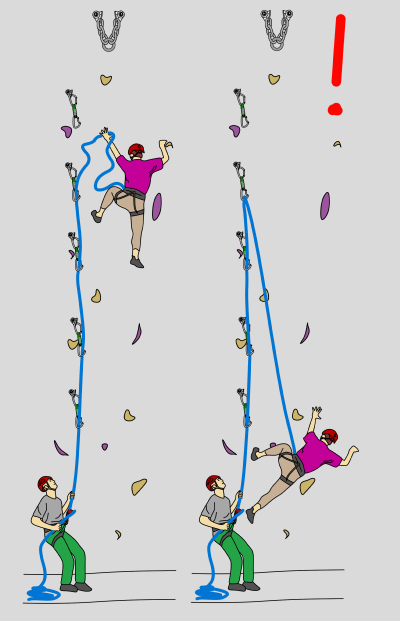
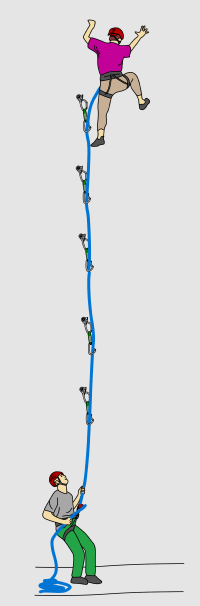
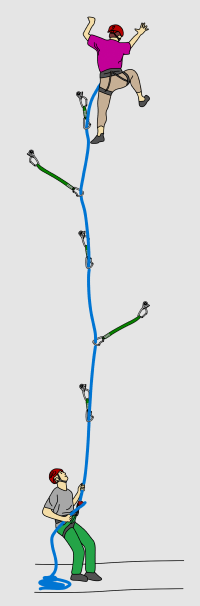
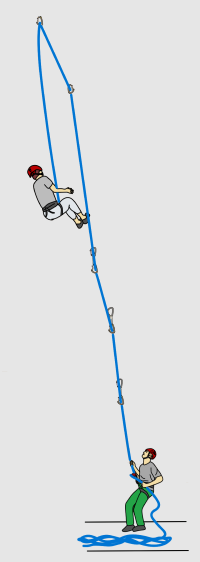
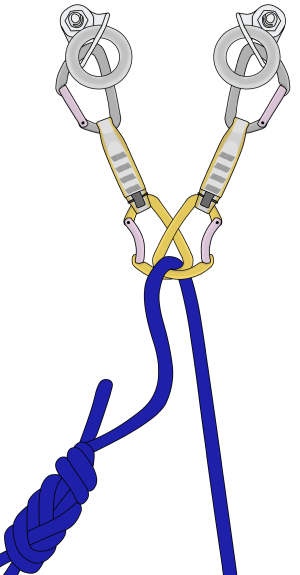
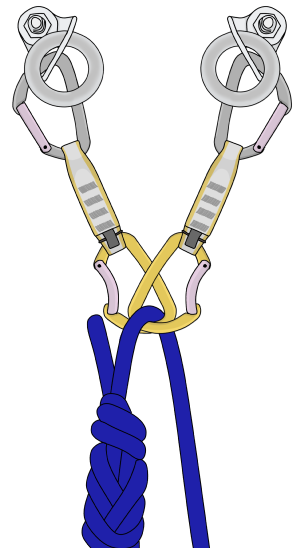
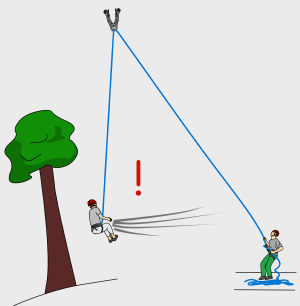
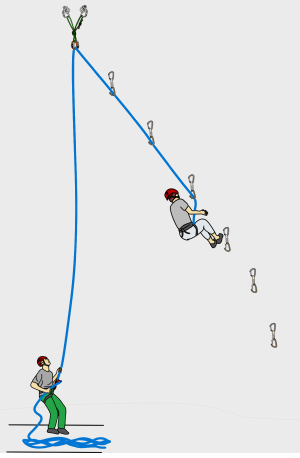
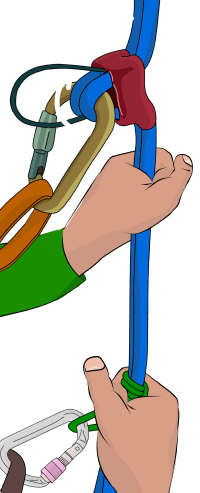
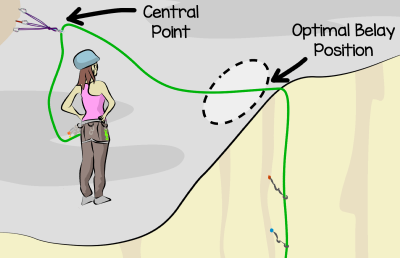
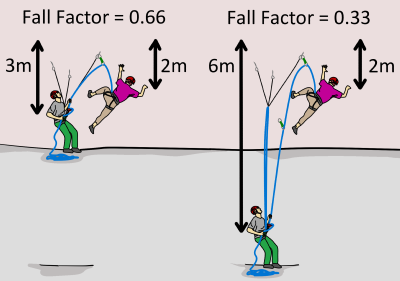
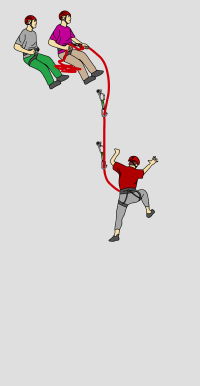
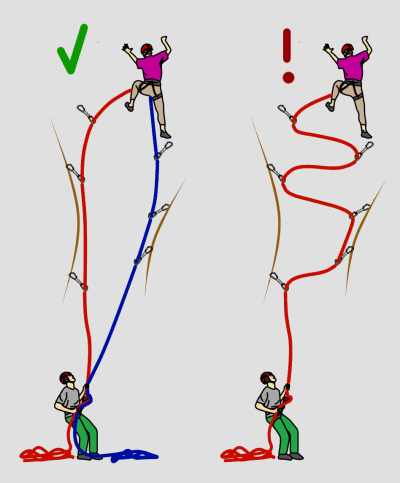
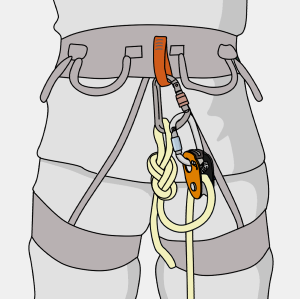
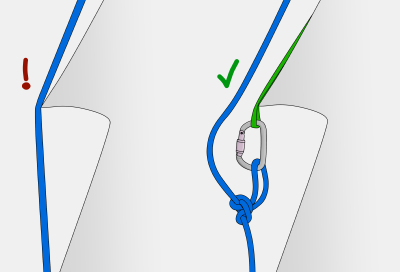
Clip the lead rope to a high point of the anchor (just like you would on a trad multi-pitch) so you won't take a factor two fall onto your belayer if you fall on the first move.

After a final safety check, remove your attachment point to the anchor itself and you are ready to go.

big wall belay

big wall aid climbing

The Basic Aid Climbing Lead System

The basic system of leading an aid pitch is:

1) Place a piece of gear
2) Test the gear
3) Transfer your weight on to it
4) Clip the rope into your previous piece of gear
5) Get as high as you can
6) Repeat

These steps are described in more detail below.

Step 1 - Place Gear

Place a piece of gear and attach yourself to it with your free aider (the one you're not standing in).

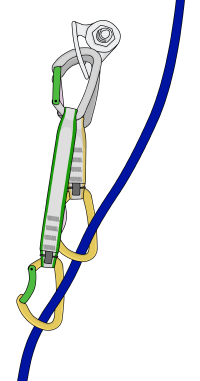
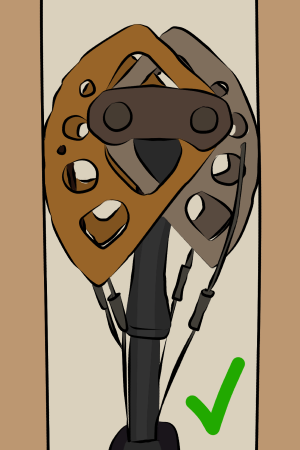
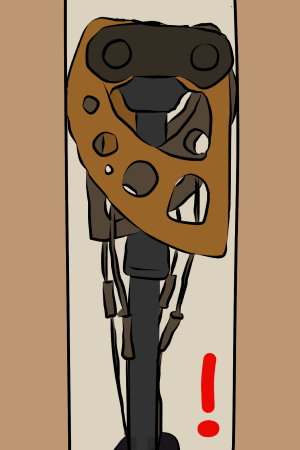
Clip as high on the piece as possible (e.g; in the plastic thumb-loop of a cam, rather than the sling). This gives you more height, meaning less moves to the top.

how to climb a big wall

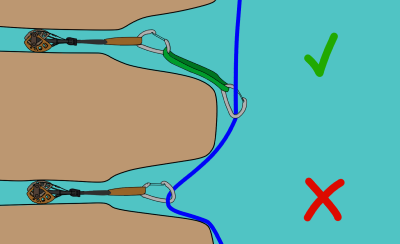
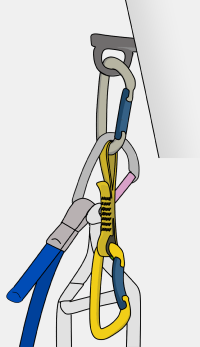
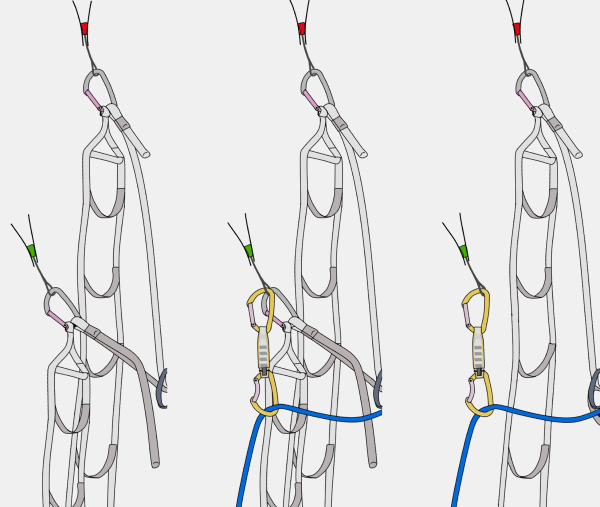
When clipping gear which only has a big enough hole for one carabiner (such as a rivet hanger or a piton), you can clip a quickdraw to it first and then clip your aider onto that.

This way you will be able to clip it as protection before removing your aider, therefore never being detached from the piece. It will, however, mean that you're a carabiner-length lower, so it may be harder to reach the next piece.
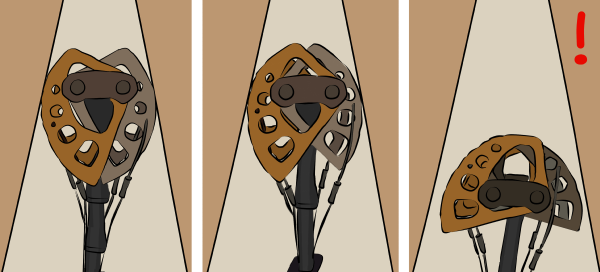
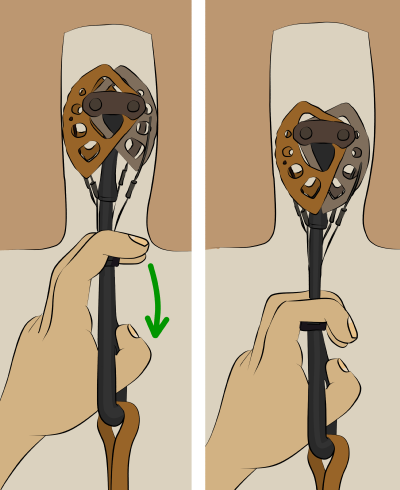
how to big wall climb

Step 2 - Test Gear

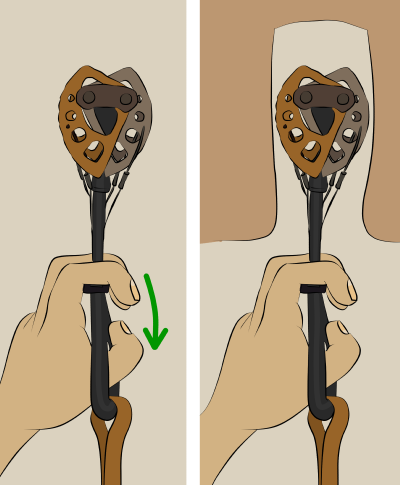
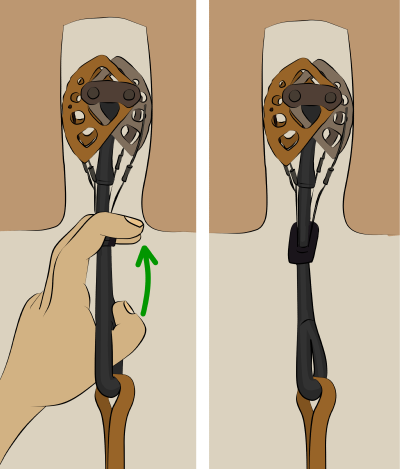
How you test gear depends on what it is and what the consequences of it failing are. A visual test may be all that is needed – if it looks bomber, just get straight on it. If you’re not sure, give it a ‘bounce test'. The point of bounce testing is to generate a little more force than your bodyweight alone. This determines whether or not the piece will continue to hold your weight while you are gently moving up your aiders and making the following move. It does not determine if the piece can withstand the higher force of a leader fall.

How you test depends on what the gear is. Burly gear (such as nuts, slings and pitons) can be bounced aggressively whereas more easily damaged or low-strength gear, (such as cams or micro nuts) should only be very gently bounced.

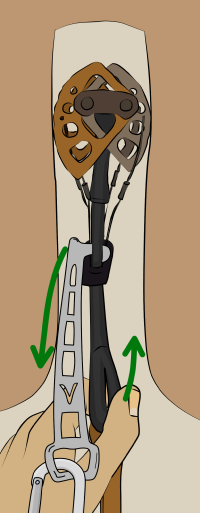
If you choose to test the piece, you should adjust your daisies so that you won't shock load your previous piece if it fails. Your position here is important. If the pieces fails, your goal is to transfer your weight as gently as possible onto your lower piece.

how to haul on a big wall

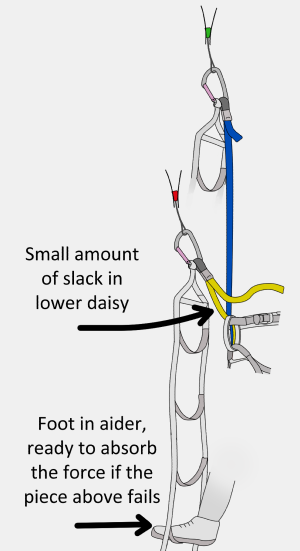
Adjust your daisies correctly, hold onto your lower daisy and leave one foot in your lower aider so you are ready to absorb the force if your top piece fails.

First, ease your weight onto the piece until it holds the majority of your body weight. Then bounce your weight on it by stamping in your top etrier with a slightly increased force each time (you could also bounce by sitting your weight onto your top daisy, but this is generally not as good). Essentially, you are shock-loading the gear. If it fails, you'll swing gently onto the lower piece, which should be strong enough to hold because you bounce tested it – right? Try not to look directly at the piece you are testing – if it fails, it'll hit you in the face!

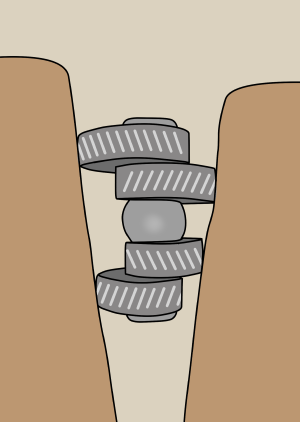
Cam hooks or skyhooks shouldn't be bounce tested, as they would be damaged over time. To test these, weight the piece, press your body away from the wall and move side-to-side. This generates a little more force than bodyweight without the harsh impact of a bounce and simulates the direction you might pull the piece when you're higher up on it.

Bounce testing is the secret to hard aid climbing. With proper technique (which takes many climbs to develop), you will be able to move up whole pitches of marginal gear relatively securely. This still doesn’t mean that anything would hold a fall, but it does mean you are much less likely to fall.

Step 3 - Commit

Once you're happy that your upper piece will at least hold your weight, it's time to commit. Shift all your weight on to the top piece.
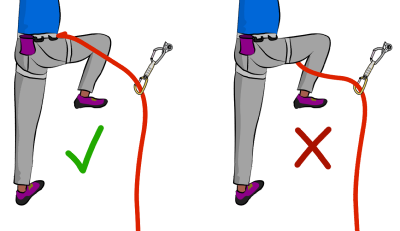
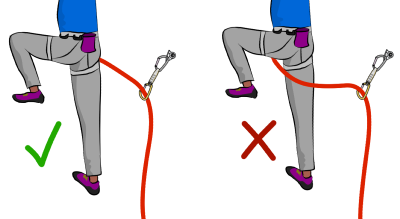
Step 4 - Reset

Reach down and clip your lead rope into your lower piece before removing your aider from it. If you're using adjustable daisies, fully extend it out at this point, then clip it to a gear loop, ready for the next placement.
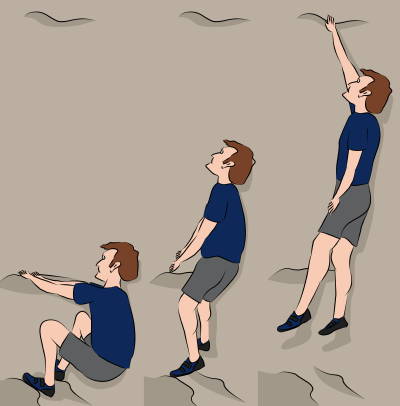
aid climbing setup

Step 5 - Get High

Getting as high on your top piece as you can means less moves to the top.

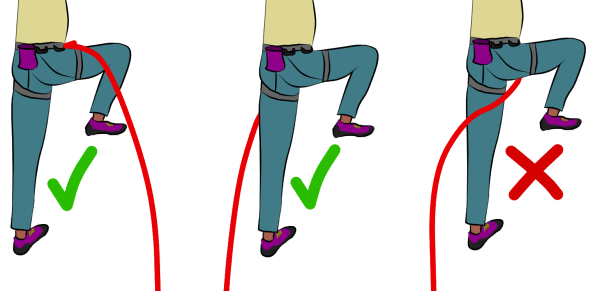
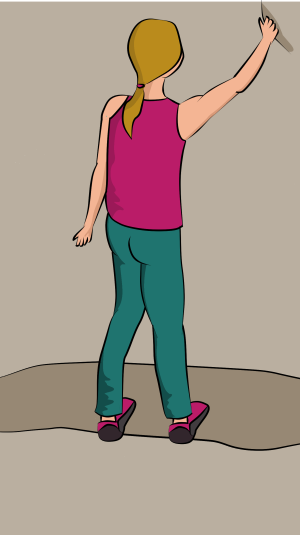
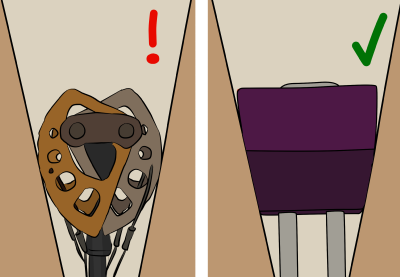
On slabby terrain, use the steps of your aider to walk upwards. With practise you should be able to stand in the top step easily. Hold onto rock features for balance if possible. As you move up, your daisy will slide up the back bar of its carabiner. Adjust your daisy tight to give you some downwards tension for balance. This also means that if you lose balance you won't fall the full length of the daisy.

Vertical or overhanging terrain is more strenuous. Move up your aiders and cinch your daisy tight to create downwards tension. By pushing down with your legs and pulling upwards with your daisy, you will create a strange feeling of opposition which provides balance.

Once you are as high up as you can get, it's time to find another placement and repeat step one.

how to go aid climbing

How To Aid Climb - Leading Overhangs and Traverses

The system for leading a roof or a traverse is very similar to the standard method. Just place a piece, reach as far sideways as you can, and place your next piece. It may be difficult to bounce test from this position – try stamping in your aider instead of weighting your daisy. Remember that the follower will have to clip from piece to piece to clean the pitch, so try not to back-clean (remove) them.

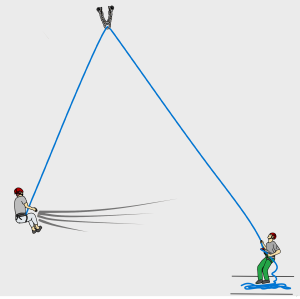
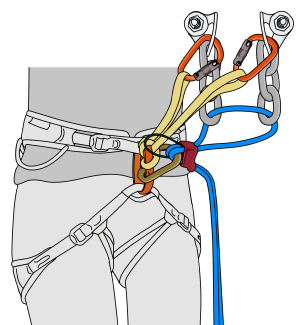
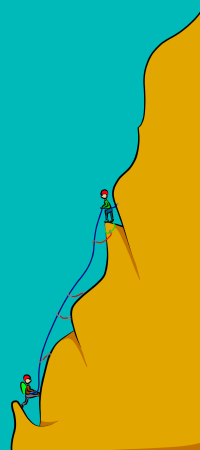
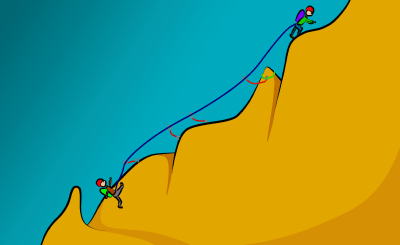
How To Aid Climb - Leading Pendulums and Tension Traverses


king swing nose

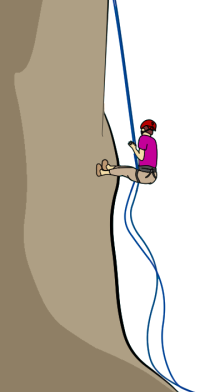
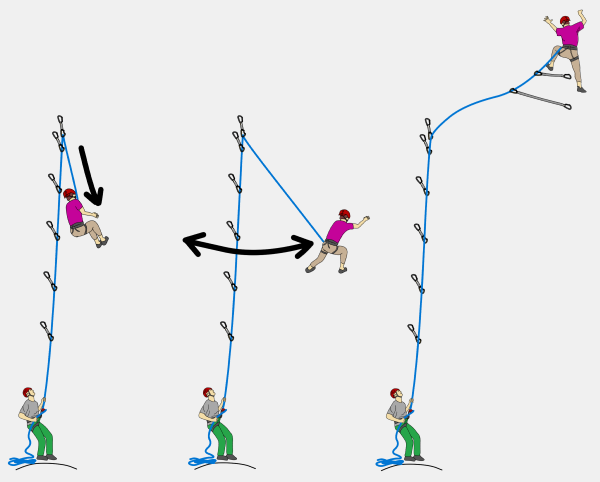
A pendulum is a great technique for moving sideways across a blank section. Essentially, you rope-swing across the blank section to features where you can begin climbing again. An alternative to swinging is to semi free climb across with some of your weight on the rope. This is known as a tension traverse.
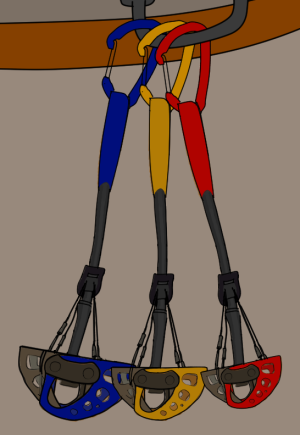
Step 1 – Clip Gear
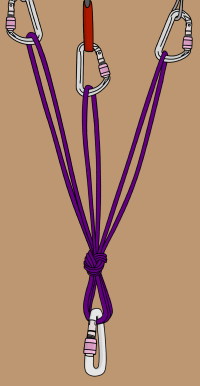
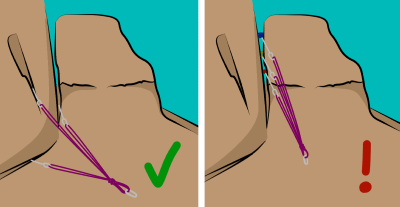
Place a piece of gear which can hold a downwards and a sideways pull (you may want to equalize a couple together). This gear should be bomber, and you probably won’t be able to retrieve it later. This is normally a bolt or rivet on popular routes. Clip your rope into the gear and ask your belayer to take you tight on the rope.

Step 2 – Lower
Get your belayer to lower you. If you plan to pendulum, you can start swinging as you are being lowered. Do this by running sideways across the wall. Communicate with your belayer so you don't get lowered too far – make sure you know where you're trying to swing to!
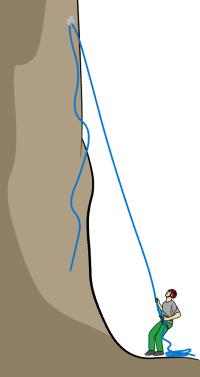
Step 3 – Swing
Keep your momentum and swing a little higher each time. Often, you'll need to grab a hold, hook an edge or clip a fixed piece at the pinnacle of your swing, so be ready for this.

Step 4 – Continue Up
Once you've stuck the pendulum, continue climbing as normal, making sure to extend the next few pieces of gear after this to reduce rope drag. Depending on the size of pendulum, difficulty of climbing and consequences of a fall, it may be better to back-clean gear until level with the pendulum point to further reduce rope drag.

how to do a swing aid climbing

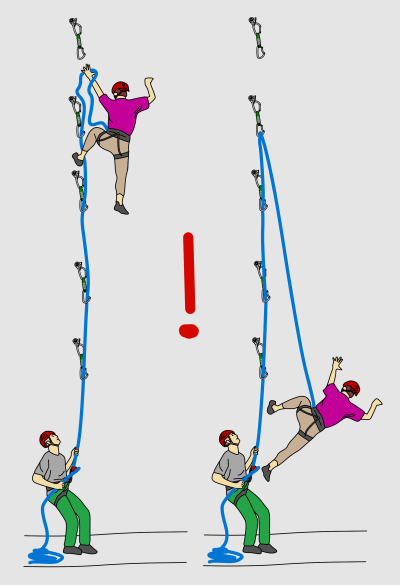
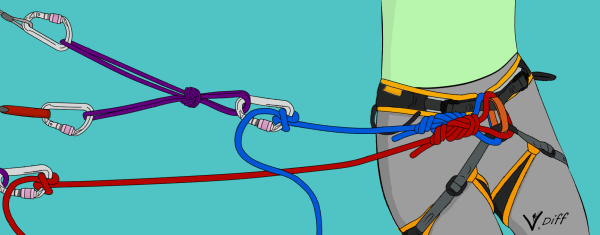
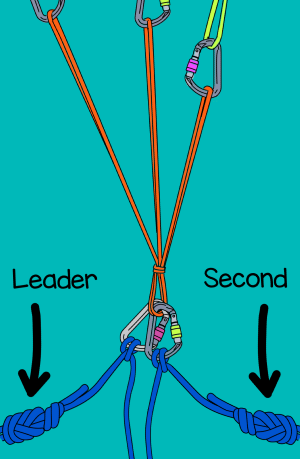
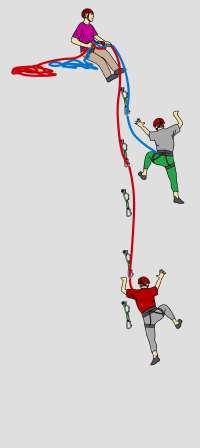
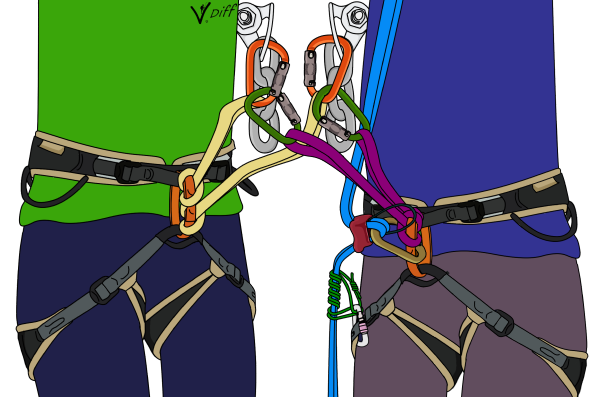
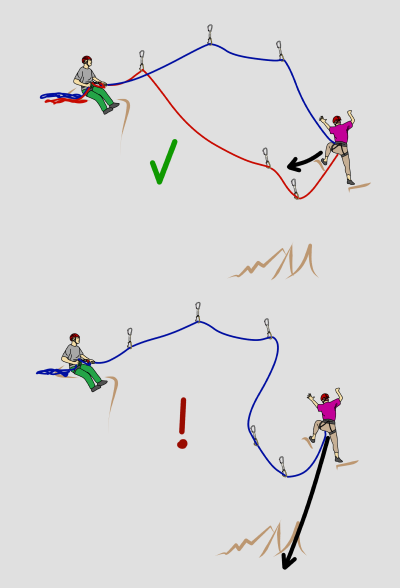
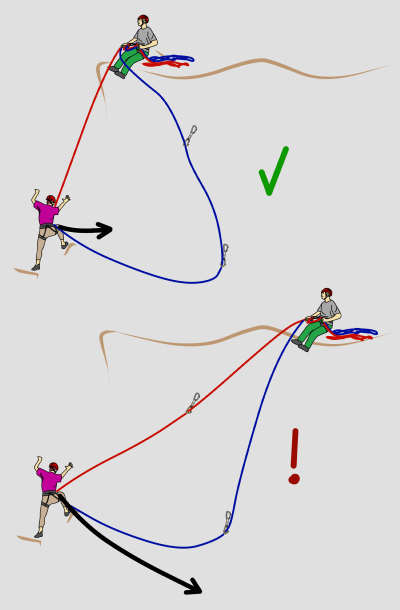
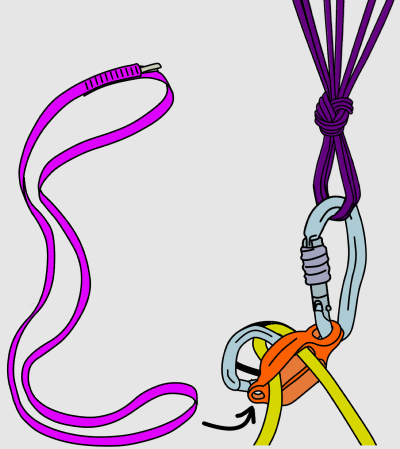
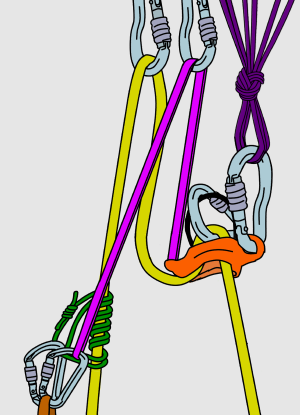
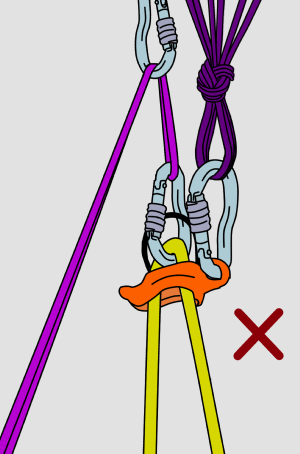
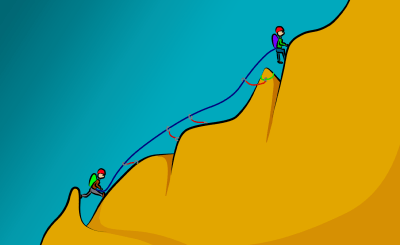
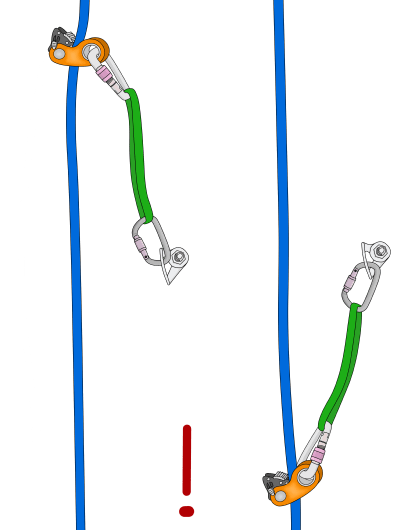
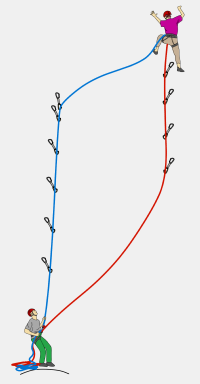
Pendulums with Two Lead Ropes
For big pendulums in the middle of a pitch, it is wise to use two lead ropes. Use one rope for clipping gear up to the pendulum point, and the other rope for gear after the pendulum.

It is recommended that the belayer uses two GriGri’s for belaying.

aid climbing pendulum

Switching Between Aid and Free Climbing

Sometimes it is necessary to switch from aid to free climbing in the middle of a pitch. To make this transition easier:

- Clip your aiders, daisies and other long tanglies away on the back of your harness so you won't trip over them in the middle of a free move.

- Attach a sling to your top piece. This will be your final foot step before you free climb.

- Ask your belayer to pass up your free climbing shoes if needed. You could also pass down your wall shoes and any other unnecessary heavy gear to your belayer.
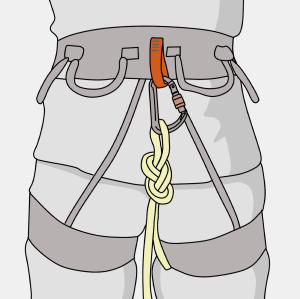
French-Free

On some pitches it may be easier to french-free. This means mostly free climbing while holding onto the occasional piece of gear to avoid difficult moves and therefore speed the climb up.

You can clip gear directly into your belay loop, or attach slings to some pieces to use as foot loops. Get your belayer to take you tight whenever you need a rest. There are no rules really – just do whatever you can to cheat your way up quickly. French-free avoids the clunkiness of a full aid setup and is great on pitches that you can mostly free.
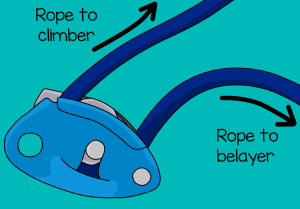
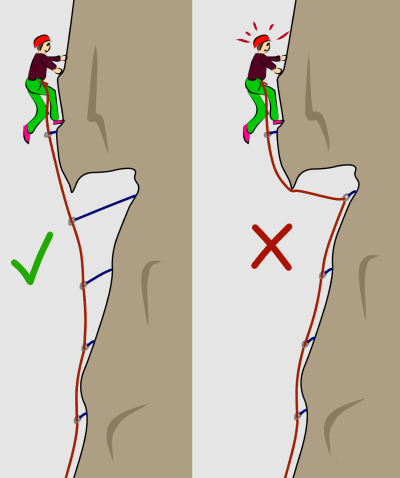
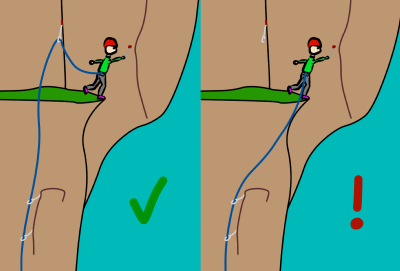
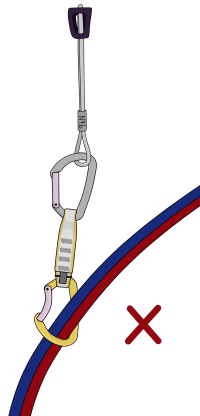
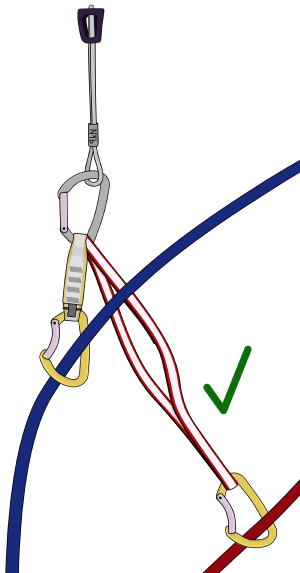
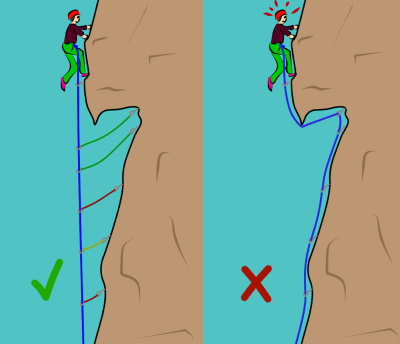
Routing the Rope

As with trad climbing, you should route your rope away from sharp edges, flakes and loose rock. Make skillful use of quickdraws and long slings to allow the rope to avoid these hazards and run in a straight line.

Remember that the rope will be taut when your partner is cleaning the pitch, which means it will cut faster on sharp edges.

Sometimes you may need to add a re-belay for pitches that end above a roof or on a ledge. Attach a sling down from the anchor so the rock abrades the sling, not the rope. Add a rope protector or duck-tape the edge too, if needed.

climbing rope on sharp rock

Back Cleaning

Sometimes, you'll need to use a piece of gear which you've already placed. Obviously, it's better to leave it there as protection, but this won't always be possible. If you remove your previous piece be aware that this can mean a big fall if your current piece fails.

A safer way is to place two or three good pieces in a row, then lower down to retrieve earlier pieces of gear. Make sure your top ones are bomber before committing to this. Once you've retrieved some gear, you can either aid back up the pieces to your high point (on top rope) or ascend the rope.

If ascending the rope, it is easier to attach your jumars to the rope which is running through the gear (rather than the rope coming straight from your harness). Retrieving gear from a traverse or overhang is more difficult. You will need to clip across your gear in reverse (known as back-aiding) to get to it, and then re-aid back up to your high point.

Passing Gear to the Leader

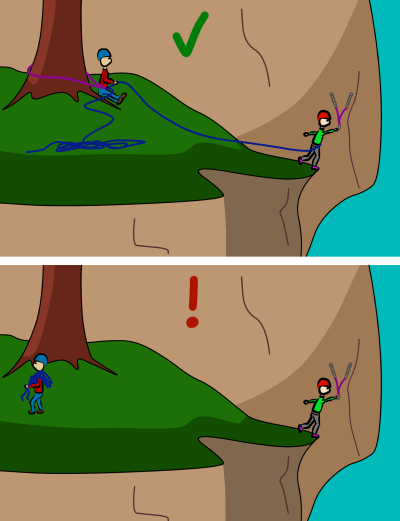
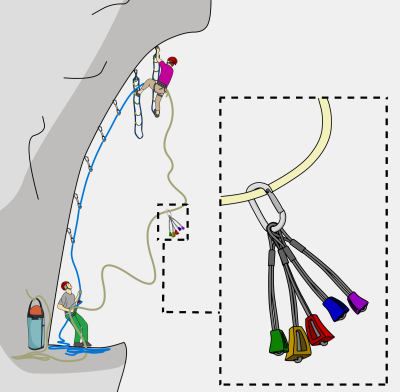
You don't need to take your entire aid rack on every pitch. If you need something from the belay, your belayer can clip it to a loop in the haul/tag rope and then you simply pull it up.

A common method is to only take enough gear to lead the first half of a pitch, then get resupplied when your rack is running low. This keeps some weight off your harness and is also useful for passing water, jackets or food on those long leads. Remember to pass the rope back once you’ve finished (if you just drop the rope, it’ll probably get stuck on faraway flakes).

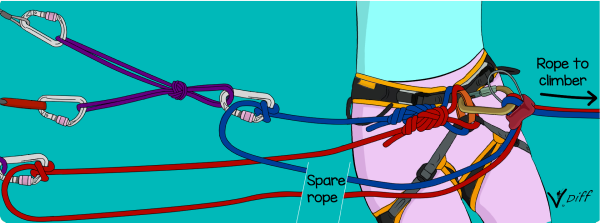
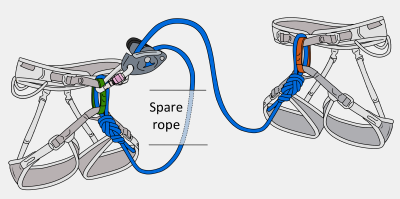
However, once you are over half of the rope length up a pitch (e.g; you are over 30 meters up the pitch with a 60 meter haul rope), the belayer will need to attach an extra rope to the end of the haul rope so they can get it back again.

A quick solution which provides a short amount of extra rope is to clip the end of the haul rope to the loop of spare lead rope. If you regularly need to pass gear late in the pitch, a much better setup is to use a tag and haul rope.

how to lead aid climbs

totem cams two lobes aid climbing

Passing Gear to the Belayer

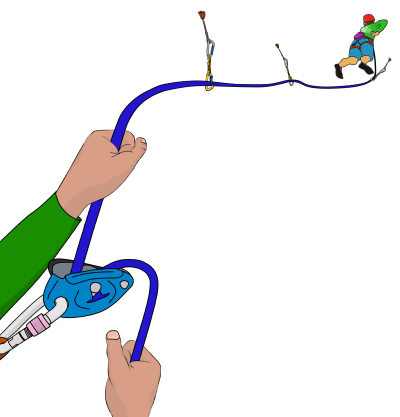
A quick way to pass gear from leader to belayer is to simply clip it to the haul rope and let it slide down.

The belayer will need to wiggle the rope to slow the item’s descent so it doesn’t slam into their face at full speed.

how to aid climb

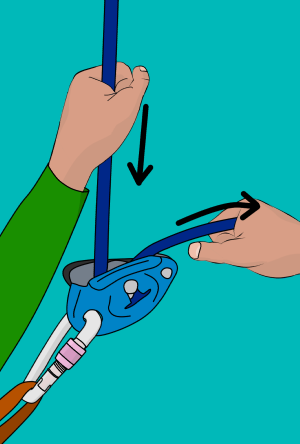
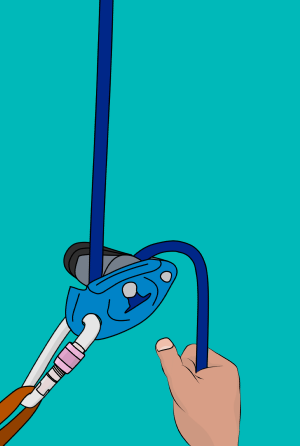
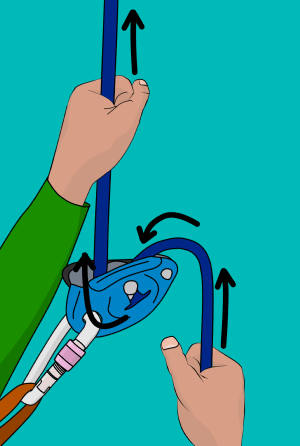
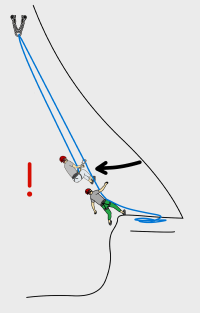
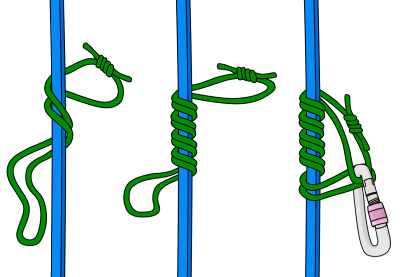
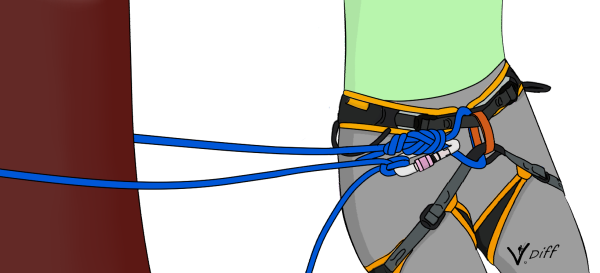
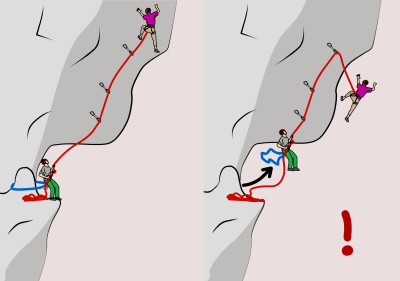
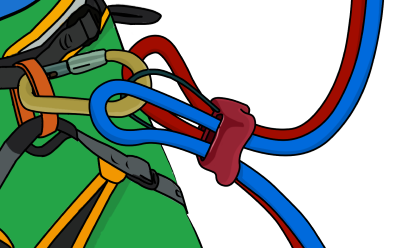
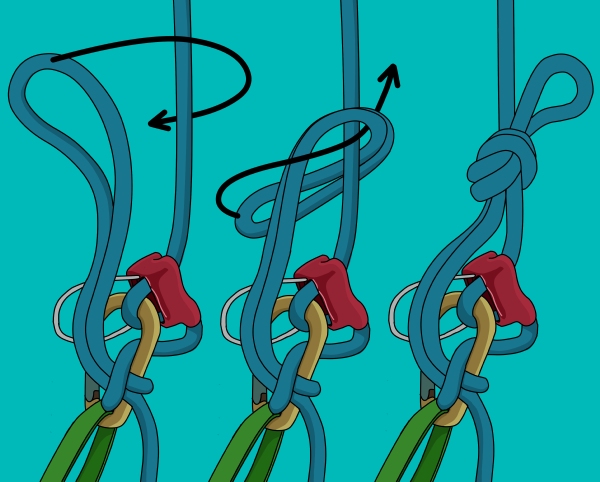
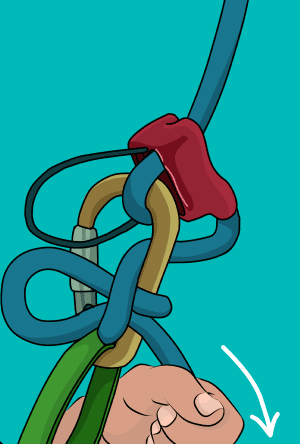
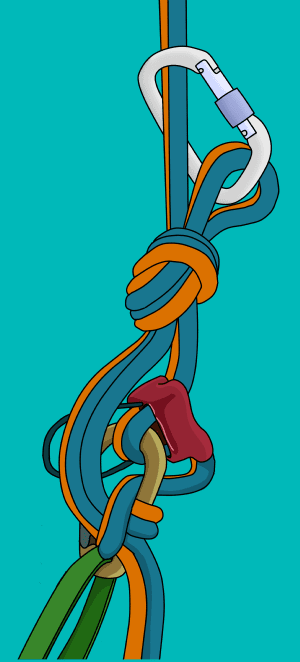
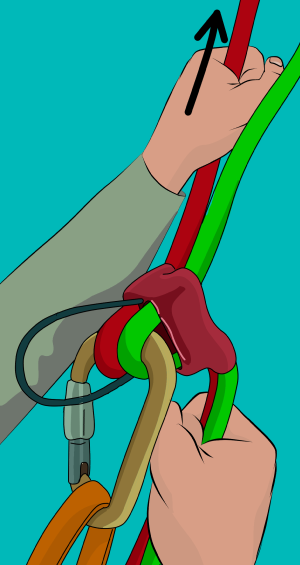
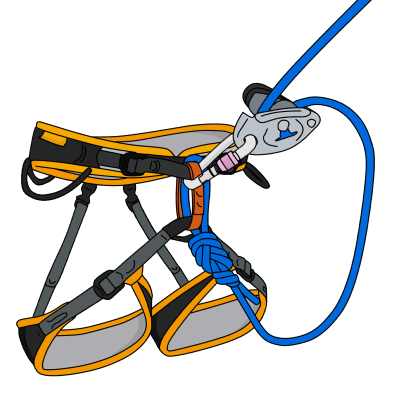
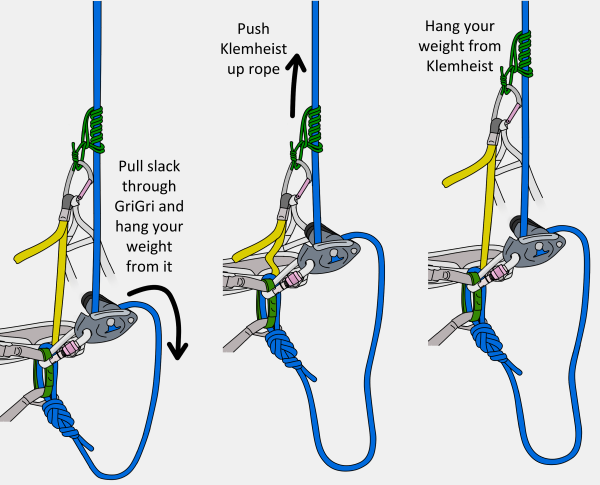
Regaining Your High Point After Falling

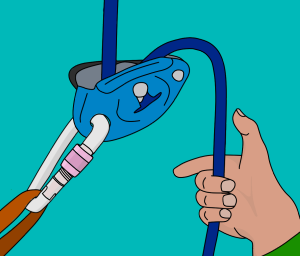
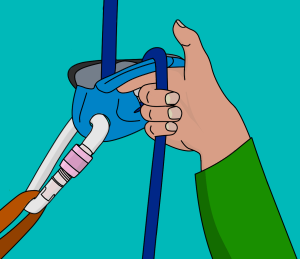
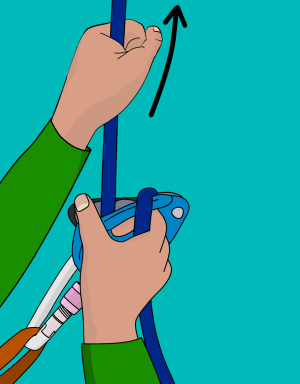
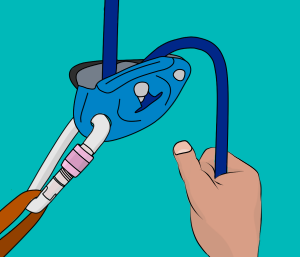
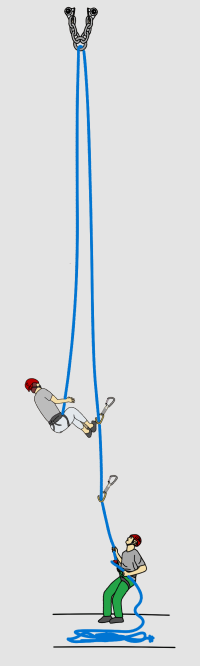
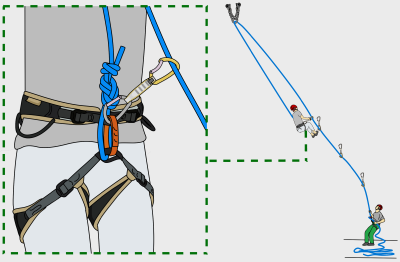
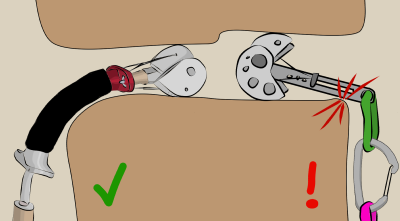
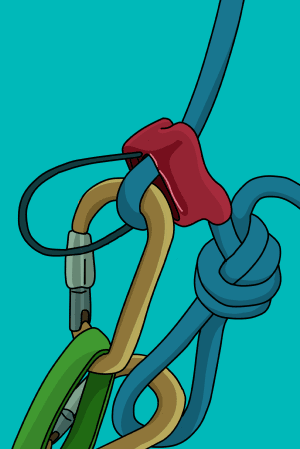
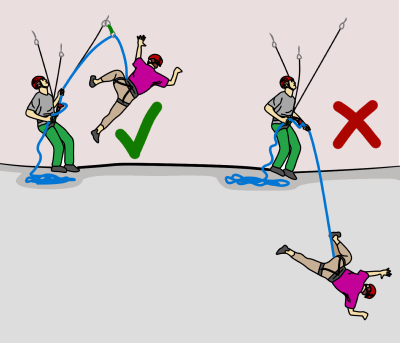
If you fall and are left dangling in space, you could jumar back up to your high point to continue the lead. But how secure is the piece that held you? If it blows while you are jumaring up, you’ll fall farther, but with the spiky toothed cams of your 5kN-rated jumars cutting into the rope – not good.

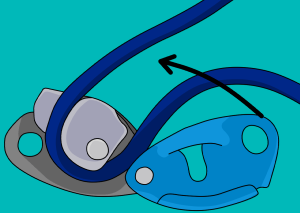
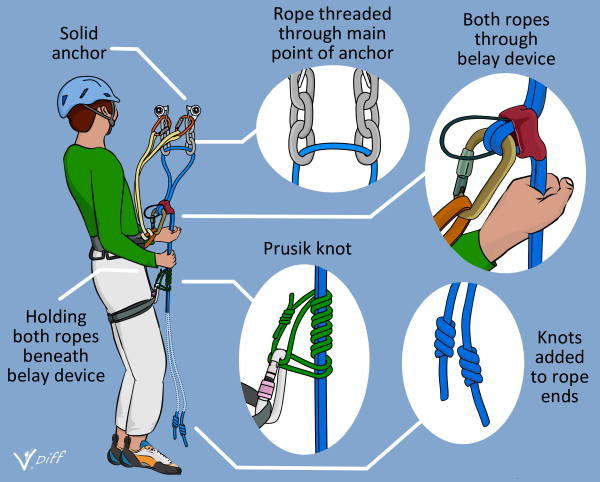
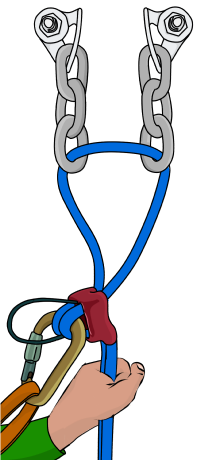
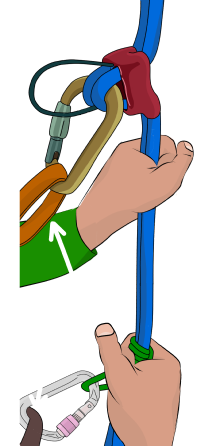
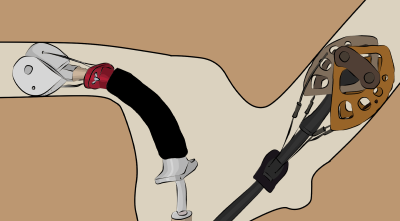
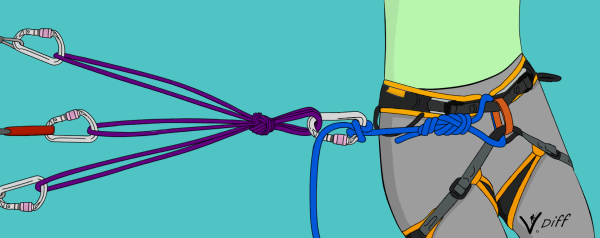
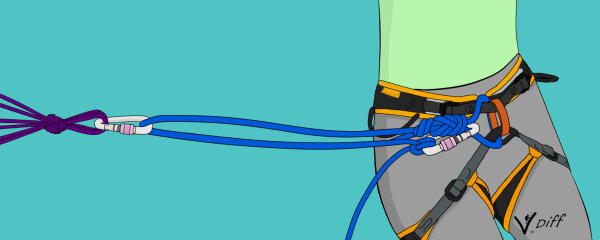
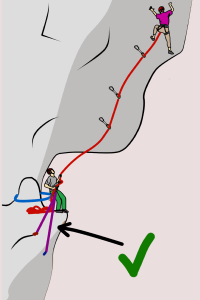
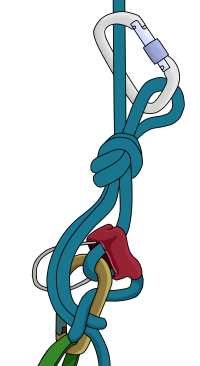
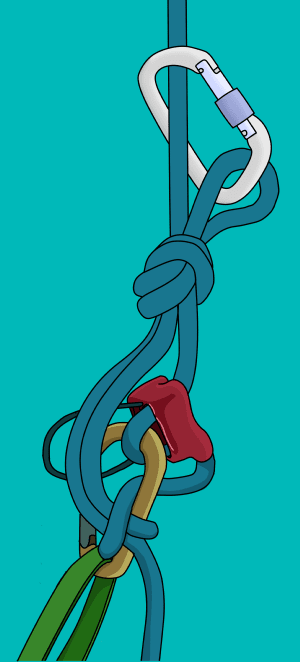
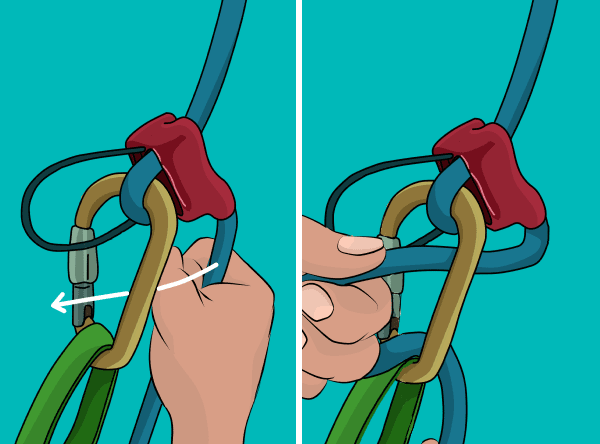
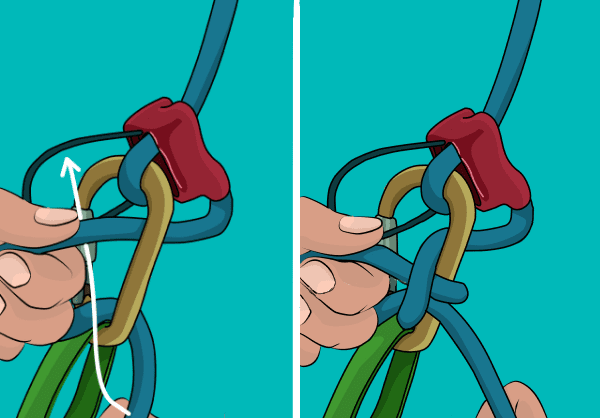
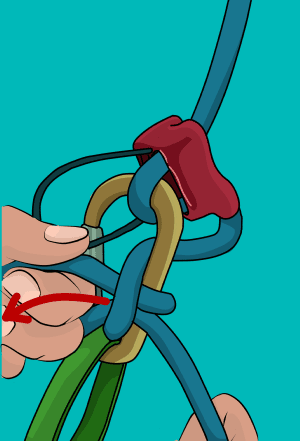
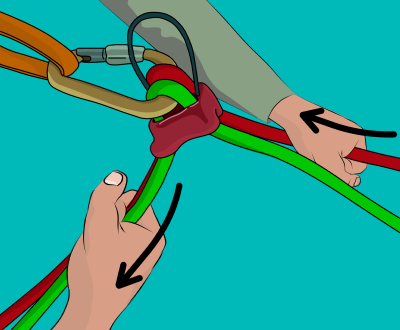
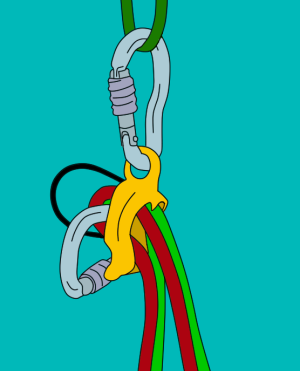
A better alternative is to ascend with a klemheist prusik and a GriGri as shown below. This way, if the piece above blows, you will fall on the GriGri and prusik instead.
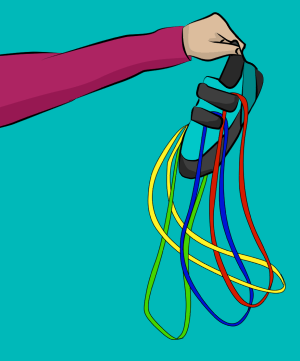
how to prusik a rope

Racking Gear

It’s better to rack gear the same as you would for trad climbing so you are already familiar with where things are, though it can be nice to spread things out on a chest harness too. It’s good to keep hooks, beaks and heads separate from nylon so they don’t stick to your slings.
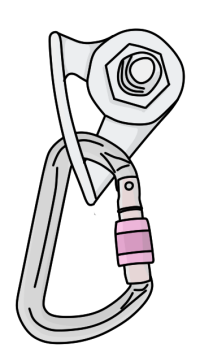
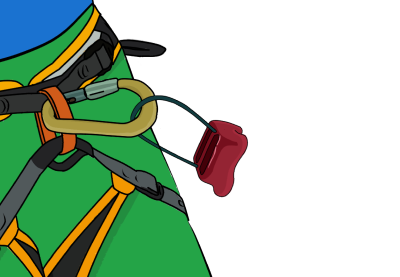
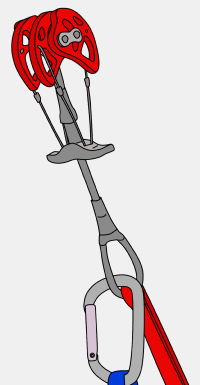
Cheater Sticks

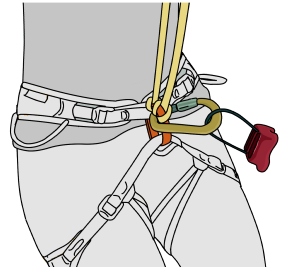
Cheater sticks allow you to bypass a difficult/impossible section by clipping a distant piece of fixed gear. Simply clip a carabiner to a long sling and tape it to some kind of stick/ avalanche probe/ portaledge fly pole as shown. Tie offset overhand knots in the sling so you can easily aid up it.

Cheater sticks are useful when abseiling down a steep wall but present problems when used on lead. First, having a cheater stick relatively handy makes it very tempting to clip past moves that you could do but are too scared to try. This prevents you from progressing at harder aid. It’s a bit like pulling on quickdraws when sport climbing, or standing on the bolt hangers. If you get into the habit of reaching for the cheat stick when things get scary, what will you do next time when there’s nothing to clip?

It’s also very difficult to test a far away piece of gear, which means you might end up falling anyway, even farther than you would have and with a giant stick in the equation.

aid climbing cheat stick

Lead Climbing: How To Lead Climb

'How To Lead Climb' is part of the book - Rock Climbing Basics: The Beginner's Guide.

VDiff learn to climb e-book book

Before you lead climb, there are 3 other things you need to do which you wouldn't do if top roping:
1) Stack the rope
2) Close the system
3) Attach quickdraws to your harness

How To Stack a Climbing Rope

You'll need to 'stack' the rope before every lead climb so that it will feed out without tangles while you're climbing.

Beginning at one end, simply feed the rope into a pile on top of your rope bag, or a clean area of the ground. The climber ties into the top end of the rope.

Stacking a climbing rope

Top Tip
If you are storing your rope for a while, or carrying it somewhere, it can be best to coil it instead.

Coiling a climbing rope

Closing the System

Tie a knot in the end of the rope. This ‘closes the system’, so it is impossible to accidentally lower your partner off the end of the rope.

The rope which the gym provides should be long enough anyway, but it’s a good habit to get into if using your own rope.

close the system rock climbing

How To Attach Quickdraws To Your Harness

Some indoor walls have quickdraws already attached to the wall, but if yours doesn't, you'll need to bring your own.

Clip half of them to the gear loops on the left side of your harness and the other half on the right side. Clipping them to your gear loops with the bolt-end carabiner will make it easier when you come to use them.

Make sure you bring enough quickdraws with you. You'll need one for each bolt, plus a couple of spares in case you drop one half way up or if a mystery bolt appears that you couldn't see from the ground.

Quickdraws on climbing harness quick draws

While you lead climb, there are 4 other things you'll need to do that you wouldn't do if top roping:
1) Clip quickdraws to bolts
2) Clip the rope into the quickdraws
3) Clip the rope into the top anchor
4) Pull the rope back down when you finish

How To Lead Climb: Clipping Quickdraws To Bolts

If the quickdraws are not already attached to the wall, you'll need to clip one on first. Simply clip the bolt end of your quickdraw to the bolt in the wall. It doesn't matter which way it faces.

Obviously, if you fall before clipping the first quickdraw, you'll land back on the ground.

Climbing quickdraw carabiners

How To Lead Climb: Clipping The Rope Into Quickdraws

The easiest way to clip a quickdraw is to place your fingers around the back bar of the carabiner, then use your thumb to flick the rope through the gate. The pressure of you pushing the rope on to it will open the gate; you don't need to open it with your fingers.

How to clip climbing rope to quickdraw

If you're clipping with your other hand, you'll need to hold the back bar with your thumb and use your fingers to flick the rope through instead.

How to clip climbing rope to quickdraw

Another way is to steady the carabiner with your middle finger and then flick the rope through with your thumb.

How to clip climbing rope to quickdraw

Warning! Back Clipping Quickdraws

The rope needs to be clipped through the quickdraw so that the end of the rope attached to you comes out of the front side of the quickdraw. If you fall, the rope will stay clipped through the carabiner.

How to back clip climbing rope to quickdraw

If you clip it the wrong way round, the rope could snap through the carabiner's gate if you fall. This would unclip the rope from the carabiner. This is known as 'back clipping'.

If you're belaying a leader, keep an eye out for them accidentally back clipping, and let them know if they have!

How to back clip climbing rope to quickdraw

VDiff climbing book

Warning! Cross-Loading Carabiners

Make sure your carabiners do not become 'cross loaded' when you climb (loaded sideways). Also make sure the carabiner's gate has snapped shut after you've clipped the rope through it. Either of these will make your carabiner much weaker.

Cross loaded carabiners

Warning! Skipping Quickdraws

You need to clip every quickdraw to stay safe.

Never miss any out.

how to clip quickdraws

Warning! Z-Clipping

You’ll end up with a z-clip if you take the rope from the beneath the last quickdraw and clip it to the one above.

Make sure to clip them all in order.

z-clip quickdraws rock climbing

How To Lead Climb: Clipping The Top Anchor

Once you get to the top of the wall, you'll need to clip the rope through the top anchor. Different walls have different systems for this – some have two snapgate carabiners, some have one or two screwgate carabiners that you'll need to unscrew first. Ask one of the staff before leading if in doubt.

Once you've clipped your rope through the top anchor, you can be lowered down in the same way as if you were top roping.

Bolted climbing anchor

Incorrect Top Anchor Setups

Clipping your rope through the same carabiners as another rope will cause the ropes to rub together when you lower down.

This will damage the ropes, making them less safe for future use.

Bolted rock climbing anchor

Only clipping half of the anchor is dangerous because you will be risking your life to a single carabiner.

Clip them both.

bad climbing anchor

Lowering Down

If you've attached your own quickdraws on the way up, you'll need to collect them on the way down.

Simply lower down, unclipping them from both the bolt and rope, and then clip them back to your gear loops. The belayer will need to stop lowering you at each bolt so you have time to do this.

Many gyms have quickdraws permanently installed, especially on overhangs. In this case, just lower down the same as for a top rope.

lower down from rock climb

Pulling the Rope Down

When you're pulling a lead rope down, shout 'rope' before it falls, so that everyone around you is expecting it – a falling rope in the head hurts!

Make sure to pull the rope through so that the falling end drops down through the clipped quickdraws – this will slow it down and make it safer.

Pulling down a climbing rope

Lead Climbing: Understanding Fall Potential

Leading for the first time can be pretty scary. Suddenly you're exposed to a much greater fall potential than on a top rope. The consequence of a fall while leading is more serious than when top roping, as you can fall much further. This increases your chances of hitting something (such as a large hold) as you fall.

If you fall while below a quickdraw you've just clipped, the fall will be similar to falling on top rope, as the rope is running through the carabiner above you.

Rock climbing fall

But if you fall when above the last quickdraw you've clipped, you'll fall below it, about the same distance as you were above it, or a little bit further (as the rope stretches to absorb the force of the fall).

Rock climbing fall

It's important not to clip quickdraws too soon. It can be tempting to pull through meters of rope to clip way above your head. But doing this means there's a lot of slack rope in the system so you'll fall a lot further if you slip while clipping.

Instead, wait until the quickdraw is between your shoulders and waist, then clip it. Not only will you not fall as far if you slip, it's also less strenuous and quicker.

Rock climbing fall

Top Tip
Try to clip from a resting position. It's much easier to clip a quickdraw while you're hanging from a big hold on a straight arm than from a tiny hold on a bent arm.

Lead Climbing: Where To Position the Rope

When lead climbing above a quickdraw, make sure the rope is running over the side of your leg. If you fall with the rope between your legs, it can flip you upside down, causing you to hit your head on the wall and get 'rope burn' behind your knees.

Rock climbing technique lead climbing

How To Belay with a GriGri

'How To Belay with a GriGri' is part of the book - Sport Climbing Basics.

VDiff learn to sport climb ebook

Belaying at the crag is more difficult than belaying indoors. Uneven ground, falling rocks, strong sunlight, wind, insects, stray children and dogs are just some of the factors which complicate the task.

Any type of belay device can be used for sport climbing, though using an assisted-braking belay device (such as the Petzl GriGri) is the most common. The GriGri functions like a car seat belt. You can pull rope through slowly without it catching, but if the rope moves through quickly (e.g. if a climber falls), a cam inside the GriGri rotates and pinches the rope. This makes it easier to hold the fall. It also requires much less effort to hold a climber while they rest for a few minutes.

GriGri's are not auto-locking; you still have to hold the brake rope at all times, just like you would with a normal belay device. This is especially true with thinner ropes, very light climbers or if there is rope-drag on the route. The GriGri can be a safe belay device, but accidents have happened due to improper use.

GriGri's are designed to work with the following rope diameters. Make sure you're using the correct rope for your device.
Other assisted-braking belay devices have different specifications. Check the manufacturer's instructions before you use them.

grigri rope diameter sizes

How To Attach a GriGri To Your Harness

Step 1
Open the device and feed the rope in as shown. (Diagrams for rope installation are engraved on the interior and exterior of a GriGri).

How to attach a grigri

Step 2
Close the GriGri.

How to use a grigri

Step 3
Clip a screwgate carabiner to your belay loop.

Clip a screwgate carabiner to your belay loop.

Step 4
Clip the GriGri to the carabiner and fasten the gate.

How to belay with a grigri top rope

GriGri Belaying: How To Take In

Simply pull rope through the GriGri as you would with a normal atc-style device, making sure to keep hold of the brake rope.

How to belay with a grigri

GriGri Belaying: How To Lock Off

If the climber falls, lock off downwards. The Grigri’s camming action will hold most or all of the weight. Pulling the brake rope down also helps the cam to engage rapidly.

How to belay with a grigri

GriGri Belaying: How To Give Slack

Giving Slack Slowly
To give slack slowly, pull rope up through the GriGri as you would with a normal atc-style device, making sure to keep hold of the brake rope.

How to belay with a grigri lead climbing

Giving Slack Quickly
If you try to feed slack through too quickly, the cam will engage and lock the device: not ideal when your partner is trying to clip a quickdraw. To avoid this happening, there is another technique you can use:

Step 1
Hold your index finger out while gripping the brake rope tightly with your other three fingers.

How to lead and top rope belay with a grigri

Step 2
Place your index finger under the lip on the side of the GriGri.

How to feed slack rope with a grigri

Step 3
Put your thumb over the back edge of the handle and push it down. This temporarily disengages the locking mechanism.

At the same time as doing this, pull out slack rope with your left hand.

How to give slack with a grigri

Step 4
As soon as you've pulled out enough rope, go back to the primary belaying position. If the climber falls when you are disengaging the locking mechanism, immediately remove your thumb and continue to hold onto the brake rope.

It's important to perform these steps quickly.

How to lead belay with a grigri

VDiff sport climbing book

GriGri Belaying: How To Lower a Climber

Lock the rope with your brake hand, and slowly pull the handle back until you feel resistance. This will disengage the locking mechanism slightly. Hold the handle at this point and slowly lower the climber, making sure to keep hold of the brake rope. To stop lowering, simply let go of the handle.

It's important not to pull the handle all the way back. This will completely disengage the locking mechanism, making it very difficult to keep control of the device.

Remember to practise these techniques well in a safe environment before you belay someone at the crag.

How to lower a climber with a grigri Gri Gri

GriGri Belaying: Common Mistake

A bad habit while giving slack is to keep the handle held down without holding the brake rope. If the climber falls when you are in this position, you will not be able to quickly lock-off the rope (or lock-off at all).

Lazy belaying can kill your partner. If you hold the handle down to give slack, even just for one second, make sure to keep hold of the brake rope and release your thumb straight away.

How not to belay with a Gri Gri

GriGri Belaying: Directly from the Anchor

You can belay directly from the anchor with an assisted-braking belay device in a similar way to the guide mode technique. This method can be very dangerous if used incorrectly (see below).

Set the device up as shown. Make sure the device is orientated so the handle is away from the rock. If the handle is pointing into the rock, it could get jammed if the climber falls. This means it will not catch the fall.

This technique is useful only when there is absolutely no chance of the handle catching on something or getting pressed into the rock, such as on an overhanging belay.

belaying directly from anchor with a grigri

To lower a climber, use a re-direct on a high point of the anchor. Failure to do this will make it extremely difficult to lower a climber in a controlled manner.

The manufacturers of assisted-braking belay devices recommend against belaying directly from the anchor due to the chance of the handle pressing on the rock in a fall.

If you are not completely certain that your anchor is suitable for this type of belaying, you should use another method instead.

Belaying in guide mode with a grigri

Climbing Technique > Movement

These articles about climbing techniques are part of the book - Sport Climbing Basics.

VDiff learn to sport climb book

Climbing is like a dance. The aim is to choreograph different types of holds and moves into one fluid movement.

It is much more efficient and enjoyable to move up fluidly, methodically and in balance. Frantic, jerky movements are clumsy and will tire you out faster. Once this becomes second nature, you will soon begin to develop your own style and move on to more advanced climbing techniques.

learn sport climbing technique

After climbing each route, review the techniques that you used. Ask yourself what worked, what didn’t and what you could do to climb the route more efficiently.

Practise makes perfect!

Climbing Techniques: Sidepull

It’s impossible to pull straight down on a vertical crimp. Instead, these types of holds are used as sidepulls.

Lean from the sidepull and use your feet to oppose the force. This counter-pressure keeps you in balance while you use your legs for upward progress. Sidepulls often give you more reach than a horizontal hold.

You can sometimes turn a sidepull into a pinch if there is a catch for your thumb. This will create more inward pulling power if you need it.

rock climbing sidepull technique

Climbing Techniques: Gaston

A gaston is the opposite of a sidepull. Push outwards on the hold with your elbow pointing away from your body.

rock climbing gaston technique

Climbing Techniques: Palming and Stemming

Palming is similar to an open grip but you use your palm instead of your fingers. You can push yourself into a corner by palming on both sides of it.

To stem, smear your feet on either side of the corner. The opposing pressure of pushing inwards keeps you in balance.

rock climbing stemming technique

Climbing Techniques: Underclings

Underclinging relies on the counter-pressure between your hand pulling out from the hold and your feet pressing onto the rock.

This technique is often used to keep a climber in balance while searching for a better hold above.

On consecutive undercling moves, such as traversing under a flake, try to use footholds as much as possible and keep your arms straight. This takes the strain off your arms.

rock climbing undercling technique

Climbing Techniques: Mantling

Mantling is the technique of surmounting a ledge when there are no holds above it to help with this (imagine getting out of a swimming pool without using the stairs). The following is a common mantling method, though many variations exist.

Step 1 - Step High
A high, well-placed foot is the foundation of the mantle. With your hands on the ledge, walk your feet up to the highest possible foothold. You may even be able to heel hook the ledge.

rock climbing mantling technique

Step 2 - Pull and Press
Pull up and switch your hands to a palm down press. Search above the ledge for any hand holds. Leaning forward and pulling yourself in with one hand makes the next step easier.

rock climbing mantle technique

Step 3 - Foot Up
If your foot isn’t already on the ledge, you can probably put it there now.

You may have to shuffle your hands to make space for your foot.

mantle rock climbing techniques

Step 4 - Rock Over
Shift the weight onto your high foot and stand up.

Try to avoid using the knee, as this will make it more difficult to stand up.

mantling rock climbing techniques

VDiff sport climbing book

Climbing Technique: Dynamic Moves

‘Dynos’ are probably the most spectacular climbing move. It is a way of using momentum to reach between distant hand holds.It is almost always more efficient to move statically between holds, but if a hold is too far away, a dyno may be the best way.

Get your feet up high and focus on the hold. Push up with your legs and pull with your arms. Move your hand quickly towards the hold. Grab onto the hold when your body reaches its apex.

A dyno is much easier if you can keep your feet on the footholds. This way, most of your weight is still on your feet when you grab the hold.

The disadvantage of dynoing is that you cannot be sure how good the hold is until you’ve committed. And committing is the most important part of the dyno. If you make a half-hearted attempt, you’ll be unlikely to stick the hold.

rock climbing dyno technique

Climbing Technique: Core Strength

Your core is the area between your lower chest and your mid-thighs. Engaging the core while climbing keeps you in control.

Without a tight core, you are likely to ‘sag’ beneath your arms, causing you to lean out from the rock, butt first.

Think of your core as something which dictates the movements of your arms, rather than something which you are simply dragging up the crag.

Climbing Technique: Slab Climbing

Climbing slabs (rock which is less than vertical) requires less strength and more balance than steeper angles of rock.

Your body should remain in the same upright position as when you’re walking. With gravity forcing the weight onto your shoes, you have more friction on the rock. Essentially, you will hold onto features for balance while pushing up with your legs.

easy sport climbing

Friction slabs are generally devoid of any positive features to crimp or edge on. To climb a friction slab, you must rely on the surface contact beneath your palms and feet. Small steps are generally more efficient. High steps tend to disrupt the delicate balance needed to stop you from sliding off.

On sustained slab climbs, where most of your weight is on your feet, it’s common to get ‘calf pump’ or ‘disco leg’. Make use of any good footholds by standing with your heel on the hold and your leg straight, so that your center of gravity is over your heel.

Climbing Technique: Vertical Rock

It is invariably more strenuous on the arms to climb a vertical rock than it is to climb a slab of the same grade.

It’s much more efficient to keep the weight off your arms as much as you can. This is done by pushing your hips and chest close to the wall and by using the minimum amount of energy to complete each move as possible. Remember that your feet provide the upwards thrust, while your hands primarily pull you into the rock.

learn sport climbing

Keep your hips perpendicular to the rock by standing on the inside edge of one foot and the outside edge of another. This is known as back-stepping. It allows you to use footholds on either side of your body with either foot.

Take advantage of any rests. Opposing your feet against each other across a corner (stemming) allows you to keep the weight off your arms. If you can’t get a two-hands rest, then alternately shake out your arms when you find a good handhold.

It’s often better to do a series of small moves, instead of a long one. Being stretched out tends to disrupt your balance and often makes the next move more strenuous.

Climbing Technique: Overhanging Routes

To climb efficiently on overhanging rock, you need to keep your hips close to the rock and your arms straight whenever possible. Bent arms will tire out much faster.

One way to do this is to use the dropknee. Place the outside edge of your shoe on a hold and twist your knee downward. Be careful though, dropknees put a lot of tension on the ligaments in your knee.

how to sport climb

As with other angles of rock, it is more efficient to pull yourself into the rock with your arms and push yourself up with your legs. This is much more physically demanding on steep routes, but even the poorest footholds will help ease the strain on your arms and give you something to push from.

Sport Climbing – Lead Skills

This 'Lead Climbing' article is part of the book - Sport Climbing Basics.

VDiff sport climbing book

Lead climbing a sport route is similar to lead climbing at the indoor wall, but with a few more factors to consider.

Quickdraw Ends

Quickdraws have a bolt-end carabiner and a rope-end carabiner.

The rope-end carabiner usually has a curved gate and is 'held in' with an elastic or rubber loop.

It's important not to get these two carabiners mixed up. The sharp edges of bolts can notch the bolt-end carabiner, which will damage your rope if you swap them over.

We recommend using quickdraws with different coloured carabiners so it is easy to identify them.

Leading climbing a sport route quickdraws

Clipping the Rope into Quickdraws

The easiest way to clip a quickdraw is to place your fingers around the back bar of the carabiner, then use your thumb to flick the rope through the gate.

The pressure of you pushing the rope on to it will open the gate; you don't need to open it with your fingers.

Clipping rope to quickdraw carabiner

If you're clipping with your other hand, you'll need to hold the back bar with your thumb and use your fingers to flick the rope through instead.

Clipping rope to quickdraw lead climbing

Another way is to steady the carabiner with your middle finger and then flick the rope through with your thumb.

Make sure you're comfortable clipping quickdraws with both hands, in either direction.

Clipping rope to carabiner

Reducing Rope Drag when Lead Climbing

You should use the correct length of quickdraw on each bolt so your rope runs as straight as possible without creating unnecessary fall potential.

If the bolts are in a fairly straight line, use short draws to limit your fall potential.

Leading a sport climb

If the route wanders a little, use longer draws on the bolts which are furthest from the center line. This keeps your rope running straight and therefore reduces rope drag.

Leading a sport climb

If a bolt is far to one side or underneath a roof, use an extendable quickdraw.

Leading a sport climb

When To Clip

Try to clip from a resting position. It's much easier to clip a quickdraw while you're hanging from a big hold on a straight arm than hanging from a tiny hold on a bent arm.

It can be tempting to pull through meters of rope to clip way above your head. But doing this means there's a lot of slack rope in the system- you'll fall a lot further if you slip while clipping.

It is often safer to do one more move and then make the clip.

Leading a sport climb

Rope Position

When lead climbing above a quickdraw, make sure the rope is running to the side of your legs.

Sport climbing rope around leg

If you fall with the rope around your leg, it can flip you upside down, causing you to hit your head on the wall and get 'rope burn' behind your knee.

Climbing rope around leg

VDiff sport climbing book

Quickdraw Orientation

If you will be traversing far to the left after clipping a draw, it’s better to orientate it so the rope-end gate faces right, and vice versa.

If the gate faces in the same direction as you, there is a greater (but still very small) chance of the gate opening in a fall.

Sport climbing quickdraw direction

Back Clipping

The rope needs to be clipped through the quickdraw so that the end of the rope attached to you comes out of the front side of the quickdraw. If you fall, the rope will stay clipped through the carabiner.

Sport climbing quickdraw backclip

If you clip it the wrong way round, the rope could snap through the carabiner's gate if you fall when lead climbing. This would unclip the rope from the carabiner. This is known as 'back clipping'.

If you're belaying a leader, keep an eye out for them accidentally back clipping, and let them know if they have!

Back clip climbing quickdraw backclip

Cross-Loading

A carabiner is ‘cross-loaded’ when it is loaded sideways. This makes the carabiner much weaker, meaning that it could break during a fall.

A common cross-loading situation is when the rope-end carabiner moves out of position. The rubber attachment is designed to stop this – check your draws to make sure the rubber is still intact.

Cross-Loading carabiners

Carabiners can also be cross-loaded over an edge of rock. Use a longer quickdraw to avoid this.

Cross-Loading carabiners over rock

Hooking Up

Hooking-up is when the square edge of a bolt hanger gets caught in the hook of a carabiner’s nose or the recess between the gate and the nose.

A hooked-up carabiner is extremely weak and could break during a fall.

hooked up carabiners

A carabiner with a hooked nose design, a shallow angled top bar or a recess between the gate and nose is more likely to get stuck in this orientation.

sport climbing carabiners

Check you have clipped each bolt correctly and avoid using carabiners with these features.

carabiners for sport climbing

Sticky Gates

Make sure the carabiner's gate has snapped shut after you've clipped the rope through it. If it stays open, the carabiner is just as weak as if it was cross-loaded.

This can happen if the gate is resting against a rock edge. Use a longer quickdraw.

Open carabiner

Stick Clipping

If there are hard moves with a bad landing before the first bolt, consider using a ‘stick clip’ to clip the first bolt.

Stick clipping climbing

Double Up

If clipping a critical bolt (e.g: when accidental unclipping would result in serious injury), it’s a good idea to clip two draws into the bolt, if they’ll fit.

Clip the longer draw on top so it won’t be loaded unless something goes wrong with the other one.

Alternatively, you could have a dedicated ‘critical’ quickdraw which has screwgates on either end.

Two quickdraws one bolt

Lead Climbing Runout Routes

Sport climbs are not always bolted as well as gym routes. Outside, bolts tend to be less evenly spaced, and further apart.

Unfortunately for the beginner, the easier routes at a crag are sometimes sparsely bolted. This is because they are considered as ‘warm ups’ and therefore the leader is unlikely to fall off. Try to stay away from runout routes when you’re starting out.

Be aware that some bolted routes are designed to be supplemented with trad gear to make them safe. You may also need trad gear to build an anchor at the top of these routes. These are not ‘sport’ routes. Make sure you know what you’re climbing before you leave the ground.

Nylon on Nylon

Never clip the lead rope through a carabiner which has a sling, cordelette or other nylon item attached.

If you fall, the rope will rub over the sling. This will damage the sling and also your rope.

nylon on nylon

Retreating

If a climb is too difficult or dangerous, and you can’t reach the top, the easiest and safest way to bail is to leave carabiners on the top two bolts.

Simply replace your quickdraws on the highest two bolts with single carabiners. If a bolt is dubious, clip a third too.

Lower down and remove the rest of your quickdraws. It’ll cost you a couple of carabiners but it is far safer than lowering from a single bolt.

how to bail from sport climb

Sport Climbing – How To Descend

This article is part of the book - Sport Climbing Basics.

VDiff sport climbing e-book

Lower, Abseil or Walk Off?

There are basically three ways to descend; walk off, lower or abseil (rappel). You will either lower or abseil to get down from most sport routes. Your choice largely depends on the type of anchor, how it is positioned and what you plan to do after the climb.

Lowering from a sport anchor is quicker than abseiling. It’s also much easier to retrieve gear on your way down when lowering. However, abseiling puts much less wear on the rings and your rope. This could be the best option if the rings are already showing signs of wear.

If the next climber is going to top-rope the route, you should make an anchor from your own gear and lower down from that.

If you are the last person to climb the route, you’ll need to clean all your gear from the anchor before you descend.

For anchors which are in a poor position for lowering or abseiling (e.g: far back across a ledge), it is much better to belay your partner from the top of the climb. You can then walk off.

Walking Off

When walking off is a common descent method, there will usually be an established trail back to the base.

Make sure to always be securely connected while cleaning the anchor. You will often have to do a ‘mini pitch’ in order to reach safe walking terrain. If you plan to walk off, make sure to bring a couple of long slings so you can make an anchor (such as slings around a tree) for this purpose.


Best Situation To Walk Off
- When the anchor is situated in such a way which means lowering or abseiling would be difficult or dangerous (e.g: far back from the top of the crag or on a ledge covered in loose blocks).

Walking off the top of a sport climb

Lower Off

Lowering is the simplest method of descent.

You Will Need:
* Two spare quickdraws

Best Situation To Use this Method
- When someone else will lead the climb after you
- When you plan to leave all your quickdraws on the bolts for the next climber

Warning!
Only lower down like this if you are leaving your quickdraws on the bolts in the pitch for someone else to lead next. The highest lead quickdraw acts as a back-up in case your anchor draws unclip as you descend. It is dangerous to lower down or top-rope from only two quickdraws. If you want to remove the quickdraws on your way down, you’ll need to either set up a top rope anchor or clean the anchor.

Step 1
Clip a quickdraw into each bolt. Make sure the rope-end carabiners have their gates facing outwards.

If there are chains or rings on the bolts, clipping your quickdraws underneath puts them in a better orientation.

Sport climbing anchor lowering chains

Step 2
Clip the rope through the quickdraws from the back so the rope is coming out towards you.

Sport climbing lowering chains

Step 3
Ask your belayer to take you tight. You are now ready to lower.

climbing anchor lowering chains

Removing Quickdraws

If you have cleaned the anchor, but your quickdraws are still in the route, you’ll need to retrieve them on your way down.

This is easy on a straight-lined, vertical route. Simply lower down and unclip them from the bolt and the rope.

The belayer will need to stop lowering you at each bolt so you have time to do this.

how to lower from a sport climb

Overhanging Routes
Removing quickdraws is more difficult on overhanging or traversing routes. To make it easier, clip one end of a quickdraw to your belay loop and the other end to the rope. This ‘lowering quickdraw’ keeps you in the same line as the route while you descend.

On your descent, unclip the lead quickdraws from the rope and then from the bolts.

lower from a sport climb

Removing the Last Quickdraw
Be careful when removing the last quickdraw. If you remove it in the same way as the others, you’ll swing out from the rock and pull your belayer with you.


Step 1
If it is a safe swing (i.e: you wouldn’t hit anything or anyone), unclip your lowering quickdraw from the rope and attach it directly to the bolt. Then allow your weight to hang on this quickdraw.

get down from a rock climb

Step 2
Remove the other quickdraw from the bolt and the rope.

Give your belayer time to take in the extra slack which is created.

how to get down after climbing up

Step 3
Remove the last quickdraw from the bolt.

To make this easier, use holds on the rock to pull yourself in. Be ready to swing out!

how to lower from top when climbing

Warning!
Be careful when removing the last quickdraw. If you remove it in the same way as the others, you’ll swing out from the rock and pull your belayer with you.

how to descend from a climb

Warning!
Make sure the swing is safe.

how to get down from a sport climb

If it isn’t a safe swing, lower to the ground as shown below, and then climb up to retrieve the quickdraw.

This works best if you have a bouldering pad and the first bolt isn’t very high.

how to come down from a sport climb

Clipping into Quickdraws
If you have top-roped an overhanging or traversing route, and someone else wants to top-rope after you, you’ll need to clip the rope to some of the quickdraws on your way down as ‘directionals’. These directionals stop the next climber from swinging wildly across the rock if they fall.

Simply clip your rope into the quickdraws as you lower. Depending on the route, you may need to clip them all, or just a couple.

Sport climbing how to get down

Pulling the Rope Down
Untie any knots from the rope before you pull it down.

Shout 'rope' before it falls so everyone around you is expecting it – a falling rope in the head hurts!

Pull the rope so the falling end drops down through the quickdraws (if you are leaving them in). This will slow it down and make it safer.

Sport climbing anchors

VDiff sport climbing book

Extending the Anchor

Never connect quickdraws together like this.

If you need to extend the anchor for lowering or any other reason, make sure to use a sling or cordelette instead, as described here.

clipping quickdraws together

Abseiling

The following description is for abseiling on a single rope where the descent is less than half of your rope’s length. For longer abseils, you’ll need two ropes. Learn more about abseiling.

Best Situations To Abseil
- If the lowering rings are already showing signs of wear (Abseiling puts much less wear on the rings than lowering).
- If your rope would rub across rough edges when lowering.

Attaching Your Belay Device and Prusik

Step 1
Attach yourself to the anchor and feed the rope through the main abseil point, as shown.

Attaching to a climbing anchor

Step 2
Clip your belay device to your belay loop with a screwgate (don’t lock it yet).

Climbing belay device

Step 3
Pull up about a meter of both strands of rope.

It will be heavy, so step on it to create slack so it’s easier to clip in.

Climbing rope ready to abseil rappel

Step 4
Push the ropes through your belay device making sure it is orientated the correct way up.

Attach belay device to climbing harness

Step 5
Clip both of the ropes and your belay device through the screwgate carabiner and fasten it.

You don't need to remove the screwgate from your belay loop when doing this; you are more likely to drop it if you do.

Attach belay device to climbing harness for abseil

Step 6
Lean into the anchor and pull any slack rope through your belay device.

Holding the ropes in the lock-off position, sit back and apply your weight to the belay device. This allows you to easily check the setup.

Attaching belay device to climbing harness

Step 7
For most abseils, it's wise to backup with a prusik knot. A correctly tied prusik will auto-lock if you let go of the ropes.

Wrap the prusik around both ropes a few times and then clip the ends together with a screwgate carabiner. More wraps will create more friction around the ropes, though four wraps are generally enough.

Pull the knot tight, make sure it is neat and the double fisherman’s knot is away from the ropes.

How to make a prusik cord

Step 8
Clip the prusik to your leg loop. The prusik will slide down the ropes if you hold it close to your leg loop and lock around the ropes if you let go. Test this before you abseil.

If it doesn't lock, take it off and re-tie it with an extra wrap around the ropes.


Prusik Too Long?
If your prusik loop is too long, it's possible that it could jam into your belay device during the abseil. If this happens, it can be difficult to control your descent. To avoid this, you can extend your belay device with a sling.

How to attach belay device to climbing harness

Abseiling - Check The System

Before you unclip your attachment point from the anchor, check:

How to abseil rappel infographic

Abseiling - The Descent

Step 1
With one hand holding both ropes in the lock-off position, unclip your slings from the anchor.

You can clip them out of the way on the back of your harness.

How to abseil from a sport climb

Step 2
Put your second hand over the prusik. Your hands should be in the same position as they would to lower a climber while belaying.

How to rappel from a sport climb

Step 3
While keeping a firm grip, lean your weight back and allow some rope to go through your belay device, remembering to slide the prusik down as you go.

Continue feeding rope through as you lower yourself down.

It takes a little practise, but you'll soon be able to figure out how fast to feed the rope while staying in control.

Descend from a sport climb

Step 4
Sit back in your harness and keep your body in an L shape with your feet wide apart. Walk backwards down the rock, making sure to look behind to see where you're going. Move smoothly down the ropes. Don’t bounce, jump or swing around – this puts much more force on the anchor and is likely to damage your ropes if they pass over rough edges.

To abseil past a roof, plant your feet on the lip and lower your body down. Once your body is below the roof, cut your feet loose to avoid hitting your head. Keep going until you've reached the ground.

Abseil from a sport climb

Step 5
Remove your abseil device, unfasten any knots from the ends of the rope and pull down on one side.

Keep an eye on the other end of the rope as you do this to make sure it doesn't go up with a mysterious auto-knot fastened in it.

When the ropes are about to fall down, shout ‘rope’ to warn people who are nearby. Be aware that the falling rope may bring down loose rock with it.

Abseiling from a sport climb

Abseiling - Top Tips

- Look out for ledges, trees, chimneys or anything you might abseil into on your descent.

- If your rope is stuck, stop just above it and allow your prusik knot to tighten. Make sure to keep hold of the ropes with one hand while you untangle them.

- Be aware of where your rope is (above and below you). Make sure it isn't rubbing over loose rock or sharp edges.

- You can only abseil half of the total length of rope that you have, so keep this in mind before climbing up.

- Be aware of rocks which may get dislodged when you pull your ropes down.

Trad Climbing Gear > Cams

This article about climbing cams is part of the book - Trad Climbing Basics.

VDiff learn to trad climb e-book book

Trad climbing infographic how to place cams rock climbing

Cams are reliable and versatile pieces of trad protection that are designed to be placed in parallel sided cracks, where nuts won't work.

A cam has three or four lobes mounted on an axle. Each lobe is shaped according to a mathematical logarithmic spiral, so the angle between the lobes and the rock is always the same, no matter how retracted the cam lobes are. This means that the cam will work at any point of it's size range (more on this later).

When a cam is weighted, the lobes are forced apart, converting the downwards force into a huge amount of outwards pressure on the sides of the crack. It is this outwards pressure which holds the cam in position.

When you place a cam, the springs cause the lobes to press out on the sides of the crack, creating just enough friction to keep it in position. Because cams rely on this friction, make sure to only place them in clean, dry cracks. Mud, dust, water or ice reduces the friction and can cause the cam to slide out during a fall.

Forces applied to climbing cams when weighted

How To Place Climbing Cams

Step 1

Pull the trigger to retract the cam lobes and slot it into the crack.

Perfect cam placement

Step 2

Release the trigger to allow the lobes to open up and make contact with the sides of the crack.

If the lobes open up all the way, try a bigger size.

How to place cams climbing

VDiff trad climbing book

Placing Cams > Size

Correct Size

This is the ideal cam size for the crack it is in.

The strongest and optimal placement is within the middle section of the cam’s range of movement. You should aim to place every cam like this.

Climbing cam placement

Too Big

This is 'over-cammed' and will be very difficult to remove. Use a smaller cam if possible.

Climbing cam too big

Too small

This is 'tipped out' and will be very unlikely to hold a fall. During a fall, cam lobes often slip down the crack very slightly before being pressed outwards.

In this case, at least one of the lobes is likely to open completely to it's maximum range, causing the cam to slip out of the crack. Use a bigger cam.

Climbing cam too small

Placing Cams > Depth

You'll need to position cams far enough into the crack to accommodate for the slight slippage that can occur when the cam is loaded. In very slippery rock, a cam may slide out completely when weighted due to the lack of friction.

Try a cam in both orientations to see which way fits better. It’s usually better if the outer lobes are on the main wall, so they are further from the edge. In shallow placements, it’s vital that the outer lobes go on the widest area of the rock.

Climbing cam in crack

Placing Cams > Constrictions

If possible, set a cam above and below a constriction. This traps the cam in place and prevents it from walking. Placements like this are very stable.

Avoid placing cam lobes on tiny bumps or crystals which may disintegrate under load. This could cause the unit to pull out.

rock climbing cam in crack

Placing Cams > Flared Cracks

A flared crack is one which becomes narrower or wider at one side. Cracks can be flared in any direction.

Upward Flares

The placement in this slightly upward-flared crack is very good. If the cam slips down slightly during a fall, it will remain securely in the crack.

Good cam placement flared crack

Warning - When a cam is placed in an extremely upward-flaring crack, as shown below, it could easily 'walk' upwards.

This means that it will either wiggle out of position or be impossible to retrieve. This is caused by movements in the rope as you climb above.

Trad climbing how to place cams rock climbing

You can reduce the chance of this by extending the cam with a sling or quickdraw.

An alternative would be to use a nut or a hex instead.

Climbing cam and hex placed in flared crack

Downward Flares

The downwards flare of this crack is too great for the cam to hold. In the event of a fall, the lobes will continue opening until they reach their maximum, at which point the cam will fall out of the crack.

Cams can hold in very slightly downward-flared cracks, but it is best to look for parallel-sided or slightly upward-flared cracks.

Trad climbing how to place cams when rock climbing

Offset Cams

Offset cams have two lobes which are a size smaller than the other two. They are excellent for protecting flared cracks and piton scars which are commonly found at granite crags.

In a flared crack, place an offset with the smaller lobes further in and the bigger lobes further out.

With regular cams, it is usually possible to orientate the cam so the outer lobe is against the main wall, and not near the edge of the crack. Unfortunately, due to the asymmetry of the design, this is not always possible with offsets.

You don’t need offset cams. But if you frequently climb at venues with flared cracks, a set of offsets will provide protection where nothing else will.

how to place offset cams

Placing Cams in Horizontal and Diagonal Cracks

Cams in diagonal crack

Cams can be placed in horizontal or diagonal cracks.

In these types of cracks, placing your cam with the outer lobes on the bottom makes the placement more stable.

Cams in horizontal crack

Flexible stemmed cams will bend around the edge of the rock and maintain their strength.

Rigid stemmed cams will lever over the edge, causing damage to the stem.

Using Cams Passively

Certain types of cams can be used passively (like a nut). However, in this situation nuts wedge into place better. So unless you've just dropped them all, you'll probably be better placing a nut instead.

Cams and nuts in crack

Types of Climbing Cams

There are too many designs of cam to list here. Different brands tend to be better suited to different rock types (e.g: Metolius Fat Cams are great for soft sandstone, whereas Black Diamond C4’s are more suited to granite). When you go to buy cams, ask the shop assistant which style is best for the rock type in your local area. If you plan to climb on many rock types and in many different locations, any new, flexible-stem design will be good enough to get you started.

Removing Cams

To remove a cam, simply pull the trigger and slide it out. Sometimes you may need to wiggle it around constrictions in the rock. If a cam is stuck, focus on freeing up the lobes which won’t move. Prize them loose with your nut tool. Once all the lobes can move, it’ll be easier to wiggle it out.

How to remove climbing cams

If your cam trigger is unreachable, use the hook on the end of your nut tool to pull it.

How to remove climbing cams with nut tool

Racking Cams

An efficient way of racking cams is to put them in size order on your harness with their own separate colour-coded carabiners.

If you have small cams on a front gear loop and bigger cams further back, they'll be less annoying as you climb.

Cams on harness

Cams Vs Nuts

Nuts are much lighter and cheaper so it’s easy to carry a lot of them. Cams are quicker to place – great if you’re getting pumped and need to place gear quickly. There are usually more options for placing cams than nuts, so it’s better to place nuts when you can and save the cams for later.

Trad Anchors – Part 1 of 4 > Introduction

This 'Trad Anchors' article is part of the book - Trad Climbing Basics.

VDiff learn to trad climb e-book book

Trad Anchors: Gear Placements

The climb isn't over when you reach the top. You still need to make an anchor to attach yourself and belay your partner from. You should produce an anchor with at least two (preferably three) good pieces of gear. Gear placements are sometimes obvious and close together, and sometimes not so obvious and far apart.

making a trad climbing anchor

If you can't find enough gear to make a secure anchor, you'll have to go somewhere else! Try a little further back or along the crag top. On a multi-pitch, you may have to climb up a bit higher, or down-climb if you've just passed a suitable place. It is essential that you find a place to make a solid anchor. Never accept that an anchor is poor quality. There are always other options.

Trad Anchors: The Central Point

Your gear placements need to be equalized together to form a central point. This is where you attach yourself and belay from. How you create the central point will depend on what gear is available, how spaced it is, if you have one rope or two, and whether the climb is a single or a multi-pitch.

It's essential to know each technique and be able to adapt your anchor building skills for each unique situation.

trad climbing anchor

Top Tip
Once you've got one piece of gear in, clip the rope through it as if you're still climbing. This will protect you if you slip while building the rest of your anchor. You can unclip this later when you are safely attached to the anchor.

how to set up a trad belay anchor

Trad Anchors: The Six-Point Rule

You should create an anchor which is worth at least 6 points. Only experience can teach you how many points your piece of gear is really worth. As a guideline, points are awarded as follows:

3 points: A new bolt or a sling around a large tree.

rock climbing bolt trad anchors

2 points: A well placed piece of trad gear.

rock climbing cam

1 point: A well placed micro nut or micro cam.

rock climbing micro nut

0 points: Any suspect gear which is either placed incorrectly or in bad rock.

bad rock climbing gear

Warning! Loose Features
Don't place all of the anchor pieces behind the same feature (especially with flakes or blocks). If that feature is loose, your entire anchor will fall out when weighted!

For this reason, it’s better to place gear in different cracks and features.

rock climbing trad anchors

VDiff trad climbing book

Trad Anchors: Belay Plan

When you've found enough good gear placements for the anchor, you'll need to make a belay plan. Your plan will include:

1) How you will equalize the gear together.
2) Exactly where you will sit or stand to belay.
3) How you will attach yourself to the anchor.
4) Which belay technique you will use.
5) Where you will put the extra rope.

When your plan is complete, you can start making the anchor. Each part of the belay plan is explained in the following articles.

Trad Anchors – Part 2 of 4 > Equalizing Gear

This 'Equalize Trad Anchors' article is part of the book - Trad Climbing Basics.

VDiff learn to trad climb e-book book

Equalizing Trad Anchors - The Basics

Let's assume you've got two incredibly good pieces of gear or two bolts at the anchor. The easiest way to equalize them together is by using a long (120cm or 240cm) sling, or a cordelette (a loop of 7 or 8mm cord).

Step 1
Clip the sling or cordelette to both pieces of gear, using screwgate carabiners. Pull it down in the middle so both strands of sling are equal.

trad climbing anchor equalized

Step 2
Tie an overhand knot in it. This creates a central point.

equalize climbing gear overhand knot in sling

Step 3
Clip a screwgate carabiner into the central point.

trad climbing anchor equalized

An overhand knot in your sling will equalize the anchor pieces in a basic sense. However, it must be tied in a way which meets the following three criteria:

1) Each piece of gear only takes around 50% of the total weight of the belay.
2) The anchor is set up for the direction that the 'pull' will come from.
3) If one piece of gear was to fail, the other would not be shock loaded.

These criteria are explained below.


VDiff trad climbing book

Criteria 1: The V-Angle

In theory, if you have two pieces of gear with 100kg hanging from them, each will take 50kg, right? Unfortunately not. This depends on the angle the sling makes just above the overhand knot (the V-angle). The smaller the V-angle, the smaller the force on each piece of gear.

You don't need to know how to calculate these numbers, but an angle of anything up to 60 degrees is acceptable. At this point, 58% of the total weight of the belay (the weight of both climbers) will go onto each piece. This is good.

trad climbing bolted anchor equalized

At 90 degrees, 71% of the force will go onto each piece. This isn't too good.

climbing bolted anchor equalized

At 120 degrees, each piece of gear takes 100% of the force! Never equalize gear with such a large angle.

trad climbing bolted anchor equalizing

You can decrease the V-angle by using a longer sling or cordelette. If you don't have one, you can extend a piece with a short sling.

trad climbing bolted anchor equalize

Criteria 2: Direction of Pull

Your gear needs to be equalized together in the 'direction of pull'. This is the direction that it would be weighted if your partner falls.

If you've climbed straight up to an anchor and will be standing or sitting directly below it, this will be straight down. But if you've traversed in to a ledge and the rope is running off to the side, the pull will be in that direction. You'll need to place and equalize the gear to suit that.

When you're setting the anchor up, think about the direction that the pull will be in. Tie your overhand knot accordingly, then test it by pulling hard in that direction. Are both strands of the sling taking the weight? If one is slack, then adjust your knot accordingly.

equalizing bolts with cordelette

Criteria 3: Shock Loading

Imagine hanging a heavy shopping bag from a nail on your kitchen wall. If you place it there gently, the nail might strain a bit, but it'll hold.

Now imagine extending that shopping bag with a piece of string. Hold it up high, then drop it. What happens? The increased force will likely break either the nail, string or bag, dumping your shopping in an untidy pile of broken eggs and plasterboard.

This principle is exactly the same at a belay. If one piece fails and the anchor isn't equalized correctly, all the weight of you and your partner will 'fall' onto the other piece, shock loading it. The extra force caused by shock loading could pull out or break the remaining piece.

There should be no slack in any part of your anchor, so that if any piece failed, there would be no movement or shock loading.

shock load climbing anchor

How To Equalize Three or More Pieces

The previous example explained how to equalize an anchor with only two pieces of gear. This is fine if both pieces of gear are absolutely bomber (such as a new bolt or a sling around a big, sturdy tree).

However, in most cases you'll be building trad anchors out of regular trad gear – nuts, hexes and cams. These are not as strong as bolts or massive trees, so you'll need to use more of them.

If you're not sure how many pieces of gear to use, see
The 6 Point Rule.

To equalize three pieces of gear, simply use a longer sling or cordelette. Pull two loops down and tie one big overhand knot in it. Then clip a screwgate through all three loops. You may need to fiddle with the knot slightly to get all strands to pull equally tight – often the middle one can go a little slack as you tie it.

three piece climbing anchor

If you have two pieces of gear close together but the other one far away, it can help to use two slings. First, use one sling to equalize the two pieces which are close together. Next, equalize the central point of that with the third piece of gear using another sling.

You may need more than three pieces of gear to make a secure anchor. Use the same method to equalize as many pieces together as you need.

If you don't have enough slings, you can use the rope as part of the anchor (this is explained in the next article).

trad climbing anchor equalized with slings

Cordelette Craft

If equalizing the anchor with a cordelette, it is typically better to create the central point at head to chest level. This provides a convenient workstation to attach yourself and belay your partner from.

The following methods describe a few ways to adjust the height of the central point.

trad climbing belay equalized with cordelette

Cordelette Craft: Keeping the Central Point High

Double Up
One or more strands can be doubled up. The double loops don’t stretch as much, so they may give the higher piece more than it’s share of the load.

Consider this when equalizing the pieces together.

trad climbing anchor equalized with cordelette

Tie a Knot
Tie an overhand in the cordelette to shorten it.

trad climbing anchor equalized with cordelette

Figure 8
Tie a figure 8 instead of an overhand at the central point. Or wrap the cord around itself one more time to create a figure 9.

When using any of these methods to adjust the height of the central point, make sure your V-angle does not exceed 90 degrees.

trad climbing anchor equalized with cordelette

Cordelette Craft: Extending the Central Point

If you would prefer to use a cordelette to equalize the anchor (rather than the rope), but it isn’t long enough, try extending the furthest away piece with a sling.

Alternatively, unfasten the double-fisherman’s bend and tie a figure-8 loop in each end of the cordelette. Clip the ends into the furthest away pieces and equalize with an overhand knot.

The disadvantages of this setup are a reduced strength on the outer pieces (one strand of cordelette is weaker than two) and there is no top shelf.

trad climbing anchor equalized with cordelette

Trad Anchors – Part 3 of 4 > Attaching to the Anchor

This 'Trad Anchor' article is part of the book - Trad Climbing Basics.

VDiff learn to trad climb e-book book

You'll need to attach yourself to the anchor in a way that you can see your partner as they follow the pitch and brace yourself if they fall.

Make sure you are positioned in a straight line between the anchor and the climber. You shouldn’t be pulled sideways if the climber falls. You may need to extend your anchor to get into the optimal belay position. There are many ways to do this, each with their own advantages and limitations.

Some of the most common methods are described below. With practise, you should develop the ability to adapt and combine these methods to suit every belay situation.

trad anchor belay position

Method 1: Clip Directly

Clip your belay loop into the central point directly with a screwgate carabiner.

Advantages
- Simple

Disadvantages
- No dynamic aspect to the anchor (using the rope is much better. See methods 2-5 below)
- Very difficult to adjust belay position

Best Situation to Use This Method
If extending the anchor with the rope would put you in a bad position to belay.

attach to climbing trad anchor

Method 2: Tie to the Central Point

Tie your rope to the central point using a clovehitch. Then fine-tune your belay position by adjusting the clovehitch; just shuffle rope through and pull it tight. The rope between you and the central point will need to be fairly tight.

Advantages
- Only uses a small amount of rope

Disadvantages
- Belay position must be close to the central point

Best Situation to Use This Method
If the central point is within reasonable reach of your belay position (up to 2 meters or so).

attach to climbing anchor rope

VDiff trad climbing book

Method 3: Loop Through the Central Point

Clip the rope through the screwgate on the central point, then walk to your belay position. Attach a screwgate to your rope loop and then clovehitch the rope to it.

Advantages
- You can fine-tune your belay position without moving back to the anchor.

Disadvantages
- Uses more rope and one extra screwgate than method 2

Best Situation to Use This Method
If the central point is out of reach from your belay position.

attach to climbing anchor with two central points

Method 4: Attaching to Two Points

Attach the rope to the nearest anchor point with a clovehitch. Then clovehitch the rope to the other anchor point, leaving a little slack between the two. Next, clovehitch the rope to your rope loop with another screwgate.

Advantages
- Equalizes two points
- Uses less rope than method 5

Disadvantages
- Must be close to the first anchor point in order to fine-tune your belay position.
- The central point is created at your belay loop. This means that you must belay directly from your harness (you can't use guide mode).

Best Situation to Use This Method
If you have two anchor points which are too far apart to equalize with a sling/cordelette.

attach to climbing anchor using the rope

Method 5: Attaching to Three or More Points

Step 1
Clip the rope through the furthest away point, then walk to your belay position. Attach a screwgate to your rope loop and then clovehitch the rope to it, just the same as method 3.

Step 2
Repeat this step with the second point.

Step 3
Tie your rope to the third point using a clovehitch, as described in method 2.

You can fine-tune the clovehitches to equalize the three points. This is a good method if you arrive at a belay with no slings or cordelette.

Advantages
- You can use this method to equalize as many points as you need. Just keep repeating step 1 until you've equalized all your pieces.

Disadvantages
- Uses up a lot of rope.
- You must belay directly from your harness.

Best Situation to Use This Method
If you arrive at a belay with no slings or cordelette.

attach to many climbing anchors with rope

Tree Anchors

Walking around a large tree and clipping the rope back to your rope loop is a quick way to make an anchor with only one screwgate carabiner. The clovehitch or figure-8 on a bight are good knots to use. It is only suitable to do this with very large trees. Watch out for tree sap.

climbing belay from tree

Attaching to a Trad Anchor with Half Ropes

When climbing with half ropes, you can use any of the previously described methods with either one or both ropes.

attach to climbing anchor with two ropes

Attaching to a Trad Anchor with a Sling

Slings are designed to be used with a dynamic rope in the system to lessen the impact on them. It's only safe to attach yourself to an anchor with a sling if you won't be moving above it (such as when setting up an abseil).

If you fall when above an anchor (even if you are only a foot above), unusually large forces will be generated.

You can damage internal organs with just a 10kN force - falling onto a sling directly is likely to be much higher than this. It could also break the sling, or the anchor.

If there is any chance that you will move sideways or above the anchor, make sure to attach to it with the rope.

clipping to climbing anchor with sling

Trad Anchor Checklist

You can use any of the previously described methods in any combination with either a single rope or half ropes. Whichever you choose, make sure:

1) Enough pieces of gear to satisfy 'the 6 point rule'
2) Each piece is placed as well as it can be
3) The rock around the gear is solid
4) The pieces of gear are equalized correctly
5) The V-angle is less than 60 degrees at each point of equalization
6) The anchor is perfectly aligned with the direction that the pull will come from
7) Each piece is independent from the others to prevent shock loading
8) You are attached to the anchor with a tight rope
9)All knots are tied neatly
10) All the screwgates are fastened up.

Once you can answer 'yes' to all of these, you can tell your partner that you are 'safe' or 'off belay'.

Multi-Pitch Trad Climbing

This 'Multi-Pitch Trad Climbing' article is part of the book - Trad Climbing Basics.

VDiff learn to trad climb e-book book

A multi-pitch route is one that is split into two or more pitches. This may be because it is longer than your rope. Or it could be a wandering route that would involve a lot of rope drag if climbed as a single pitch.

Multi-pitch climbing combines many skills: placing gear on lead, building belays, route-finding, rope management and (often) abseiling down after you reach the top.

Due to the length and complexity of multi-pitch routes, you should develop your problem solving and self-rescue skills before embarking on this kind of adventure.

Multi-pitch: What To Bring

Extra Climbing Gear
You’ll need two anchor kits for a multi-pitch route. Make sure you bring:
- Two cordelettes/ long slings
- At least six screwgates
- Two belay devices

If the descent from your route involves abseiling, make sure to bring ATC style belay devices and prusik cords.

Food and Water
If your multi-pitch is likely to take more than a few hours, consider bringing food and water to snack on at the belays.

Many routes have luxury belay ledges, so if you're not in a rush, why not have a vertical picnic?

Climbing a multi-pitch

Clothes
Any comfortable all-cotton clothes will suffice for single pitch cragging, especially venues with a short approach. For multi-pitch routes, or for any climbs with a long approach, wearing synthetic clothing is a better choice. Synthetics insulate much better than cotton in wet or cold environments.

If you expect cold temperatures, bring a pair of gloves so you can belay with warm hands and then take them off to climb. A thin hat that fits under your helmet is a very lightweight way of keeping you warm too. If the descent is long, it's nice to bring a comfy pair of shoes.

A warm/waterproof jacket, or even a thin wind-proof layer, can make multi-pitches more comfortable when it gets windy and the sun disappears, especially for the belayer.

Down jackets are a poor choice unless you’re climbing in dry climates below freezing. Most down jackets will repel a small amount of moisture, but the feathers will clump together in a storm and you’ll freeze. They also tend to rip very easily on rock.

First Aid Kit
A small first aid kit can be useful, along with a pocket knife for cutting anchor webbing or stuck ropes. Make sure the knife has a folding blade which is impossible to accidentally open when attached to your harness.

Route Description
On a single pitch, it's easy to remember where to climb. However, on a multi-pitch you may have forgotten the details by pitch six.

Bringing the whole guidebook is a bit excessive. But a route description (or topo), neatly folded in your pocket, will help show you the way.

Another option is to take photos of the topo on your phone. Make sure you don’t run out of battery though.

Take descriptions from adjoining routes too, as this can help you figure out where you are.

multi-pitch trad climbing

Extra Rope
You’ll need to bring a second rope if your route involves an abseil descent where the anchors are more than half of your rope’s length apart (i.e: you can only abseil 35 meters with a 70 meter rope). You will also need a second rope if climbing as a team of three.

Headlamp
Headlamps are essential on long multi-pitches. Finishing a climb, or trying to descend in the dark can be incredibly difficult and dangerous.

If you take spare batteries, tape them together in the correct orientation, so you can just plug the whole block in at once. This also means you won’t have random batteries floating around your bag and no idea if they are full or empty.

Backpack
All this stuff can be put into a small backpack and carried by the second.

Alternatively, the load can be split between climbers so neither climber has a particularly heavy bag.

Depending on the route and your tolerance of suffering, you may not need any of it. For routes that are difficult to return to the base, you'll need to bring everything. Plan before you go.


VDiff trad climbing book

Multi-pitch Anchors

If the leader falls on a single pitch route, the belayer is often pulled up off the ground when they hold the fall. On a multi-pitch, the belayer would instead be pulled out of position.

This could potentially pull out part, or all, of the anchor if it was built to only hold a downwards force.

Climbing a multi-pitch belaying

For this reason, you should build multi-pitch anchors with both an upwards and a downwards pulling aspect.

If the last pitch traverses into the belay or the next pitch traverses away from it, the anchors could get loaded with a sideways pull. Build the anchor to be strong in any conceivable direction of pull.

How to climb a multi-pitch

If the best upward-pulling gear is just below the downward-pulling anchor pieces, you can incorporate it into the anchor with some cordelette craft to make it multi-directional.

There are many variations to this. One is to tie clovehitches on the lower two pieces as shown.

multi pitch trad anchor

Multi-pitch Belay Changeovers

Efficient belay changeovers will speed up your ascent, making you less likely to get benighted or stranded in a storm.

Sometimes the more experienced climber will lead every pitch. Other times, each climber will choose which pitches they prefer.

A common tactic is to swing leads (lead alternate pitches). Be aware that easier pitches may be runout.

Swinging leads is the most efficient. The rope is already stacked with the new leader’s end on top and the gear from the previous pitch will be racked on their harness.

It’s much more efficient if both climbers can go hands-free during the changeover. How you do this depends on who will lead the next pitch. Two methods are described below.

Method 1: Tie-Off Your Belay Device
If alternating leads, the easiest method is to tie-off your belay device. When the leader is ready to climb, simply unfasten the knot and they will be on belay immediately. This works well if there is a small ledge to stand on. If not, you may prefer to choose method two.

How to tie off a belay device climbing
Climbing a multi-pitch tying into the anchor

Method 2: Attach to the Central Point
If the same person is leading every pitch, the second will have to attach to the central point, in the same way as the leader.

Use separate screwgates to attach the second's rope to the central point(s). When they are attached, they can be taken off belay.

The leader will need to be put on belay before they detach from the anchor.

Guide mode belaying

Method 3: Using Guide Mode
If belaying with Guide Mode and swapping leads, you'll need to change from Guide Mode to normal belaying when the second has reached the anchor.

To do this, put the second on belay as normal with another belay device, then remove the Guide Mode setup. It's better if the next leader removes the Guide Mode setup so the belayer can keep both hands for belaying.

Multi-pitch: Leaving the Belay

It's a good idea for the leader to clip a high point of the belay as their first piece of gear. This eliminates the chance of a factor two fall should they fall before finding protection on the next pitch.

It's also much easier for the belayer to hold a fall this way.

How to climb a multi-pitch trad climbing

You can reduce the fall factor further by extending the belayer's anchor attachment.

This puts less force on the first pieces of gear if the climber falls.

multi-pitch fall factors

Where To Belay

Recommended belay stations will be described in the guidebook. You don’t have to belay there, but they are usually the best spots.

Experienced climbers often stretch pitches to the full rope length to reduce the number of belay changeovers and therefore speed the climb up.

Teams with an inexperienced partner may do shorter pitches so they can communicate more clearly.

When looking for a belay, choose a place which:
- Has cracks for solid gear placements
- Has protection from rockfall (especially if there are climbers above)
- Does not cause the rope to run across loose rocks
- Allows communication between partners
- Provides a comfortable stance for belaying, if possible

Hanging Belays

If there is no belay ledge, you will have to create a hanging belay. Try to create this in a place which at least has some good footholds.

It can be unnerving at your first few hanging belays, because you must completely trust your anchor and lean all your weight on it.

The key points are making sure the anchor is bomber and having the central point at chest level or higher so you can lean out comfortably.

For long belays, keep moving your feet around to stop your legs from going numb, or stand in a sling to get the weight on your feet if there are no footholds.

Rope Management

Stacking or coiling the rope neatly so it doesn’t tangle is important on multi-pitches.

If the belay ledge has a flat area, simply stack the rope onto it in a place where it won’t slide off. If there isn’t a suitable belay stance to put the rope, you can stack it in neat coils across the rope which goes between your harness and the anchor (lap coils).

Alternatively, stack it through a sling. Either way, the first coils should be the longest, with progressively smaller coils added on top. This ensures the rope feeds out well on the next pitch.

If it is windy or there are bushes or loose rock below you, make sure to keep the coils short enough so they don’t get stuck.

If climbing with half ropes, treat them as one rope and stack them together in the same way.

multi-pitch rope management

Time Budget

Make a realistic estimate of how long the route might take. Figure out what time you need to have finished the route (to avoid thunderstorms or darkness etc..) and then work backwards from there.

Break the climb down into pitches and figure out how long each one will take. Remember to add time for approaching and descending the route and for belay changeovers.

Be conservative with your estimations – it’s much easier to lose time than gain it.

Retreat Options

As part of your time budget, it’s smart to figure out places where you can switch to an easier route if you are running low on time, or places where you could easily descend without leaving most of your rack behind.

Teams of Three

In most situations, a pair of climbers is faster than a team of three. But having someone to chat with at the belay makes climbing as a three more social.

It also means you have an extra person to help carry the gear and lead some of the harder pitches.

There are many ways to connect three climbers to the rope. Two popular methods are described here.

Caterpillar Style

Step 1
The leader climbs a pitch with one rope.

multi-pitch rock climbing with three people

Step 2
The second climber follows on that rope, but trails another rope (Both ropes are tied into the harness tie-in points).

The second climber unclips the gear from the first rope and clips it to the second rope beneath them.

This ensures the third climber is protected from a swinging fall if the pitch traverses. If the pitch is straight up, the second climber could remove the gear.

multi-pitch trad climbing

Step 3
When the second climber has reached the belay, the third climber starts up.

The third climber removes the gear as they follow on the second rope.

multi-pitch rock climbing

Double Rope Style

Note
This technique is often employed with half ropes. However, half ropes are not designed to be used individually when following a pitch. For this reason, it is recommended to use two single rated ropes instead.

Step 1
The leader climbs with both ropes. They clip gear alternately to each rope.

multi-pitch trad climbing with three people

Step 2
The second and third climbers follow, keeping around 5 meters apart from each other, while the leader belays them both at the same time.

It is highly recommended to belay with an auto-blocking belay device directly from the anchor, such as an ATC in guide mode.

When communicating, finish the command with the rope colour, so the belayer knows which rope you mean (e.g: slack on red rope).

multi-pitch climbing with three people

Common Mistake
Clipping both ropes into a carabiner causes the ropes to rub against each other if a climber falls while leading or following.

This could damage your rope or even cut through the sheath.

It also reduces the ropes impact absorbing capabilities, and therefore puts a lot more force on the gear. This makes the gear less likely to hold the fall.

multi-pitch rock climbing with three climbers

If you need to clip both ropes to a piece of gear (e.g: to protect both followers on a traverse), use two quickdraws of different lengths as shown.

These quickdraws are then removed by the third climber.

multi-pitch rock climbing with three

Attaching to the Anchor

After abseiling, attach to the next anchor as described here.

For bolted anchors, make sure to attach to both bolts independently.

multi-pitch abseiling

If there is only space for one climber to attach, the other climber can clip directly into their partner’s screwgates as shown.

However, this means that the climber who descended last must descend first on the next abseil.

multi-pitch rappelling

Removing Your Belay Device

Once securely attached to the next anchor, you can remove your belay device as follows:

Step 1
Unfasten the screwgate. Unclip the device’s cable and both ropes from it.

Step 2
Re-clip the cable. This ensures that you can’t drop it.

rock climbing belay device atc

Step 3
Pull the ropes out of the device.

belay device climbing

Threading Ropes Through the Next Anchor

Thread the rope through the next anchor and tie a stopper knot in it before you pull it down.

Tie the stopper knot big enough so that it cannot fit through the main abseil point. This ensures that you cannot lose your ropes.

thread climbing ropes through anchor

Alternatively, tie the rope to yourself so it cannot be dropped.

clovehitch rope to harness

Extendable Quickdraws

This 'Extendable Quickdraws' article is part of the book - Trad Climbing Basics.

VDiff learn to trad climb e-book book

Extendable quickdraws (or alpine draws) are usually made from a 60cm sling and two snap gate carabiners. They can be used either as a short draw or fully extended, meaning it's quick and easy to extend your gear to reduce rope drag without carrying extra slings.

Extendable quickdraws for climbing

It's great to carry at least a few of these on trad routes instead of fixed length, shorter draws. You could also opt to only carry extendable draws, particularly for alpine routes.

How To Make Extendable Quickdraws

To make an extendable quickdraw, simply attach both carabiners to the sling, then pass one biner through the centre of the other one, clipping the extra two loops of the sling through it at the other end. This can now be racked on your harness like any other quickdraw.

How to make extendable quickdraws for climbing

When choosing carabiners and slings for your extendable draws, there are a few things to bear in mind. You should have a gear carabiner and a rope carabiner, just like you would with normal quickdraws.

You'll need to pick different coloured carabiners so you can distinguish between them. Keeping them consistent between all your draws is good – try silver for the gear end and your favourite bright colour for the rope end. You could try marking one end with tape, but this could be really hard to see whilst hanging on by one finger, and can easily wear off.

We prefer making extendable draws with thinner dyneema slings (6 or 8mm) as they fold up more neatly than thicker dyneema or nylon, reducing bulk on your harness. They will wear out faster than thicker versions though, so be prepared to replace them more regularly.

Nylon dyneema quickdraws climbing

VDiff trad climbing book

How To Use Extendable Quickdraws

To use extendable quickdraws, clip the draw to your gear, then slip two loops of the sling out of the rope-end carabiner. Pull it out to full extension, then clip the rope in.

Extendable quickdraws for rock climbing
Extendable quickdraws climbing

Occasionally, the sling can become twisted which can result in it being looped around the gear carabiner. It's OK to use it like this if you're really pumped and need to make the clip quickly, but much better to sort it out if you can.

If you fall while the sling is tangled like this, the strands of it will slide over each other, causing it to weaken, just the same as if it was knotted.

Many short draws have a loop of elastic at the gear end to hold the carabiner firmly in place. It's important NOT to use one of these elastics on an extendable quickdraw. If it's twisted in the wrong way it can end up with the sling attached only with the elastic, not clipped through the carabiner. This is easily missed and would be disastrous if you fell on it!

Elastic on climbing quickdraws
Velcro climbing shoes with slings

Top Tip
The velcro on rock shoes quickly kills dyneema slings, so try not to bundle them all into your bag in one big messy heap!

How To Rack Extendable Quickdraws

When following a pitch where your leader has used extendable draws, you can either re-make the draw as you go and rack it onto your harness, or simply sling the whole thing over your shoulder – much easier in a tricky position. Some people prefer to carry them on lead like this too, rather than racking them on their harness.

Wearing climbing slings over shoulder

Extending Climbing Gear

This 'Extending Climbing Gear' article is part of the book - Trad Climbing Basics.

VDiff learn to trad climb e-book book

Extending climbing gear with a sling, quickdraw or extendable quickdraw has advantages in certain situations.

The disadvantages are fairly minor: you’ll have to carry extra slings/quickdraws, it'll take a little extra time and it increases your fall potential slightly.

Planning ahead is important. Visualize where you want your rope to run, and extend gear as necessary.

Extending Climbing Gear: When To Do It

Wandering Routes
When gear placements are not in a straight line, you'll have to extend them to avoid 'rope drag'.

You should aim to extend gear so that your rope runs as straight as possible without creating unnecessary fall potential.

For this type of route, it can be worth using half ropes too.

Extending rock climbing gear to reduce rope drag

Gear Position
Extending climbing gear helps to keep it in the position that you placed it.

If you don't extend gear appropriately, slings can lift off, nuts can be pulled out and cams can 'walk' out of position. This happens because of movements in your rope as you climb above.

Extending climbing gear to stop protection falling out

Deep Placements
Sometimes, gear must be placed far inside a crack, or around a corner. You'll need to extend the piece to avoid rope drag. This is especially important if the edge of the crack or corner is sharp.

Extending rock climbing cams with a quickdraw or sling

Sharp Edges
Extend gear to keep your rope away from sharp edges or loose rock.

Rope-Eating Cracks
Cracks at the lip of a roof or overlap are notorious for eating ropes and halting the leader. Even with gear correctly extended beneath the roof, your rope may get stuck if the route continues up low-angled terrain. Sometimes, a nut or hex placed at the lip of the crack can help your rope feed more smoothly, or a piece of gear to one side can guide the rope away from the crack. Another option is to belay immediately after the roof if sufficient gear exists.

Extending rock climbing gear with a quickdraw or sling

VDiff trad climbing book

Cross-Loading
In some situations, carabiners could be ‘cross-loaded’ over an edge. This is most common in deep horizontal placements.

A cross-loaded carabiner could be damaged or break during a fall.

Cross loaded climbing gear

The best solution is to loop a sling through the piece, then clip both ends of the sling to a carabiner.

This is better than having a cross loaded carabiner, but it reduces the strength of the sling by 50% or more.

Extending climbing gear to stop cross loading

Warning: Girth-Hitching
If you girth-hitch a sling on the wire loop of a nut it is likely to damage or break the sling in a fall.

Cross loaded climbing gear

The Mule Overhand Knot > How To Tie-Off a Belay Device

'How To Tie-Off a Belay Device' is part of the book - Trad Climbing Basics.

VDiff learn to trad climb e-book book

When belaying with a standard belay device, you obviously can't let go of the rope. But sometimes it's really useful to have both hands free.

Times when you may need to be hands-free include:
- Switching gear on a multi-pitch
- Sorting out a rope tangle
- Passing a knot when abseiling
- Escaping the belay in an emergency situation

Rock climbers swapping gear at belay anchor

In situations where the rope isn't weighted, a simple overhand knot backed up to your belay loop will work. However, if the rope becomes weighted when using this method (e.g; if the leader falls), it will be almost impossible to release the tie-off.

Overhand knot tied to tie-off a belay device

If there is any chance of this happening, you should instead use the mule-overhand method (described below).

This allows you to tie-off your belay device while the leader is weighting the rope, and also release the tie-off when it's weighted.

Mule Overhand knot

VDiff trad climbing book

Step 1
Pass a loop of the slack rope through your screwgate carabiner with one hand while keeping hold of the rope with your brake hand.

This can be difficult when heavily weighted – you’ll need to pinch the rope tight.

Climbers tie-off belay device

Step 2
Pass a loop from the opposite side through the first loop so that a mule knot is formed around the spine of the carabiner.

Do not tie this knot around the gate of the carabiner.

Climber ties a knot to lock off ATC belay device

Step 3
Make sure the second loop is around 60cm long.

Pull it tight.

Climber ties a mule-overhand to lock off ATC belay device

Step 4
Tie an overhand knot around the tensioned rope as shown.

tie mule overhand knot

Step 5
A carabiner completes the hands-free mule-overhand knot.

Release locked ATC belay device

Step 6 – Releasing Under Load
To release the tie-off with the rope loaded, first untie the overhand knot. Then holding the slack rope securely with both hands, simply pull down to release the mule knot.

You should be ready to expect a few centimetres of rope to slip through. Keep a firm grip so you do not lose control of the belay device.

You can now belay or lower the climber as normal.

Release locked ATC belay device

Top Tips
* If belaying with two ropes (such as half ropes), simply treat them as one rope and follow the same steps.

* Make sure to communicate with your partner so they know not to continue climbing while tied-off.

* We strongly recommend that you practise this technique in a safe environment before doing it in a real situation

Overhand knot tied to lock ATC belay device with two ropes

How To Use Half (Double) Ropes

'How To Use Half Ropes' is part of the book - Trad Climbing Basics.

VDiff learn to trad climb e-book book

Half ropes (also known as double ropes) are thinner than normal 'single' ropes, and are designed to be used as a pair.

Best Situations to Use Half Ropes
- When climbing a wandering route
- When climbing a long alpine route with an involved descent

Half ropes climbing

Advantages
- Rope drag is reduced on wandering routes where the protection is not in a straight line
- You have more options for protecting your partner when they follow traversing pitches
- They double the length of abseil you can make
- If one rope is cut on a sharp edge, you still have the other to catch you

Disadvantages
- Involves more forward planning
- More difficult to belay
- It's possible to get into a situation where only one half rope would stop you from hitting the ground. They are not designed to be used like this (This is explained later)

Climbing with half or double ropes

Half ropes are marked by a ½ symbol on the end of the rope (a single rope will have a 1 symbol).

Single and half or double ropes

Twin ropes are also available. BE CAREFUL! These are not designed to be clipped individually like half ropes. Instead, you must clip them both into the same carabiners as you climb. They're mainly used for ice and mixed climbing.

Different types of climbing rope are explained here.

Twin climbing ropes

VDiff trad climbing book

Half Ropes: Leading

Two ropes tied into climbing harness

Designate Your Ropes
Tie in to half ropes just as you would a single, but with one rope on either side of your belay loop.

The left rope will be used to clip gear on the left side of the route, and the right rope is for gear on the right.

Traversing
On a traversing route, it's best to have an 'upper' and a 'lower' rope. The upper rope can help protect the second from taking an enormous sideways swing.

When there are sections of down-climbing, the second will often have worse fall potential than the leader. Plan ahead and place gear high on the upper rope to protect the second.

Rock climber climbing with two ropes

Belay Position
If there is a traverse to the belay, you can protect the second better by building the anchor above the middle of the traverse. Building the anchor to one side could create unnecessary fall potential for the second.

Straight-Up Pitches
On a straight-up pitch, clip your half ropes alternately to each piece. This way, you never rely too much on one rope and you never pull extra slack into the system when clipping a high piece.

Crossing Ropes
Beware of crossing the ropes as you clip gear. It’s possible to trap one rope around a piece of gear, creating very bad rope drag.

Rock climber climbing a traverse with two ropes

Half Ropes: Belaying

Belaying the Second
To belay with half ropes, you'll need an 'ATC style' belay device which has two slots in it. You cannot use a GriGri.

You'll often need to take in or give slack on one rope more than the other to keep the ropes equally tight on your partner.

Simply go through the normal belaying motion, but hold one rope tight while letting the other slide through your hand. Obviously, never let go of either rope.

Rock climber belays with two ropes

Another option is to use guide mode.

Rock climber belays in guide mode with two ropes
Rock climber belays with two ropes

Lead Belaying
Sometimes you'll need to feed out more slack on one rope than the other, as the climber pulls it up to clip.

Once they've clipped one rope higher than the other, you'll need to take in that rope, while giving out slack on the other.

This can be pretty tricky to do well and takes some practise. It helps to keep the two ropes separated in your hand above the belay device. Remember to keep hold of both of them together in your lower hand.

Using Half Ropes in the Belay

Half ropes make building a gear belay much easier, as you can use both ropes to equalize yourself to the gear. Rather than having one central point that you tie into, you can have two, with one rope going to each. Use a clovehitch to attach yourself to the screwgate carabiner at each main point.

Rock climber belays with two ropes at belay

Can You Fall on Just One Half Rope?

There's no simple answer to this. Half ropes are designed to be used together and are fall-tested by the UIAA with a smaller falling mass than for a single rope. The theory is that one rope will take most, but not all, of the force in a fall.

In reality, all of the force goes on one rope if you fall.

You should be very cautious of creating situations where only one rope would hold a large fall. This situation would also reduce the redundancy that is inherent in half ropes on complicated terrain, where there is any risk of a rope being cut by a sharp edge.

If you need to use half ropes 'separately' (e.g. if you have to clip gear to one rope for the first half of a route and then use the other rope for the last half) you should consider using two single rated ropes instead of a pair of halves.

We also recommend using two single ropes (instead of two half ropes) if you are climbing as a team of three.

Some ropes are available that are rated as both a single and a half rope; a perfect compromise!

The Statistics
For a single rope to pass UIAA testing, it must hold five falls of 80kg at a fall factor of 1.77. A half rope must hold the same five falls at the same fall factor, but only with a mass of 55kg.

If half ropes are tested as single ropes (with the full 80kg), most hold between one and three falls before failing.

This means that half ropes are safe to fall on individually. However, they shouldn't be relied upon to hold massive whippers. If you were to take a large fall on one half rope, you should retire that rope afterwards.

How to rock climb with two ropes

How To Belay In Guide Mode

'How To Belay In Guide Mode' is part of the book - Trad Climbing Basics.

VDiff learn to trad climb e-book book

Guide Mode is an auto-locking belay technique. It is a safe way for the leader to bring up the second. Do not use this method for lead belaying.

How To Set Up Guide Mode

Some ATC-style belay devices have a 'guide mode' function - they can be set up in a way which locks automatically if a climber falls. They can be used as a normal belay device too. You can set up guide mode as shown, with one rope or two.

Simply pull the brake strands through as the climber moves up. If they fall, the device will lock by itself almost instantly. Even though guide mode belay devices are auto-locking, you should always keep hold of the brake rope.

Advantages
- The weight of a falling climber isn't on your harness, which is much more comfortable!
- You can bring up two climbers at the same time (on two different ropes) - great if climbing as a team of three.
- Because you are not directly attached to your belay device, it is easier to detach yourself from the system in an emergency.

Disadvantages
- Time-consuming to lower a climber, even a short distance.

How to set up guide mode belay using two ropes

Best Situations to Use this Method
- When it is unlikely that you will need to lower the climber (e.g: climbing an easy slab route)
- When climbing as a team of three


VDiff trad climbing book

How To Lower a Climber in Guide Mode

Before you use guide mode, you must understand how to lower a climber.

Note: The belayer's anchor attachment has been omitted from the following diagrams for clarity.

Lowering a Short Distance
If the climber only needs a few inches of slack, you can wiggle the belay carabiner as they weight the rope. Carabiners with a perfectly round cross-section are not so effective at this.

How to lower a climber in guide mode

Step 2

Girth hitch a sling through the small hole on your belay device (newer devices have a big enough hole to clip a carabiner. If yours does, you can clip a sling to it with a carabiner).

Sling through the hole in guide mode belay plate

Step 3
Redirect the sling through a high point of the anchor with a carabiner, then fasten the sling to your belay loop with another carabiner. This will allow you to use your weight to release the belay device.

You could also stand in the sling to release the belay device, though it's often easier to control when clipped to your harness.

You are now able to lower the climber in a controlled manner. Remember to slide the prusik knot as you continue lowering.

Lowering a climber in guide mode

Warning
Never weight the belay carabiner as shown.

This will disengage the device and cause the climber to fall.

Dangers of guide mode belaying

Tying-Off a Climber in Guide Mode

If you need to go completely hands-free while belaying in guide mode, you can tie-off the device.

Simply form a loop in the brake strand and clip it to the rope. Be aware that if the knot jams up into the belay device, it will be difficult to lower a climber without belaying them up a few inches first. Consider this before you tie them off.

Tying off a guide mode belay

Top Tip
If swapping leads on a multipitch, you'll need to change from Guide Mode to normal belaying when the second has reached the anchor. To do this, put the second on belay as normal with another belay device, then remove the Guide Mode setup. It's better if the next leader removes the Guide Mode setup so the belayer can keep both hands for belaying.

Guide mode belaying

Guide Mode with a GriGri

You can belay directly from the anchor with an assisted-braking belay device in a similar way to the guide mode technique.

This method can be very dangerous if used incorrectly. Learn more here.

belaying with a grigri direct from anchor

Safe Simul Climbing

Simul climbing is a technique where all climbers move at the same time while tied into the same rope. Protection is placed by the first climber and removed by the last.

This technique allows climbers to extend the length of their pitches, without extending the length of their rope. With experience, a simul-pitch can stretch for 300m or more, whereas a belayed pitch is limited by the length of your rope.

Advantages
- Much faster than belayed climbing.

Disadvantages
- Much more dangerous than belayed climbing. If the follower falls, they could pull the leader off too.

Simul climbing on alpine route
Simul climbing on snow

Simul Climbing is Most Useful:
- On long, easy routes when it is safer to move fast (e.g: climbing pitch-by-pitch would result in getting hit by a storm or stranded overnight).
- On a long, exposed approach or descent when a fall is very unlikely, but the consequences would be severe.
- If a pitch is slightly longer than your rope length. A short section of simul climbing can allow the leader to reach a more solid belay.

Simul Climbing is Dangerous:
- If any member of the team might find the route difficult (especially the follower)
- On loose rock
- On runout routes (climbs which offer little protection)
- For inexperienced climbers

Prerequisite Skills
Simul climbing introduces a level of risk that is completely inappropriate for beginner climbers. This section is written for experienced trad climbers who are proficient at:
- Placing trad gear and building anchors
- Route-finding on complex terrain
- Leading long multi-pitch routes
- Self rescue
- Analysing and managing risk

The Basic Simul Climbing System

Step 1
The leader begins climbing. They place gear and are belayed with a GriGri.

Simul climbing on alpine route

Step 2
When the leader has climbed the full length of the available rope, the belayer simply begins climbing (leaving their GriGri attached to their belay loop).

Simul climbing with PCD micro traxion

Step 3
Both climbers continue up, moving at the exact same speed and keeping protection on the rope between them.

Simul climbing route

Step 4
When the leader reaches a suitable anchor, they stop climbing and belay the follower up.

Simul-climbing on alpine route

VDiff self rescue course

Simul Climbing Equipment

What To Take
With both climbers constantly moving, it is easier to stay warm, and so belay jackets could be left behind. With a faster style of ascent, you could take less food and water.

The less you bring, the easier the climbing will feel, and the less chance you will have of getting exhausted or benighted on a long route. However, the decision to leave critical items behind should only be made with lots of experience.

Depending on how long you plan to stretch your simul-pitches, you may want to bring a bigger rack. Having more gear enables you to climb the route in less pitches and therefore spend less time changing over belays.

Gear Distribution
It’s better to distribute the gear fairly evenly between the leader and the follower so that neither climber has an excessively heavy load. Often, the leader will take a little more weight so the follower will be able to stay as light and nimble as possible. Remember that the leader will start the simul-pitch with the whole rack, but the follower will have it all by the end.

Simul Climbing Devices
In addition to the equipment you would normally take on a multi-pitch, these two devices give you more options for simul climbing:
- Progress capture devices (such as the RollNLock or Tibloc)
- An assisted braking belay device (such as a GriGri)

simul climbing roll n lock petzl micro traxion

The Simul Climbing Setup

For most situations, the optimum distance between climbers while simul climbing is around 30m. This is close enough that you can communicate well with each other and manage rope drag, while being long enough to ensure adequate protection between climbers.

Simply using a 30m rope has drawbacks, especially if your route has an involved descent. Shortening a full length rope with coils will give you more options on the route. There are several ways of doing this. A simple setup is described below.

Follower:
- Tied in to the end of the rope with a figure-8.
- 20-30m of rope is neatly coiled over the shoulder, then pulled tight to belay loop with an alpine butterfly.
- GriGri pre-attached to belay loop with a small amount of slack in the rope.

Simul climbing rope coils

Leader:
- Tied in to the end of the rope with a figure-8.
- GriGri pre-attached to belay loop (this allows a quick transition to belaying when needed).

Simul climbing on alpine route with PCD

Optional Rope Coils
The leader could also attach to the rope with coils in the same way as the follower. Each climber takes half the number of coils so the length of rope between them is still the same. This enables the leader to quickly release some extra rope without needing to communicate this to the follower.

Make sure to keep your rope coils tight so they are unlikely to snag on rock features as you climb. Whenever releasing coils, always keep a hand on the brake strand of rope until you either re-tie your coils or reach the end of the rope – GriGri’s are not designed to be hands-free.

Simul Climbing – Understanding Dangers

Falling
The main danger with simul climbing is falling. This isn’t a big deal if the leader falls (assuming they protected the climb well and the follower hasn’t allowed slack into the system). However, if the follower falls, they will probably pull the leader off too. The leader will then be sucked, crotch first, into their last piece of gear.

Simulclimbing on alpine route

The force on that piece of gear is far greater than in a normal climbing situation. This is because:
- There is twice as much weight falling on the piece.
- The second cannot give a dynamic belay because they are falling.

The force generated is much more likely to explode that gear from the rock. For this reason, it is not safe to simul climb on routes that are loose, runout, or that either member of the team may find difficult. Using progress-capture devices reduces the chance of this type of fall.

Awareness
It’s easy to get swept up in the flow of a long simul-lead, and take unnecessary risks.

As a simul-leader, you should:
- Communicate clearly with your partner about your plan.
- Ensure that you protect the climb well when needed.
- Save enough gear to make a solid anchor.
- Be prepared to switch to belayed climbing anytime, even if this involves downclimbing.
- Be aware of your partners position on the route. If there is a tricky section, you should place gear on the rope in front of you just before they climb it, so that you are both protected. Or better, make an anchor and belay them up.

Unroping
On long ridges, there are often stretches of non-exposed hiking between steeper rock sections. A rope which is dragged through hiking terrain is likely to get stuck or dislodge rocks. It may be safer to put the rope away and stay close together, therefore avoiding any self-inflicted rockfall danger, and being able communicate more easily about route-finding.

Make sure you have a solid belay when transitioning back to belaying or simul climbing. Being unroped on exposed and/or difficult terrain is obviously very dangerous.

Climbing at Different Speeds – The Accordion Effect

It is important for both climbers to move at the same pace so there is no unnecessary slack in the system. Having too much slack can result in either an unnecessarily long fall for the leader, or a high loading of the progress-capture device if the follower falls. The follower also risks pulling the leader off the wall if they are not keeping up the pace, or if they have to down-climb.

Keeping the exact same pace all the time is extremely difficult. However, using rope coils makes this much easier.

For example, the leader may stop to place gear, while the follower is in a strenuous or awkward position. Instead of staying there, the follower can move up to a comfortable position while pulling the excess slack through their GriGri. From a resting position, the follower can then belay the slack rope back while the leader climbs up.

Also, if the follower would prefer a real belay for a difficult section, but the leader needs more rope to reach a solid anchor, the follower can release some coils and belay the leader until they find an anchor.

Once the leader has made a suitable anchor, the follower can either tie-off the coils again or continue belaying out the rest of their coils while the leader belays the rope in. This ensures there is never any unnecessary slack in the system. Once all the slack has been taken in, the leader can continue to belay the follower up to the anchor.

Similarly, if the leader encounters more difficult ground, the follower can stop at a good stance and/or make an anchor. The follower can then release their coils and belay the leader. Being able to quickly transition between simuling and belayed climbing allows you to safely navigate crux sections while cruising across the easier terrain.

Using Progress-Capture Devices

The use of a progress-capture device (such as the RollNLock or Tibloc) can protect the leader from receiving too hard of a pull on their rope if the follower falls.

The leader simply attaches a PCD to a piece of gear as shown. In theory, if the follower falls, the device will lock on the rope and hold the fall without affecting the leader.

In reality, there are serious drawbacks, which could make the situation more dangerous if the system is not fully understood.

PCD simul climbing

PCD’s should be attached to bomber multi-directional gear with minimum extension. Clipping one directly to a bolt is the best option, but they can also work well with trad gear if some cunning sling craft is used. Make sure your rope is able to run freely through the device.

The more the device can move up or down, the more the leader will ‘feel’ a tug if the follower falls and therefore have a greater chance of being pulled off. This will also exert a greater force on the rope, increasing the chance of ruining the sheath. Do not extend a PCD.

The leader should place another progress-capture device before the follower removes the previous one, so there is always one in the system.

Simul climbing pcd

Dangers of Progress-Capture Devices

* A high force (such as the follower falling when there is slack in the system, or falling on a ridge traverse) could sever the rope’s sheath.

* On wandering climbs, the PCD may get pulled to one side, causing it to (depending on the type of device) disengage or add rope drag.

* Many types of PCD work poorly on wet or icy ropes.

* If the leader needs to downclimb, the follower cannot take in any of the slack created. In this case, the leader must belay themselves down with their GriGri.

* If the follower needs to downclimb, they will have to remove their coils and self-belay down.

Types of Progress-Capture Device

There are many PCD’s available, but some are more suitable than others for simul climbing.

A device with a ribbed camming style is less harsh on rope sheaths than a toothed device. A PCD with a ball bearing pulley will feed rope through smoother than one without.

A good device is the Climbing Technology RollNLock which features a ribbed cam and a ball bearing pulley.

roll n lock petzl micro traxion

Another commonly used device with a ball bearing pulley is the Petzl Micro Traxion. However, this is a toothed device and so is more likely to damage a rope’s sheath.

Other ribbed devices include the Kong Duck and the Wild Country Ropeman. These do not have a pulley, so do not feed as smoothly as the RollNLock. A much simpler device is the Petzl Tibloc which is cheaper and lighter than the others but is toothed and has no pulley.

Simul Climbing – Summary

Simul climbing does not need to be epic. For example, if after climbing a full rope length, the leader is still 3 meters away from a belay, the follower may be able to safely provide them with enough rope by removing their belay and walking 3 meters across a ledge. This may be much safer than the leader attempting a desperate downclimb.

The techniques discussed in this section are for advanced, experienced climbers who are looking for creative ways to solve problems and climb faster. Make sure you fully understand the dangers and only apply simul climbing techniques to situations when it is safe to do so.