Check out the full big wall video course, or download the e-book.
Setting up a big wall belay is more complicated than a standard trad belay but follows some of the same principles. Belays are bolted on most popular routes which makes this process much quicker.
If you're building a big wall belay from trad gear, you’ll need two or three points which are EACH as strong as a bolt. Three medium sized cams or nuts (well placed in good rock) equalized together are about as strong as one bolt (approximately 25kN).
Depending on your setup, the whole thing may contain many pieces of gear. Remember that much more force is applied to a big wall belay (with hauling and jumaring happening at the same time) than a trad belay.
To set up a big wall belay station, you will need to:
1) Create a central point
2) Tie yourself in
3) Fix the lead rope
4) Set up a hauling system
Each of these are described on the following pages.
Top Tip
It is good to get into the habit of fixing the lead rope before setting up the haul. If communication is difficult, the belayer will know that the lead rope is fixed when the leader starts to haul.
Note
Unless you're standing on a ledge, you'll use your aiders to move around the belay while you set it up. These are omitted from the following diagrams for clarity.
Big Wall Belay - Creating a Central Point
Step 1
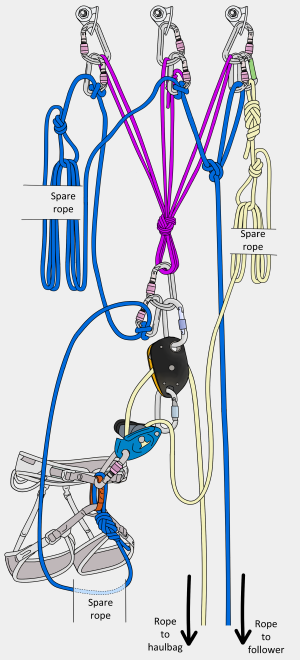
Clip a screwgate carabiner into each bolt.
Step 2
Clip a cordelette (a seven meter length of 8mm cord tied with a double fisherman’s bend works well) into each carabiner.
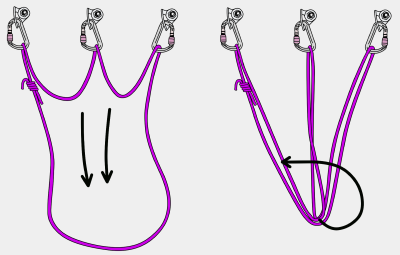
Step 3
Pull the loops of the cordelette down and equalize it with an overhand knot. Clip a large screwgate into this central point and fasten all four screwgates.
These carabiners will stay locked for the whole time you have the belay set up. You will clip other carabiners into these rather than tying knots directly onto them.
This way, you won't end up with something stuck behind something else (e.g: the leader unable to leave the belay because the haulbag is weighted on their tie-in point).

You'll also never weaken the belay by opening one of the main screwgates (when heavily weighted, some screwgates will open but not close).
You could set up a simpler belay which involves less screwgate carabiners if you are confident that you won’t encounter any problems doing so.
Central Point Tips
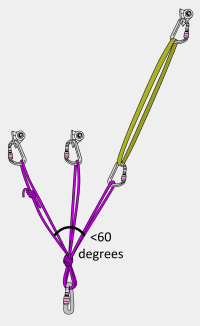
* Make sure your V-angle is less than 60 degrees. With widely spaced bolts, you may have to extend one of them with a sling.
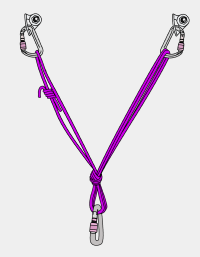
* If there are only two bolts, you can 'double up' your cordelette on one of them to keep your central point within reach of the bolts.
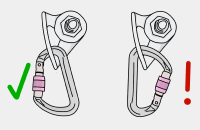
* It's better to position your screwgates with the wider side down, so you can fit more carabiners onto it later.

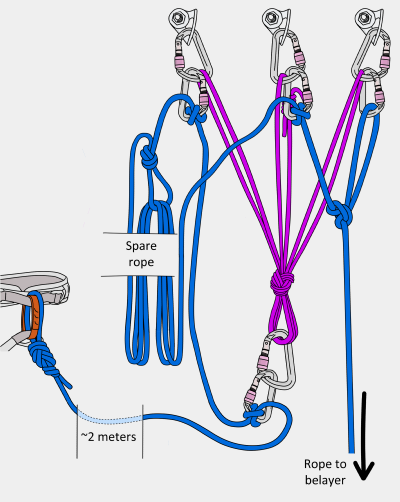
Big Wall Belay - Tying In
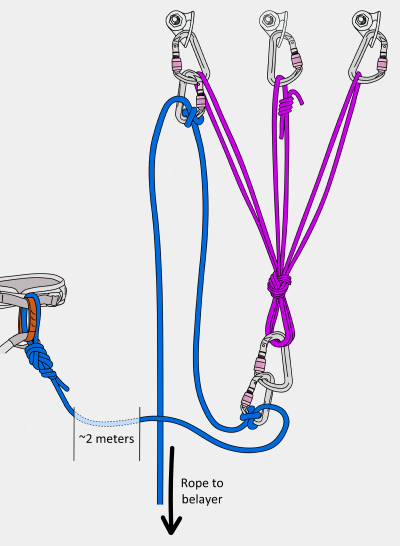
You need to tie into your central point as you would on a normal belay, but leaving enough slack to haul with (approximately 2 meters). Your weight will be taken by your daisies or the haul rope while you're hauling, not on your tie in – this is there as your full-strength back-up.
Clovehitch the lead rope to the central point on a separate screwgate and back it up by clove-hitching the lead rope, with a little slack, to one of the bolts (with another screwgate).
To keep the belay de-clustered, do this on the opposite side to where you will fix the lead rope for your partner.
You can use other knots, such as an alpine butterfly, but clovehitches are super easy to adjust. At this point you can tell your belayer that you are ‘off belay’.
Big Wall Belay - Fixing the Lead Rope
Your partner will jumar up the lead rope – you don't belay them as you normally would on a multi-pitch. This rope needs to be 'fixed' so it doesn’t move while they jumar up.
Step 1
Pull up the extra lead rope until it's tight-ish on your partner and stack it away on a sling or a rope loop. This makes it easier for your partner by removing clutter from the lower belay, but puts it at the upper belay. In some cases, you may choose to skip this step. For example, if your partner needs to lower-out at the start of the pitch, they will need the extra rope to do so.
Step 2
Fix the lead rope by tying a large-looped alpine butterfly to one bolt and a clove hitch to another bolt so that the rope is equalized. Make sure this is in the correct direction for the pull they will put on the rope while jumaring. An alternative is to fix the lead rope to the central point and back it up to one of the bolts. However, having a weighted rope at the central point can interfere with the hauling system.
Step 3
Now you can tell your partner that the 'lead rope is fixed'. At this point they can attach to the rope with their GriGri and jumars.
Big Wall Belay - Setting up the Hauling System
Step 1
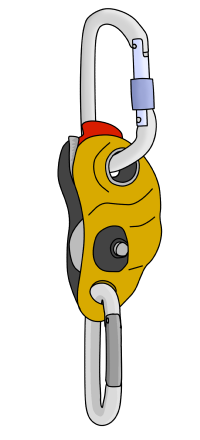
Clip your hauling pulley to the central point with a screwgate.
Step 2
Slot the haul rope through the hauling pulley and close it.
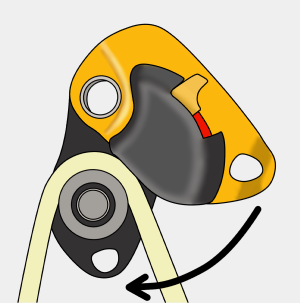
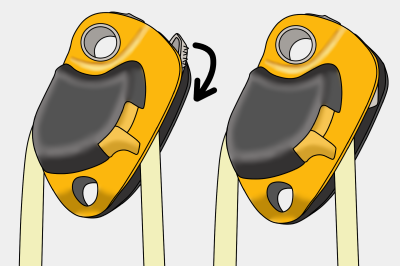
Step 3
Push down the catch, so the teeth bite into the rope.
Check that you have attached it the correct way around. Keep the end of the haul rope connected to your harness while you do this, so there's no chance of dropping it.
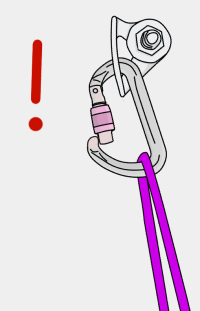
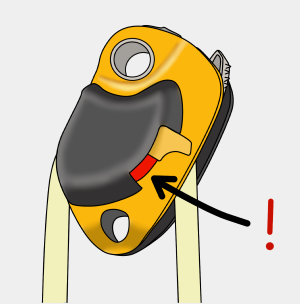
Warning!
It is important to make sure the device is locked.
Step 4
Remove the end of the haul rope from your harness and clip it away to the side of the belay.
Step 5
Pull the slack rope through the hauling pulley until the rope is tight on the haul bags, stacking it away in a sling or loop of rope.
Step 6
Put the slack end of the haul rope through your GriGri and attach it to your belay loop. Sit back to pull extra slack out of the rope. After a final check of your hauling setup, you can tell your partner that the 'haul rope is ready'. At this point, they can release the haul bags and leave the lower belay.
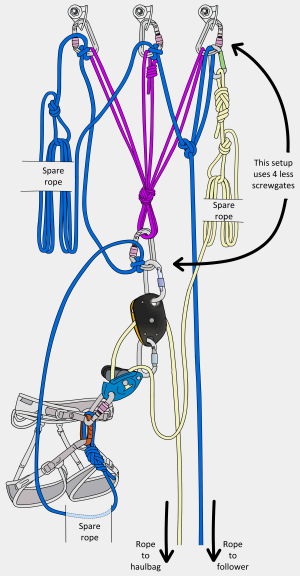
Alternative Setup
The setup described on the previous pages keeps the belay neatly organized but uses a lot of screwgates.
You could set up a simpler belay with less carabiners if you are confident that you won’t encounter any problems doing so.
Note
Some hauling pulleys (such as the older style Petzl Pro Traxion) must have a carabiner clipped through their base to stop them from potentially opening mid-haul.
Read the instructions with your pulley to see if this is needed. If you’re not sure, then clip one through anyway.
Big Wall Belay - Rope Management
Having random loops of rope hanging down from the belay will create all manner of problems when they get tangled around flakes and poop tubes. Keep them tamed in a rope bag (best option) or by stacking them neatly.
However you do it, make sure that all rope ends are clipped to the belay when not in use (e.g: clip the end of the haul rope to the belay overnight). This is so the whole rope can’t blow out of reach or zip off the wall completely.
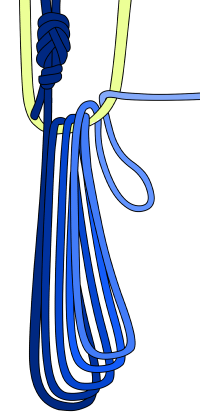
Stacking Ropes
Stack them in a sling or rope loop. Making smaller loops each time reduces the tangle factor when they feed out. Don’t allow loops of rope to get long enough to tangle underneath the haulbags – always keep the loops within reach.
If belaying from a portaledge or natural ledge, you could simply stack them on the ledge in a neat pile, if you are confident they won’t slide off.
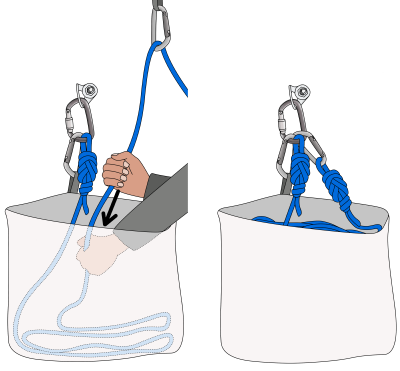
Stuffing Ropes
Stuffing ropes into a rope bag is the ultimate way of taming ropes on a windy wall.
Step 1
Clip one end to the belay.
Step 2
Run the rope through a high-point carabiner. Then stuff the rope into its bag, going hand-over-hand. This is much faster than picking up bundles of rope and dropping them in.
Step 3
Clip the top end of the rope on top of the other, so you know which end is which.
Keeping the Belay Organized
A well organized belay will help to speed things up. Tie-off your belay device while completing any of the suggested tasks below, or doing anything that requires you to let go of the brake rope (GriGri’s are not hands-free!). Watch the leader carefully and be ready to give slack quickly when needed. Remember that belaying is your priority – the other things are secondary. As well as enjoying the view while belaying, consider doing the following:
Get Food and Water Accessible
It’s useful to have a small water bottle (around 500ml) to pass up to the leader during those long pitches. A small bag with a good clip-in point is also useful for passing snacks, jackets, headlamps, cameras or other items which are difficult to clip in. Get these things accessible.
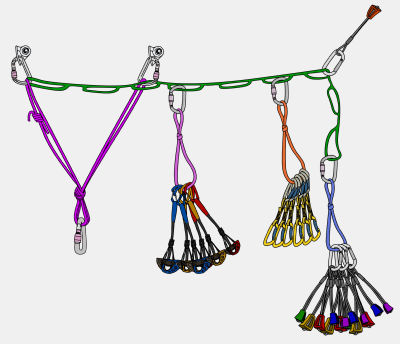
Organise the Rack
Having the whole rack organised and accessible makes it quick and easy to pass gear to the leader when they need it. For large racks, it’s useful to organise by type on racking slings. Attach a loop-style daisy chain between the belay bolts to provide plenty of clip-in points for the rack and any other things you might need during a long belay.
Eat Your Lunch
During belay duty is a good time to eat, hydrate, re-apply sunscreen (be careful not to get it on your rope or gear) and deal with other personal hygiene issues, without slowing down the ascent.
Prepare to Pack the Haulbag
As the leader is approaching the end of the pitch, you can begin re-packing the haulbag. The rack can be packed away once the leader has enough to finish the pitch. It’s nice to have a water bottle and a few snacks on the very top because finding these is usually the priority after hauling. Aim to have the haulbag packed so you can lower it out as soon as the leader has the haul rope ready at the upper belay.
Belay Transitions
Ideally, the leader will have completed the haul, stacked the haul rope and organised the remaining rack by the time the follower has cleaned the pitch. Upon arriving at the belay, the follower will remove excess rack from their harness and immediately be put on belay, ready to lead the next pitch. The new leader will have a quick snack while the belayer stacks the lead rope. The leader will leave the belay within a few minutes of arriving at it.
A streamlined transition like this can happen, but it’s often slowed down by something such as a stuck haulbag, poor rope management or if the leader hasn’t finished hauling. Work together to solve any problems. There is always something you can be doing. If the haul isn’t complete, both climbers can haul together to speed it up. Make it a priority to finish the haul and then get the leader started on the next pitch. Things like organising the rack and adjusting your belay seat can wait until the leader is moving up the next pitch.
Big Wall Communication
Communication on the wall is best kept to a minimum to avoid confusion. Keep commands simple and practise them with your partner before the climb. Trying to shout 60 meters into the wind about some complicated rope setup to your partner who you can’t see could result in disaster. Standard commands are:
Off Belay
The leader is safely attached to the upper anchor and no longer needs a belay.
Lead Rope Fixed
The leader has fixed the lead rope. It is now safe for the follower to attach to the lead rope to clean the pitch.
Haul Rope Ready
The leader has set up the hauling system, pulled through the slack rope and is ready to haul.
Releasing Haulbag
The belayer is about to release the haulbag from the lower belay. This is used as a final check before lowering out the haulbag and informs the leader to begin hauling.
Each of these commands can be followed with ‘OK’ by the other climber to confirm that the message was understood.
Communication Breakdown
It’s important to have a plan for what to do when you can’t see or hear each other. For example, if the leader is out of sight above and the haulbag starts moving up the wall, it means the leader is off belay, the lead rope is fixed and the haulbag can be released. You know this because it wouldn’t be possible for the leader to be hauling if they’re still climbing the pitch!
Radios
Two-way radios can be useful in some situations. For example, on an obscure route or first-ascent when the leader frequently needs to ask for many different types of gear to finish a long pitch or make an intricate gear belay. To save batteries, keep your radios turned off until you need them. Have a signal for switching them on, such as a loud ‘monkey call’ or a series of tugs on the rope.