Glacier Travel: Moving on Snow
Walking on Snow
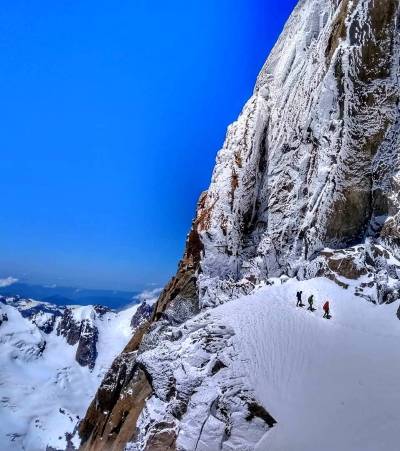
The snow which covers a glacier is very variable. Sometimes a 20 degree slope is easy to walk up, with the front team member kicking in steps as they go. On the same slope at other times, you’ll be wallowing in powder up to your armpits, or using crampons to front-point up snow which is as hard as ice. Or maybe the snow has transformed and you’ll actually be on ice.
It’s important to learn how to move on all snow types and how to regain control if you start sliding down a slope.
Kicking Steps
If the snow is hard, the front climber will need to kick steps to create an easy path for the rest of the team. Steps that are slightly incut will be more secure. When following, kick into the steps to improve them. Simply standing in them is not as stable.
Moving on Low-Angled Snow
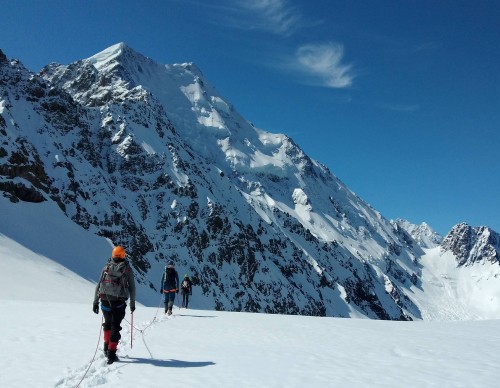
Travelling across a fairly flat glacier is simple – just walk and try not to trip over your crampons. But as the slope increases, you will need to adapt your walking technique from what you normally use on city streets.
Hold the axe in your uphill hand and place the shaft into the snow above you. Then move your feet up, one at a time, and repeat. The axe provides balance while you walk uphill – a bit like holding onto a railing when walking up stairs.
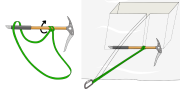
How to Carry an Ice Axe
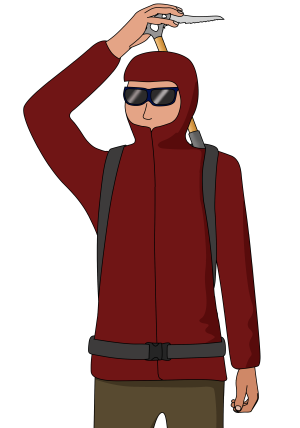
In Your Hand
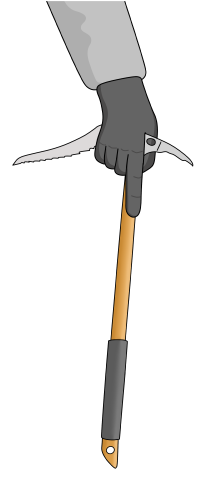
Hold the axe in your hand with your thumb under the adze and the pick pointing back as shown. This means you are always ready for an ice axe arrest if you slip.
Inside Your Rucksack
For extended sections of scrambling/rock climbing, it’s useful to put your axe inside your rucksack, if it will fit. This means it is much less likely to get snagged on something.
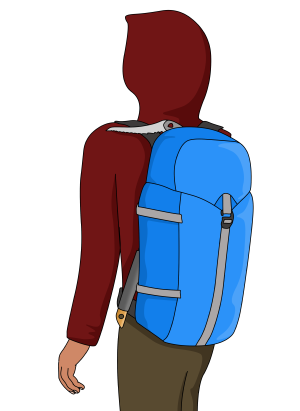
On Your Rucksack
If the axe is not needed for a while, attach it securely to the axe-loop on the outside of your bag, as shown below.
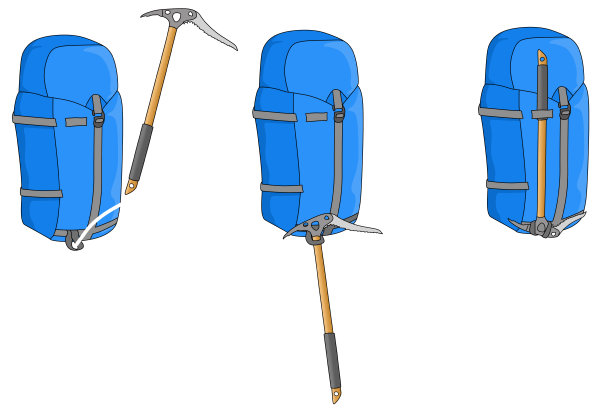
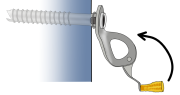
On a Shoulder Strap
If you need both hands free, you can quickly store your axe down the back of your rucksack so the pick rests on a shoulder strap.
Simply poke the shaft a few inches under your shoulder strap by your collar bone and raise the head of the axe so the shaft levers off your shoulder.
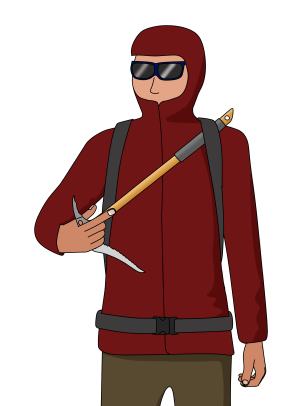
Then allow the axe to slot down between your back and rucksack.
Shoulder Strap Tips
– If this feels uncomfortable, try loosening your shoulder straps a little.
– If you have chest coils on, use the shoulder strap on the same side as the coils.
– If the shaft of the axe is curved, try putting the axe in with the pick facing the other way so the end of the shaft doesn’t stick out as much.
– If you take your bag off, remember that the axe isn’t attached!
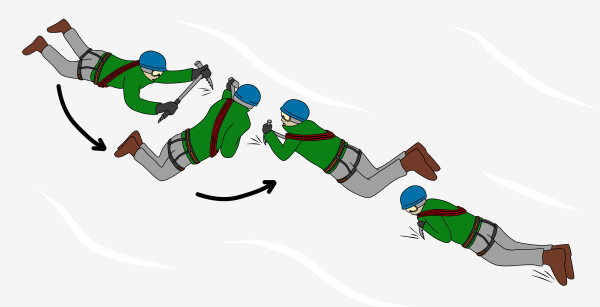
Ice Axe Arrest
The ‘ice axe arrest’ is a technique where you stop yourself sliding down a snow slope.
The Basic Technique
The simplest scenario is when sliding on your stomach, feet pointing downhill.
The correct body position is:
– Axe held diagonally across your body.
– Adze pressed into the hollow below your collar bone (if you don’t keep the adze at your shoulder, the pick will be unlikely to bite. It would also be difficult to hold onto the axe if the pick did bite).
– Face turned away from the axe (in case the pick hits something and the adze kicks back and cuts your nose off, like Joe Simpson).
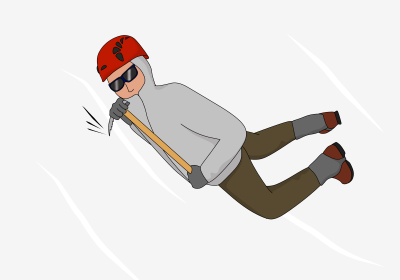
– One hand over the head of the axe, the other covering the spike on the end of the shaft (to prevent it from accidentally catching in the snow and being ripped out of your hands or spinning you).
– Elbows tightly tucked in by your sides (stronger position).
– Legs apart and bent at the knees with feet up in the air (this provides stability and having your crampons in the air prevents them from catching and sending you into a cartwheel).
Once in this position, focus all of your weight over your shoulder down through the adze to push the pick into the snow. If you don’t stop, just keep trying and try harder. At least it will slow you down.
Sliding on your Back
If you are sliding on your back then you must roll over. It is best to roll over in the direction of the pick, as this reduces the chance of the spike on the shaft jabbing into the snow by accident.
Sliding Head First
If you are sliding head first you must hold the axe far out to one side, push it into the snow and allow your legs to swing around below you. Then remove the pick from the snow, bring the axe down to your shoulder and get into the correct position described above.
Practise
The ice axe arrest technique needs to be practised to a point where it becomes an instinctive reaction. Try it out on slopes of different angles and snow conditions, making sure there is a safe runout below you. When you need to arrest for real, it must be executed instantly to be most effective.
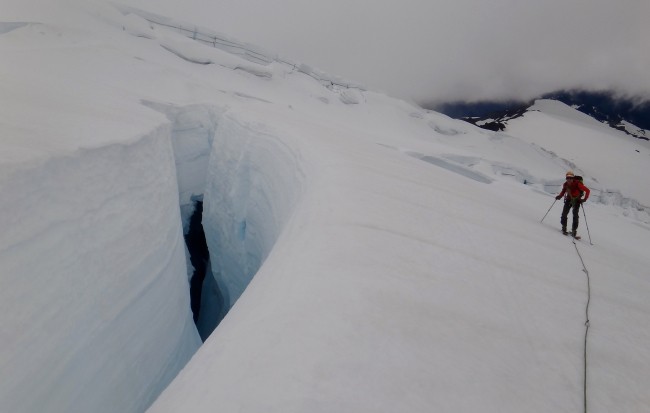
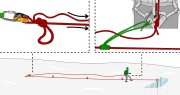
Crossing Crevasses
There are a few different ways of getting past a crevasse. In order of preference, these are:
– Go around the end
– Cross on a snow bridge
– Jump over
– Climb inside / abseil over
Going Around
This is the preferred method, since you are much less likely to fall in. Crevasses generally narrow towards their ends, but the visible end may not be the actual end. Probe carefully and give the end a lot of space. Look for other nearby crevasses and consider if one of them is actually an extension of this crevasse – you might be crossing a snow bridge.
Crossing a Snow Bridge
The strength of a snow bridge varies considerably with temperature – stronger when frozen overnight and weaker in the midday sun. Just because there are footprints on it doesn’t mean it won’t collapse under your weight. If you’re unsure of the bridge’s stability, make a snow anchor and belay across. Once the leader is across, the rest of the team should follow their footprints exactly.
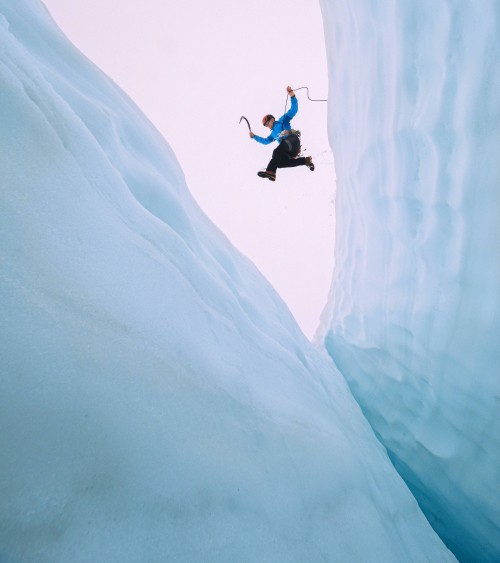
Jumping Over
Jumping over a deep void in the ground is exhilarating and makes you look like a hero on photos. But it can also be very dangerous. With a solid belay, probe around to find the true edge of the crevasse. Pack down the snow to create a runway for your leap of faith. Make sure to have enough slack rope to complete the jump and keep your axe in the self-arrest position so you can climb up if you land on the lip. The leader then belays the other team members across.
Climbing Inside
Sometimes, it may be possible to climb inside a crevasse, walk across the bottom and climb up the adjacent wall. This really only works in shallow crevasses which have easy exits. Before going in, make sure the bottom of the crevasse really is the bottom and not just a half-sunk snow bridge. As with jumping across, this can be dangerous and requires a solid belay.
Abseiling Over
It is fairly common to abseil over the bergschrund when descending onto the top of a glacier. This is best done from rock anchors (if available), but an anchor could also be made on ice (using a v-thread) or on snow (using a snow bollard) if necessary. Remember to abseil with a prusik and keep your ice axes handy as you may need to climb up and out of the other side of the crevasse.
Glacier Travel: Risk Assessment
It is important to understand the risks involved in all types of climbing and mountaineering. The process of evaluating these risks during the activity is often referred to as a dynamic risk assessment.
When looking at a situation, think about the likelihood of a negative incident occurring (e.g: a slip or fall, a hold snapping off, a storm coming in, a rock falling from above), then think about the consequences of this happening. How does the terrain, situation or weather affect the consequences of the negative incident?
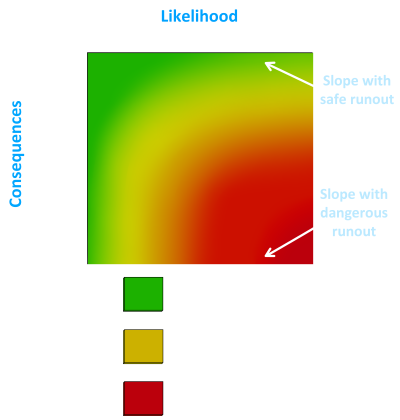
For example, there might be no serious consequence for a climber who slips on a small snow slope which has a safe runout. Whereas the same incident on a similar slope but with a rocky runout, or a cliff or crevasse below, may lead to serious injury.
It is the relationship between likelihood and consequence that is crucial to evaluating the risks. To stay safe in the mountains we need to continually make these dynamic risk assessments and adjust our plan, or the technique and tactics we use. This will mitigate either the likelihood or consequence to bring risk to an acceptable level for each given situation. Keep asking yourself, what will happen if…?
Related Topics
The article above is part of the book – Glacier Travel and Crevasse Rescue

E-book (pay what you want)
Paperback
Kindle
Free Sample
Learn:
– The fundamentals of glacier travel
– What gear you need to safely cross a glacier
– How to tie into the rope with chest coils
– How to move efficiently on snow
– How to make snow and ice anchors
– Different methods of performing a crevasse rescue
– How to prusik out of a crevasse
Plus much more.