Aid Climbing and Big Wall Gear
Big wall gear is expensive, but you don’t need to buy everything to start with. Many trad climbers already own most of the rack for a clean aid route, and sufficient bivi gear for a summer wall. If you’re not sure that big wall climbing is right for you, consider choosing your first route as one which does not require a portaledge.
By choosing a fairly fast route, you can get a smaller haulbag too. You will of course need to spend more money if you want to advance to harder, longer or more remote walls. If so, it is worth getting durable kit that will last many walls. An example kit list for a short clean aid wall is given below.
Short Clean-Aid Wall: Kit List
Rack
3x sets of cams up to Camalot #3
1x cams size #4 and #5
1x set of small offset cams
1x set of regular nuts
2x sets of offset nuts
2x nut tools
2x cam hooks
2x skyhooks
10x regular quickdraws
10x extendable quickdraws
5x 120cm slings
20x spare snapgate carabiners
12x spare screwgate carabiners
2x cordelettes
1x hauling device
Personal Equipment for Each Climber
Harness
Helmet
Pair of approach shoes
Pair of free climbing shoes
Pair of fingerless gloves
2x Aiders
2x Daisy chains
2x Jumars
GriGri
ATC
Prusik cord
Sleeping pad
Sleeping bag
Bivi bag
Jacket and spare clothes
Headlamp
Group Equipment
1x full size haulbag
2x 60m dynamic ropes
2x rope bags
Knot protector
Water
Food
Spoons
First aid kit
Topo
Phone
Sun protection
Small repair kit
Pocket knife
Poop tube
Hygiene products
A few stuff sacks
Big Wall Ropes
Almost every wall requires two ropes; a lead line and a tag/haul line. A length of 60 meters (for each rope) will be suitable for most walls. However, modern routes are often established with 70m ropes, so reaching the belay with a shorter cord may be impossible. The character of the route, the length of pitches and the abrasiveness of the rock dictate what ropes you should take.
Lead Rope
The lead rope is your most critical piece of gear. A burly 10-11mm diameter dynamic rope with a low impact force rating will stand up well to the abuses of aid intensive walls.
Free Climbing Ropes
For walls that you plan to mostly free climb, a lighter, 9.0-9.4mm rope will be much more practical but less durable. In this case, consider using a dynamic haul line so you have a spare rope in case your lead line gets trashed.
Dry Treatment
A rope with dry treatment will resist absorbing water. This increases its durability and maintains a low impact force when wet. The treatment also helps to stop dirt and sand getting into the rope’s fibers, which means the rope will run across the rock and through carabiners with less friction than if it was untreated. It’s worth the extra cost for a dry treated rope if you plan to climb wet/snowy walls.
Unicore Ropes
Some modern ropes have a unicore design – the rope’s sheath is permanently bonded to its core. This eliminates sheath slippage, making it much safer for situations such as jumaring.
Haul Rope
The haul rope should be the same length or longer than your lead rope, and can be either static or dynamic. This rope is used for:
– Hauling your bags up the wall
– Passing gear to the leader mid-pitch
– Abseiling
– Jumaring (if climbing as a team of three
Static Haul Ropes
Because a static rope has almost no stretch, it is great for hauling and fixing pitches. A 8-9mm diameter static rope is a good lightweight choice for hauling light loads. A 9- 11mm rope is a better choice for hauling heavier loads and for climbing as a team of three. Fixing pitches with a static rope is much safer than using a dynamic if the rope is running over rough rock or sharp edges.
Dynamic Haul Ropes
A dynamic haul rope theoretically lowers the efficiency of a hauling system. However, once loaded, the extra stretch is barely noticeable. A single-rated dynamic haul rope also serves as a spare in case you destroy your lead line.
Tag Lines
Tag lines range from 5.5mm (dyneema) to 8mm (perlon) in diameter and are used for hauling super light loads. A half rope could also be used. For fast walls, you may choose to use one of these instead of a haul rope. If climbing a slower wall with a thick haul rope, it is worth trailing a tag line to save weight on your harness. Tag lines (and half ropes) are much lighter than haul ropes, but are not strong or thick enough for jumaring or hauling heavy loads.
Rope Bags
Ropes can be stacked in slings at the belay, but stuffing them into rope bags is a better way to tame them when windy. You can buy expensive rope bags which have sewn clip-in loops, but Ikea bags work just as well.
Big Wall Rack
The rack requirement is different for each route. Most easier routes are climbed clean (without using gear which needs a hammer to place and remove). Generally, a triple set of cams to #3 Camalot and a double set of offset nuts will be a sufficient rack for many clean aid routes. For a hard nail-up, you may need 4-5 sets of cams, 50+ pitons, 100+ copperheads, a bolt kit and plenty of other obscure pieces of ironmongery. Even on clean aid routes, it is useful to have a hammer for removing stubborn nuts (hit your nut tool with your hammer).
In general, it is a good idea to have as great a variety of gear as possible, since one particular brand of cam may fit in a certain placement much better than any other.
Slings and Quickdraws
Slings and quickdraws extend gear to reduce rope drag, help insecure placements from dislodging themselves and direct the rope away from sharp edges or flakes. 60cm and 120cm dyneema slings are particularly useful for equalizing gear on lead. Take a mixture of at least 20 slings/draws on a wall.
Screamers
Screamers (fall arresters) are energy absorbing quickdraws. A screamer activates (the stitching rips) when ~2kN force is applied. This reduces the impact force on your gear during a fall, meaning that it is more likely to hold.
Screamers are most useful when attached to the first few pieces of gear in a pitch when fall factors are the highest and also on fairly marginal gear higher in the pitch. A screamer can only be activated once, but it can be used as a full-strength extender after activation. Scream Aids work in a similar way except they activate at ~1.5kN and break completely at 7kN. They are only really useful on extremely marginal gear.
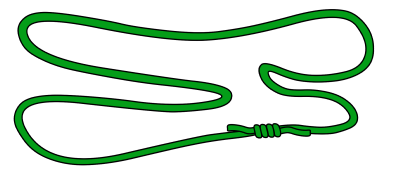
Cordelettes
You’ll need two cordelettes on a wall – one for each belay. A 7 meter length of 8mm cord is great for equalizing 3 bolts. Simply tie it in a loop with a double fisherman’s bend. You can then coil it up (like you would with a long sling) to rack it on your harness. A shorter length of cord is more convenient for 2 bolt anchors.
Long slings can be used too, but cordelettes are more durable and much easier to untie after loading. You could also get a pre-made cordelette such as the Trango Equalizer or the Metolius Equalizer.
Knots in slings can be difficult to unfasten after being heavily loaded.
To loosen up stubborn knots, tap them against the wall with your hammer.
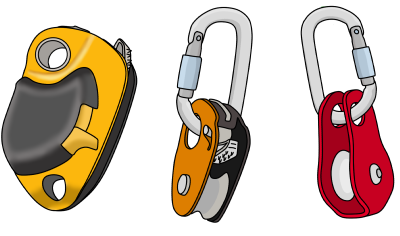
Hauling Pulleys
A pulley with a locking, toothed catch (such as the Petzl Pro Traxion) is essential for hauling heavy loads up the wall.
For hauling lighter loads, a smaller device (such as the Petzl Micro Traxion) will be fine.
For super heavy loads, you’ll need a locking pulley plus two other pulleys to create a 2:1 or 3:1 mechanical advantage hauling system.
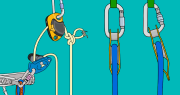
Carabiners
You’ll need lots! There are no special aid specific carabiners, but you’ll need more than you would take for your standard multi-pitch trad outing. Aim for at least 12 spare screwgates and 20 spare snapgates in addition to the carabiners already on your gear.
Swivel
Some climbers use a swivel on their haul bag to avoid the haul line getting kinked as the bag is lowered out on a traverse. It’s not essential, but can be useful.

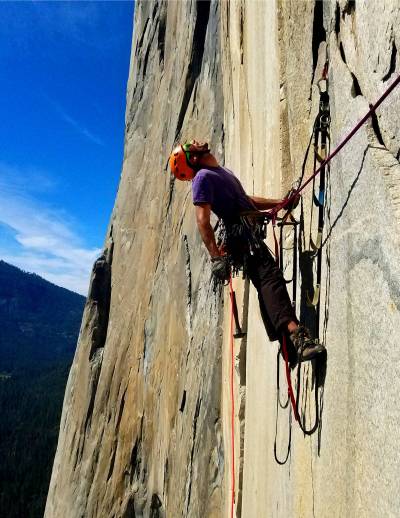
Personal Big Wall Equipment
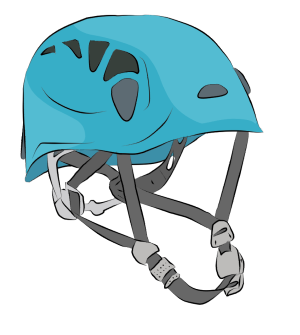
Helmet
Helmets are essential on big walls. Leader falls can happen with no warning, rocks can fall and gear can be dropped. Wear one. The most important factor when buying a helmet is getting one that fits your head snugly – it shouldn’t move when you tip your head. A sloppy fit reduces the helmet’s ability to protect your head.
Your helmet should adjust to accommodate a hat, and a ponytail if you have long hair. Also, make sure the headlamp attachments are compatible with your headlamp.
Belay Device
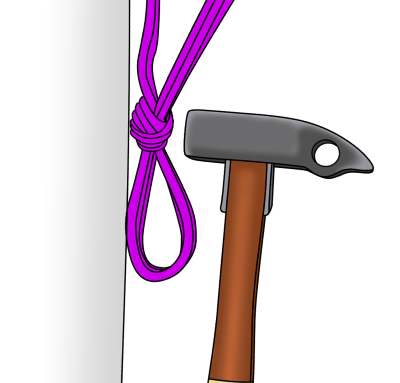
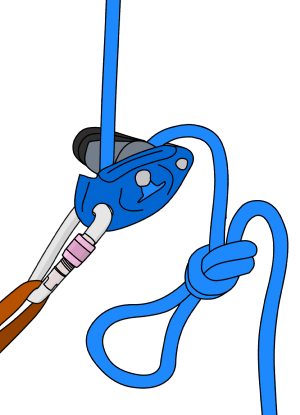
Any type of belay device can be used for big wall climbing, though using an assisted-braking belay device (such as the Petzl GriGri) is the most useful. It requires much less effort to hold a climber while they hang on the rope (e.g: during pendulums or tension traverses), it can be used as a backup when cleaning pitches and is useful for hauling.
GriGri’s are not auto-locking; you still have to hold the brake rope at all times, just like you would with a normal belay device. This is especially true with thinner ropes, very light climbers or if there is ropedrag on the route. To go hands-free at the belay, simply tie an overhand knot as shown.
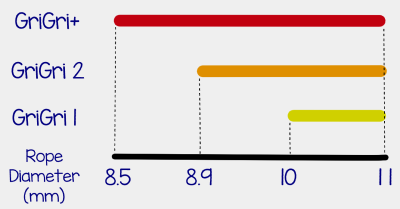
GriGri’s are designed to work with the following rope diameters. Make sure you’re using the correct rope for your device.
Harness
Any climbing harness will suffice, but getting a big wall specific one makes life a lot more comfortable. A typical big wall harness has:
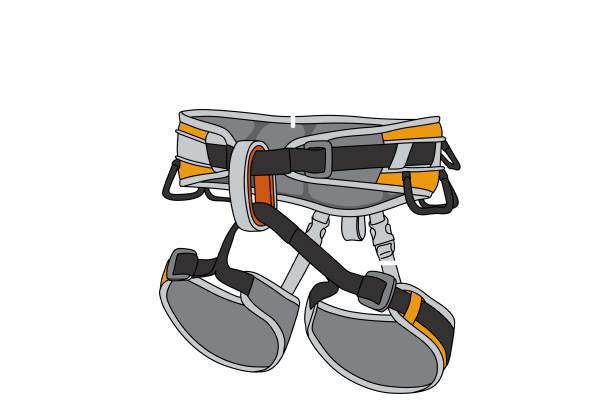
Some also feature a handy hammer holster. If your harness doesn’t have a haul loop on the back, you can make one by tying webbing around the whole waist belt. It’s worth going to your local shop and trying some on, rather than ordering online. Clip some heavy stuff to the gear loops and hang in the harness to simulate what it’ll be like on the wall. Good shops will have a facility for you to do this.
Waist Belt
The waist belt needs to go small enough to be tight over a t-shirt, with enough adjustment to safely doubleback the buckle when you’re wearing multiple layers.
Leg Loops
Some climbing harnesses have adjustable leg loops too. This is useful if you plan to climb in cold environments where you’ll need to wear thicker pants, or if the fixed size options just don’t quite fit. The leg loops should fit closely around your thighs without hindering movement.
The Rise
The rise is the distance between the waist belt and leg loops. Think of it as the measurement between your belly button and crotch. Women’s harnesses tend to have a bigger rise, to fit women’s body shapes better. If the rise is too short, you won’t be able to get the waist belt all the way up to the smallest part of your waist.
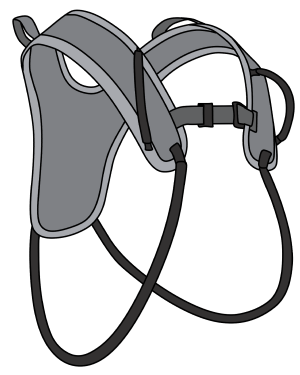
Chest Harness
Many aid climbers also use a bandolier or chest harness to rack gear on.
Aid climbing gear is heavy – having that weight distributed between your shoulders and hips is much more comfortable. It also helps spread the gear out, making it easier to find.
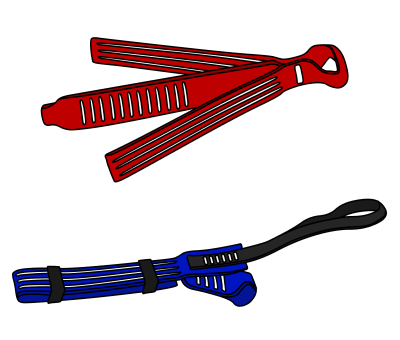
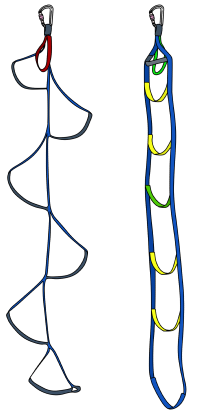
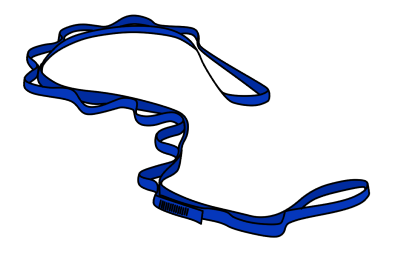
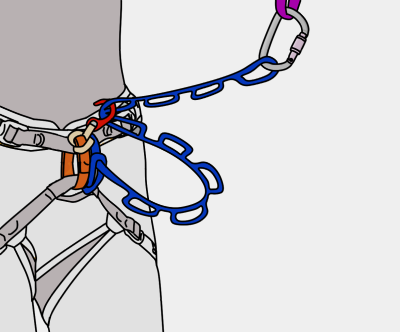
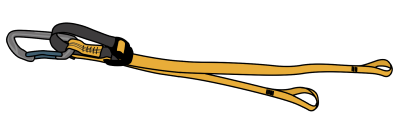
Aiders
Aiders, or etriers, are multi-stepped fabric ladders, sewn as either a ladder or in alternating triangles. They attach to the gear you place (together with your daisy chain) so that you can stand your weight on it. You’ll need two of them.
If getting the ladder type, look for some that have a solid plastic reinforcement on the top step, as this makes top stepping much easier. Alpine aiders are the same design but made with thinner webbing. They are light and pack up small, making them great for occasional use. Alpine aiders are uncomfortable on the arches of your feet if you stand in them for long periods of time.
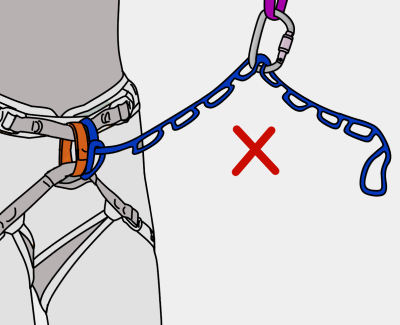
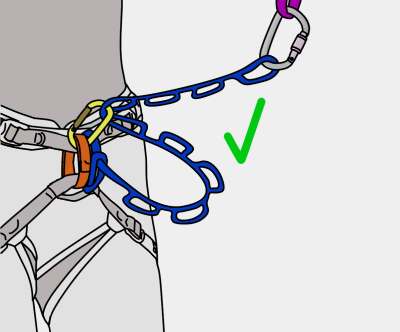
Daisy Chains
Your two daisy chains (lanyards) connect you directly to the gear which you place. Attach the daisies to your harness by girth hitching them through your harness tie-in points or belay loop. There are two main types available: Loop-style and adjustable. Which type you use mostly depends on the style of climbing you’ll be doing and personal preference. Adjustables save a lot of energy on complex aid pitches, especially overhangs.
The traditional loop-style daisies are generally better on easier, slabbier terrain when it’s not necessary to adjust your daisy so often. Combining either of these styles with an Allfrifi hook can speed things up too. Having a third daisy/aider is super useful for equalizing yourself between sketchy pieces when creeping up a hard aid pitch.
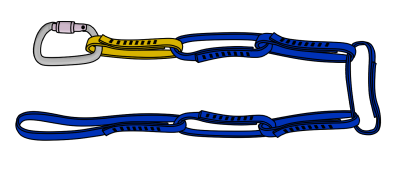
Loop-Style Daisies
This traditional daisy is a full-strength nylon or dyneema sling with lots of sewn loops in it, designed to be used with a fifi hook or carabiner to adjust the length.
The stitching between loops is very low strength, however. If you connect to a piece of gear by clipping a carabiner through two consecutive loops, the stitching could break, causing you to become completely detached.
Loop-style daisies should be shortened as shown so the daisy is still connected end-to-end and therefore remains full strength.
You could also use a personal anchor system (PAS) as a daisy.
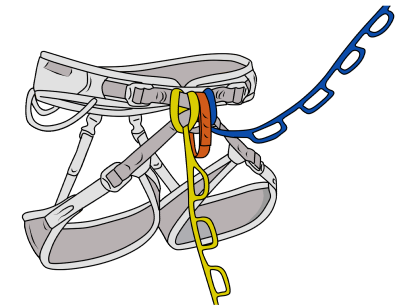
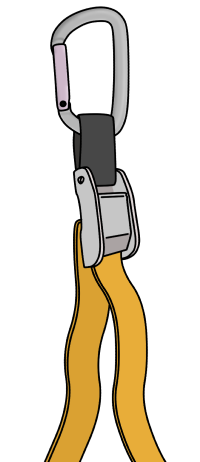
Fifi Hook
A fifi hook is a metal hook that is girth hitched to your harness. It allows you to hook into a daisy loop, or directly into a piece of gear so you can weight it at the length you choose.
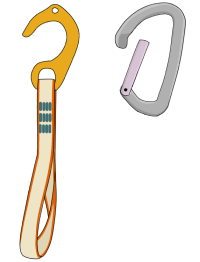
You can also use a snap gate carabiner instead of a fifi hook – it’s a bit fiddlier but more secure. If using a carabiner, a keylock style gate (without a nose) is better, as it will snag less.
Adjustable Daisies
Adjustable daisies use a buckle system for easy length adjustment. They are not full strength and should never be used as your primary anchor attachment. They are much quicker to adjust than the loop style and significantly less strenuous on overhanging terrain.
A few types are available with Yates producing an excellent design. Be warned that if you have the buckle facing into the rock, it can self-adjust when weighted. Other disadvantages are that the webbing gets twisted easily and wears out fast. Yates daisies are only 5kN to start with and soon become less. Consider replacing the webbing after each wall.
Metolius Easy Daisies should be avoided. They are very weak (1.5kN) and are nearly impossible to tension or release under load, making them useless on a big wall.
Allfrifi Hooks
The Allfrifi is basically a fifi hook welded directly onto the buckle of an adjustable daisy. They are not essential for aid climbing, but can speed up the process a little and allow you to attach slightly closer to a piece of gear – useful when aiding on steep ground.
If you choose to use an allfrifi, you’ll still need two regular daisies since the allfrifi does not have a clip in point for an aider.
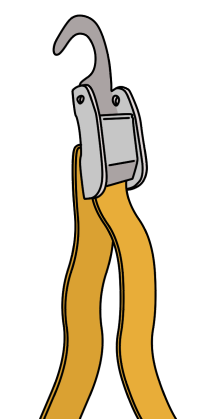
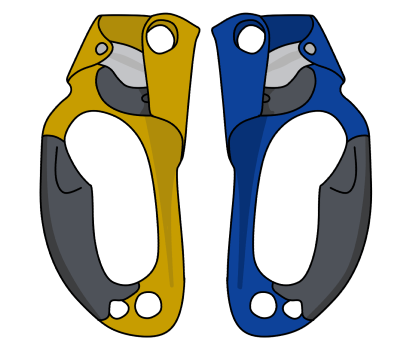
Jumars
Jumars, or ascenders, are used to ascend the rope when it’s fixed in place. They’re like a mechanical version of a prusik (friction hitch). You use them when cleaning pitches, jumaring up fixed lines and in some hauling setups.
For most walls, a pair with large comfortable handles is best. They are made in a left and right hand model, with the cam designed to be operated by your thumb. You’ll need a pair – having two left jumars is like having two left shoes.
Gloves
Fingerless leather gloves with a clipin point help to prevent your hands getting destroyed on the wall. You can buy specially designed wall gloves or make your own out of hardware-store gardening gloves.
Clothes
Often you will be overheating and sweating on lead, only to be shivering when belaying the next pitch. Temperatures drop significantly during storms or periods of high wind and it is often much colder high up on the wall than it is on the valley floor. Once you get cold and wet, decisions tend to be made poorly and disasters begin to happen. Prevent problems by bringing enough clothes to stay warm. Cotton has poor insulating properties, especially when wet. Merino wool and synthetic base layers and pants are a much better choice for walls. These materials insulate well when wet, are lighter, dry faster and stretch to accommodate movement when climbing. If you expect cold temperatures, bring a pair of gloves so you can belay with warm hands and then switch them out to climb. A thin hat that fits under your helmet is a very lightweight way of keeping you warm too.
Make sure to bring a good fleece, a waterproof jacket and a puffy synthetic belay jacket – even in Yosemite it gets cold high on the wall when you’ve been belaying for hours. For colder walls, you’ll obviously need even more layers including a super warm belay jacket. Down jackets are a poor choice in wet climates, but make excellent belay jackets in dry climates below freezing. Most down jackets will repel a small amount of moisture, but the feathers will clump together in a rain storm and you’ll freeze. They also tend to rip very easily on rock, so take it off for leading and cleaning.
Shoes
Your shoes need to be comfortable enough to stand in aiders all day and durable enough to withstand constant rubbing around the front and sides. A stiff-soled, sticky rubber approach shoe is good for aid intensive walls that have sections of easy free climbing. For pure aid, a stiff-soled high-cut boot may be more comfortable on those long leads. You’ll obviously need your free climbing shoes too for leading free pitches. On free climbing walls, be ready to switch out to more comfortable shoes when needed – it’s painful to clean or lead aid pitches in free shoes. It also wears them out fast.
To make your boots last as long as possible, apply a thick coat of Shoe Goo or a similar strong glue-type product to the seams most likely to blow out (mainly around the toe). Tie in loops are great for clipping in your shoes at night – if you drop your wall shoes, the rest of your climb will be extremely painful.
Knee Pads
Your knees are often in contact with the wall when aid climbing and hauling. A pair of slip on knee pads can make things a bit more comfortable, but can get in the way when free climbing and snagged in your aiders when aiding. If you want knee pads, get the lightest and most low profile ones you can find.
Sleeping Bag
Bring a good synthetic sleeping bag which is rated to a colder temperature than you are likely to encounter. Not even the best portaledge fly will keep everything dry in an epic storm. Condensation builds up on the inside of the fly and your bivi bag. Your clothes and sleeping bag will get damp, reducing their warmth. Synthetic bags retain a decent amount of warmth if they get soaked in a storm, whereas down-filled bags are completely useless. The feathers will clump together in a wet pile at your feet, offering zero warmth for the rest of the wall. Take a synthetic bag instead. Sew decent clip-in loops on your sleeping bag rather than just clipping the cord on the zip.
Bivi Bag
Rain always seems to find a way into a portaledge fly somewhere. Usually it sneaks in through the seams, combines with condensation and soaks down into the edges of the nylon bed. A waterproof and breathable bivi bag will give you greater protection during those intense storms. You should definitely take a bivi bag if you don’t have a portaledge fly.
Foam Pad
A foam pad isn’t essential on warm walls, but it makes a huge difference in colder climates. To make a clip-in point, tie a loop of cord through a tape reinforced hole. An inflatable pad packs down smaller but is likely to pop when stuffed in a haul bag next to a rack of beaks. Take a repair kit if going inflatable.
Group Big Wall Equipment
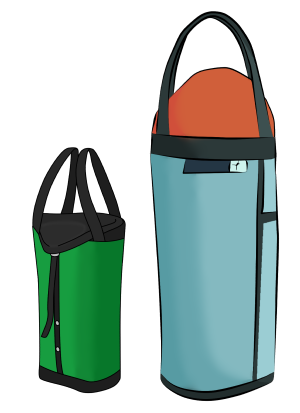
Haul Bag
For multi-day aid routes, you’ll need to haul. Haulbags are generally made of thick vinyl fabric and are durable enough to be dragged up rough slabs all day. Different sizes are available, up to around 160 litres.
For day routes, a small haulbag will suffice. For two climbers on a shorter wall (two or three days) a medium or full-size bag is good. For long walls (a week or more) you’ll need a full-size haulbag for each climber. Many haulbags feature full strength clip in points underneath, so you can carry a durable stuff sack, portaledge or haul bucket without it taking up space in the haulbag.
Food
You’ll burn 3,000-6000 calories per day on a wall – twice as much as a day spent sat in the office. The best wall food:
– Has a high calorie per weight ratio
– Is in a durable container
– Doesn’t rely on a stove to be edible
– Is convenient to eat
– Is nutritious and tastes great
What food you bring largely depends on your style of ascent and what you normally like to eat. You can save time and weight with ready-made, plastic-wrapped food. Or go luxury with a cooked breakfast and fresh coffee every morning, and a warm meal with a selection of aged cheeses and fine wine in the evenings.
Organise your food into day-bags so you can keep track of your supplies. Cans weigh more than plastic wrapped food, but are much more durable. A mix of both is generally preferred with the less durable food being consumed first. If you choose to bring a stove, try not to bring food that requires cooking. You can eat cold canned food if your stove breaks, but chomping on bits of dried pasta or uncooked rice is miserable. Similarly for caffeine addicts, instant coffee can easily be hydrated in cold water, but tea bags or fresh coffee just doesn’t work.
Freeze dried food is lighter but requires water, thus negating any weight saving benefits. Once hydrated, the food itself weighs the same as food in a can. It is only the packaging which makes it lighter. However, if you are collecting water (i.e: melting snow) during the wall, freeze dried meals will save you a lot of weight.
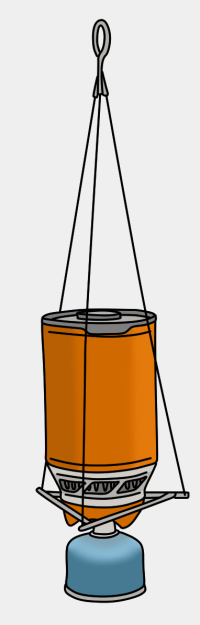
Stoves
It’s nice to chill out in the mornings with a coffee and eat warm food in the evenings, if you’re not in a rush. A propane stove with a screw-type canister (e.g: Jetboil Flash) is simple and reliable. For faster walls, you may choose to forego this luxury.
A good quality stove is essential for winter walls where you’ll use it to melt snow. Propane canisters don’t work so well in very cold climates or high altitude, so a multi-fuel type (e.g: MSR XGK) running on white gas may be better. If you bring a stove, it’s recommended to buy/make a reliable hanging kit to reduce the chances of burning a huge hole in your portaledge.
Water
Water is the heaviest item you will take on a wall. It can be tempting to skimp on hydration to save weight, but by doing so you risk putting yourself in a serious situation. Dehydration causes fatigue and poor decision making, which leads onto other problems. You can survive for days without food, but not without water. In cold temperatures, 1.5-2 litres per person per day can be plenty. In hot and sunny climates (e.g: El Capitan in summer), you may need 5-6 litres a day to stay hydrated. Keep track of how much is used each day so you know to ration water if you’re running low (or have a shower if there’s too much!).
Store your water in durable plastic bottles and compress them after use to save space in the haulbag. 1 and 2-litre plastic soda bottles work well for the main storage. A weak plastic bottle or one with a poor quality lid will likely explode in your haulbag, saturating your spare clothes and sleeping bag. It’s also useful to have a durable 0.5 litre bottle (Nalgene bottles are good) for passing up to the leader for a midpitch swig or carrying on the back of your harness during long leads.
You can create water bottle clip-in points in a variety of ways using duck tape and cord. A simple way using 3mm cord is to tie an overhand loop in one end as a clip-in point, and a self-tightening barrel knot in the other.
This cinches itself tight around the bottle’s neck. Make a few of these and swap them over to new bottles as you use up your water supply.
First Aid Kit
As a minimum, you should bring:
– Pain relief tablets
– Anti-diarrhoea tablets
– Anti-septic cream
– Oral rehydration salts
– A small selection of bandages
– Adhesive tape
– Sterile pads for cleaning wounds
– Tweezers
Stuff Sacks
Stuff sacks are excellent for combining many small items together, such as food and clothes. Get some with durable clip-in loops – Metolius make good ones.
Hygiene Products
To keep your personal hygiene at a socially acceptable level, you should bring:
– Toilet paper
– Hand sanitizer
– Moist paper towels (for having a ‘shower’ in the evenings)
– Toothbrush and toothpaste
– Hand moisturiser (Climb On or similar is great for skin repair)
– Sun protection – sunscreen, sunglasses, lip balm
– Any other hygiene or medical products that you would normally use in daily life (contact lens fluid, etc..)
Headlamp
Headlamps are essential on the wall. Finishing a pitch, or trying to descend in the dark can be incredibly difficult and dangerous. They’re also pretty useful to have in the evenings or if you need to get up in the night. Tape your spare batteries together in the correct orientation, so you can just plug the whole block in at once. This also means you won’t have random batteries floating around your bag and no idea if they are full or empty.
Topo
A topo is a handy illustration of the route which tells you where each pitch goes, how difficult it is, pitch lengths and sizes of gear needed. Print out a few pocket-sized copies, laminate them and keep one in your pocket for the duration of the wall. Take descriptions from adjoining routes too, as this will help you navigate. You can take photos of the topo on your phone as a back up. Don’t rely purely on your phone though – it’s better to save your battery for emergencies.
Communication
Having a phone is useful but can detract from the wall experience if you use it every day to post photos on Instagram. Consider taking an emergency communication device, such as a Garmin inReach, if you are climbing in a remote area.
Other Essential Small Items
– Small sewing/repair kit
– A roll of duck tape (this fixes everything on a wall)
– Athletic tape (finger tape)
– Pocket knife (make sure it has a folding blade which is impossible to accidentally open when attached to your harness)
– Lighter
– Spoon
– Can opener (if applicable)
Belay Seat
Aid leads can take hours, and belays are often on featureless rock. Having somewhere to sit is a saviour. You can buy a belay seat or easily make your own out of a piece of plywood and some cord.
Poop Tube
With big wall destinations seeing a rise in popularity, it is no longer acceptable to drop a ‘mud falcon’ off the side of your portaledge. To be a civilized wall climber, you must use a poop tube. You can buy them or make your own out of hardware store supplies. To make your own, glue a PVC cap onto one end of a 6-inch diameter PVC pipe. Make sure the pipe is long enough to account for the length of time you’ll be on the wall. Use a second cap as a removable lid. Line the tube with a plastic bag. Collect your waste in durable plastic sealable bags (wag bags are good) and store your used bags inside the poop tube. Add a handful of kitty litter between each bag to keep it smelling fresh and fasten the lid tight. Take the whole thing down from the summit and dispose of it responsibly.
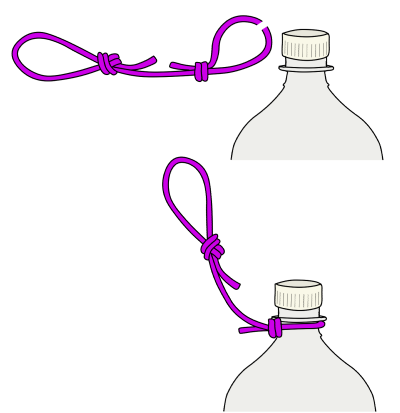
Knot Protector
When a haulbag is dragged up blocky ground, over roofs or any other nonuniform feature, the knot will rub against the rock and damage your rope.
Adding a knot protector significantly helps to increase your haul rope’s lifespan. Simply cut a small plastic bottle in half and smooth the edges with duck tape.

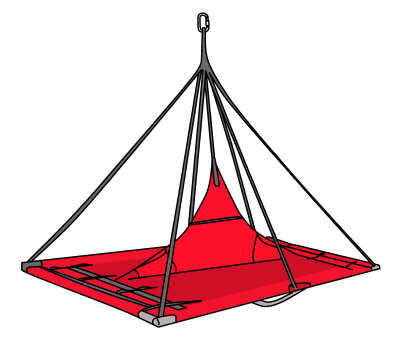
Portaledge
A portaledge offers a luxurious island of comfort in an otherwise uninhabitable vertical world. A portaledge is comprised of a ripstop nylon bed which is stretched around a collapsible metal frame with six straps that join together to form a single clip-in point. They are available in a range of sizes, weights and levels of durability.
Single ledges are easier to set up than doubles, but are half the size, and so are really only useful for one person. You can fit two people on a single ledge in an emergency, but it’s a rubbish night’s sleep. Unless you’re planning to exclusively solo walls, it’s better to get a double ledge. Inflatable ledges are now available. They are lightweight, compact and excellent for fast alpine walls. Some routes have convenient natural ledges which are big enough to sleep on, but the majority will require a portaledge.
Portaledge Fly
A waterproof fly can be deployed from the clip-in point to cover the ledge like a tent. Having a fly is critical if there is any chance of rain or high winds. Basic designs cover the ledge and have a drawstring to cinch it tight underneath. These are simple to use and are comparatively cheap. Deluxe models fully enclose the portaledge and have one or two zip operated doors. These fully stormproof designs are excellent for cold walls in remote environments. Both types have a removable tent pole which pushes the fly out. This creates more living space and keeps the condensation-prone material away from your sleeping bag. In general, always expect a storm and practice setting up your portaledge and fly while hanging from a tree.
Portaledge Costs
Unfortunately, portaledges are very expensive. Before spending your life savings, consider what you will use it for most. If you plan to climb short routes in places with stable weather (e.g: Yosemite or Zion), a secondhand simple ledge will be a cheaper option. If you want to go for long adventures or explore remote walls, you’ll want a durable ledge with a fully enclosing storm-proof fly and a door.
Hammocks
Wall hammocks are cheaper and lighter than portaledges, but are much less comfortable and totally useless in a storm. Most designs can be suspended from a single point. Hammocks are best employed as an emergency bivi for single day walls so you have the option of spending the night on the wall without taking the extra weight and cluster of a portaledge.
Big Wall Gear Considerations
Clip-in Loops
Everything you take on the wall will need some kind of clip-in point. Having a pile of stuff balanced on your knees while digging around in the haulbag is a guaranteed way of dropping something. However you do this, make sure the clip-in points are reliable.
Weight
Big wall gear is heavy. If possible, use the lightest gear you can, as long as it doesn’t compromise on safety. Carabiners and gear slings are good places to trim weight. Lead ropes and harnesses are not.
Used Gear
Pieces of equipment which your life depends on (e.g: ropes, harness, carabiners), should be bought new. You can save money on other gear (e.g: portaledge, shoes, stuff sacks), by getting it used or by making it yourself (e.g: poop tubes, wall gloves). The best place to get used wall gear is from people who have bought brand-new everything, then bailed off their first wall, claiming that ‘big wall climbing is shit’. These folks usually sell high-quality gear for cheap.
Looking After Your Gear
It’s important to inspect your climbing gear frequently and replace anything which shows significant signs of wear. Frayed or faded slings, or any metal gear which has been dropped off the wall should be replaced. Nylon gear (ropes, slings and harnesses) degrades over time and should be replaced every five years, even if you’ve barely used it. UV radiation from direct sunlight will speed this time up. Exposure to battery acid or acid fumes will significantly reduce the strength of nylon. Keep your rope out of the dirt. Grains of rock and sand can cut tiny fibres inside it. Wash your rope occasionally in lukewarm water and allow it to dry in the shade. Store your climbing gear in a cool, dry place out of direct sunlight. If any gear gets wet, let it dry completely before you store it away.
Related Topics

The article above is part of the book – Big Wall and Aid Climbing

E-book (pay what you want)
Paperback
Kindle
Free Sample
Learn how to:
– Lead and follow aid pitches
– Use cam hooks and skyhooks
– Set up a big wall belay
– Use different hauling systems
– Descend with a heavy load
– Place pitons and copperheads
– Camp on a vertical wall
Plus much more.