Aid Climbing Gear > Rivets
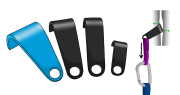
Aid Climbing Gear: Rivets What are Rivets? A rivet is basically a smaller, weaker version of a bolt. It’s common for first ascentionists to place rivets to bypass blank sections when establishing a new route….
Aid Climbing Gear: Rivets What are Rivets? A rivet is basically a smaller, weaker version of a bolt. It’s common for first ascentionists to place rivets to bypass blank sections when establishing a new route….
Aid Climbing Gear: Copperheads What are Copperheads? Heads are single-use malleable lumps of copper (copperheads) or aluminum (alumi-heads) that can be shaped with a hammer and chisel for a custom fit into a weird slot…
Aid Climbing Gear: Beaks Beaks are an ingenious type of piton which offer protection in super thin cracks, where even micro nuts are too big to fit. They are available in three common sizes. How…
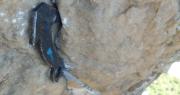
Aid Climbing Gear: Pitons The dark art of smashing pitons into rock with a hammer has been frowned upon by climbers since the 1970’s when less destructive protection (cams and nuts) was developed. Advancements in…
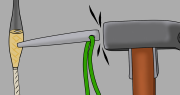
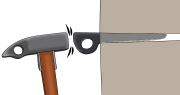
Aid Climbing Gear: Cam Hooks Watch the video lesson (5 min) What are Cam Hooks? Available in four common sizes, cam hooks greatly reduce the need to hammer a piton. They fit into small cracks…
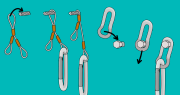
Aid Climbing Gear: Skyhooks Skyhooks come in many different sizes, with each brand being shaped slightly differently. However, for most aid routes, you’ll only need the three common types:– Bat/talon (small)– Cliffhanger (medium)– Grappling (large)…
How to Climb a Big Wall: Leading The Lead Climbing Setup Step 1 – On Belay Before you leave the belay (or ground), you’ll need to get set up for the lead. Both climbers tie…
Big wall gear: In addition to regular trad gear, you’ll need some specialist stuff to aid climb. Here is a full description of everything you need.
How to Train for Big Wall Climbing On this page, you will learn: Video version: How to Practise Aid Climbing Top Rope Many of the skills can be safely practised with a top rope. This…

How to Choose a Big Wall Route, Partner and Climbing Style On this page, you will learn: Video version: Choosing a Big Wall Climbing Partner Choosing the right climbing partner is probably the most important…
Aid Climbing Ratings On this page, you will learn: Video version: Aid Climbing Grades: The Theory The grades range from A1 to A5, and from C1 to C5. ‘A’ grades refer to anything that requires…

Big Wall Climbing Locations On this page, you will learn: That’s it. Video version: Where Can I Climb a Big Wall? With stable weather, simple approaches and plenty of easy routes, Yosemite Valley (California) is…

What is Big Wall and Aid Climbing? On this page, you will learn: Video version: What is Big Wall Climbing? Big wall climbing is a guaranteed adventure. A big wall is essentially a vertical expanse…
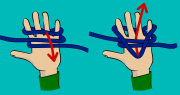
This article explains different ways to tie an alpine butterfly knot and how to use the alpine butterfly in different rock climbing situations.