Aid Climbing Gear: Copperheads
What are Copperheads?
Heads are single-use malleable lumps of copper (copperheads) or aluminum (alumi-heads) that can be shaped with a hammer and chisel for a custom fit into a weird slot where nothing else will go.
Due to their super low strength (body weight only) and difficulty to place, they are only useful for aid climbing. Every aid climber should know how to place copperheads, even if it’s just to replace the occasional one which has ripped out on a popular route.
Size
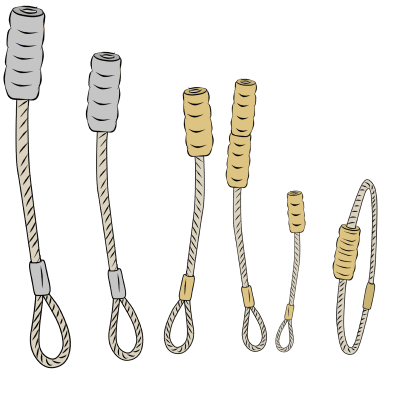
Heads are commonly available in four sizes (#1 to #4) from matchstick thin to the thickness of your little finger.
They can be made in a variety of styles, including double-heads, circleheads or lead-heads.
#0 copperheads are made of the same cable diameter as cam triggers. These will break under the force of a gentle bounce test. There’s really no point using #0 heads because you can always flatten a #1 head and use that instead.
Length
Heads are available in different lengths. Long-wired copperheads can be wedged deep into ‘expando’ slots, or be bent over an edge. Short-wired heads are better for most other situations, simply because they’ll put you higher up the wall.
Copper or Aluminum Heads?
Copper is a stronger metal but aluminium is more malleable. This means that a copperhead will take longer to place and it’ll be more difficult to get it to stick. But a well-placed copperhead will be a stronger piece of gear than an alumi-head of the same size.
Generally, if the placement is a good nut-like slot and the head doesn’t need much chiselling, use copper for a stronger piece of gear. If the placement is a flared pod, use aluminium so it is quicker to shape and more likely to stick.
How to Place Copperheads
Heads work best in small pods, flared constrictions, or shallow grooves where pitons or offset cams and nuts won’t quite fit. Try to get a beak or a small brass nut to fit in first. If this doesn’t work, bring out your ‘heading kit’.
Attach your heading kit together with a piece of cord and clip it to your aiders so it cannot be dropped when in use.
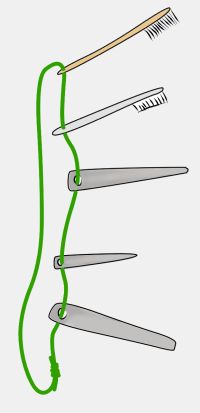
Step 1 – Clean Up
Use a wire brush to scrub away loose rock fragments. Then use a toothbrush to ‘dust’ the placement. For a head to stick, the placement must be clean and dry. A layer of water, dust or slime between the head and rock will prevent the head from sticking.
Step 2 – Measure Up
Measure your rack of heads against the slot and select the correct size. It’ll need to be the same size as the slot and no bigger.
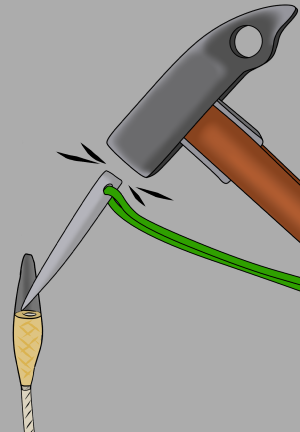
Step 3 – Shape It
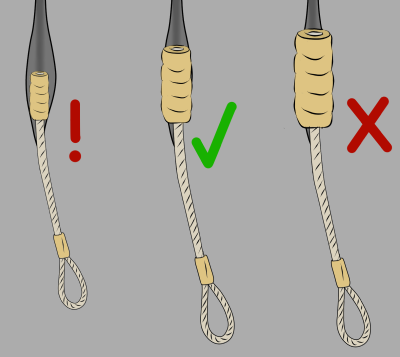
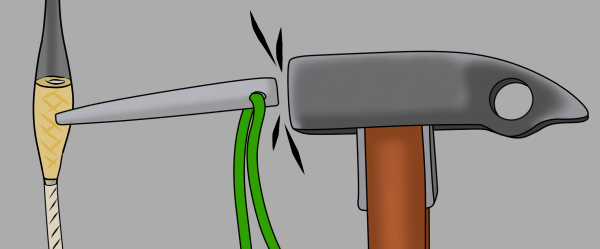
Hold the head against a flat and clean section of rock away from the placement and hit it with the square end of your hammer to make it the same shape as the slot.
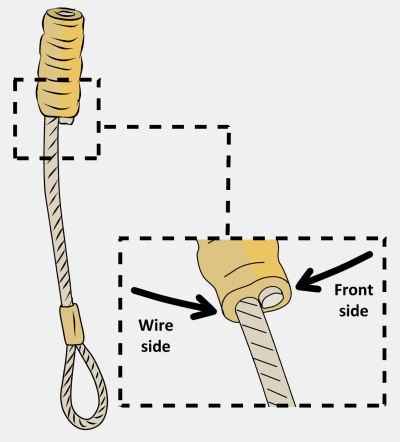
Make sure to have the wire side of the head at the back of the placement. This means your body weight will pull down from the rear (and more secure part) of the placement. It also means that you can punch more metal into the placement, therefore having more head-to-rock surface contact.
Top View
Step 4 – Place It
Place the head into the slot and set it in position with the pointed end of your hammer (use a chisel on tiny heads for a more precise aim).
It should stick with just a couple of hammer taps. If it won’t stay, dust the placement, re-shape the head and try again.
Be careful not to hit the rock with your hammer when you do this; it’ll ruin the placement.
Step 5 – Chisel It
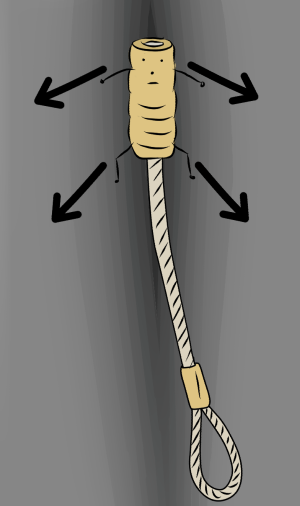
Use your blunt chisel to cross-hatch the head into place. Start in the middle and work outwards. Make sure your chisel is blunt, otherwise you’ll chop the head into pieces. You can also use a large punch (similar to a chisel, but with a rounded point) to do this.
Imagine the head is a tiny climber facing outwards in a flared chimney. In order to stay wedged in place the tiny climber needs to press itself into the chimney using as much surface contact as possible.
Hit the head hard enough to push it into the placement, but not too hard that you chisel down to the wire. The aim is to push the head so it makes as much surface contact with the back of the placement as possible. Obviously you can’t see this, but if you shaped the head correctly it’ll conform to the placement fairly quickly. Make sure to chisel and punch to the very top and bottom edges, being careful not to ding the cable as you do so. If the head moves when you hit its top or bottom, take it out and try again.
To fine tune the head, use a small punch to smear as much copper as possible into every useable grain of rock. Start in the head’s centre and work outwards. The aim of this is to add a little extra head-to-rock surface contact. Finally, clip your aiders to your copper artwork and give it a test.
Copperheads on Overhangs
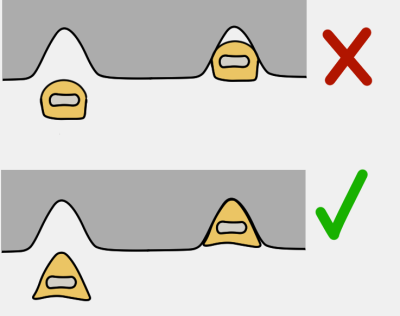
Heads are more secure when placed in slots which are less than vertical. This is because of the direction of loading. An ‘overhanging’ head is more likely to be plucked out when weighted, just like a nut would.
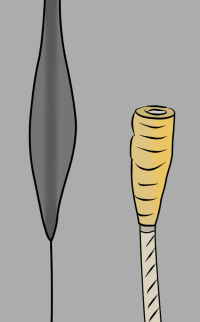
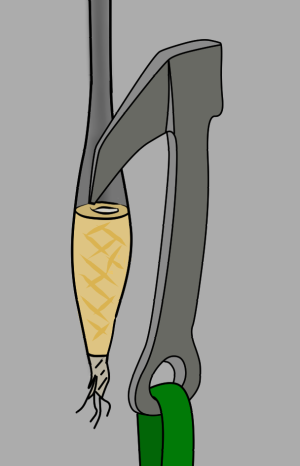
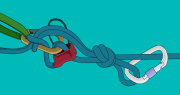
Dead-Heads
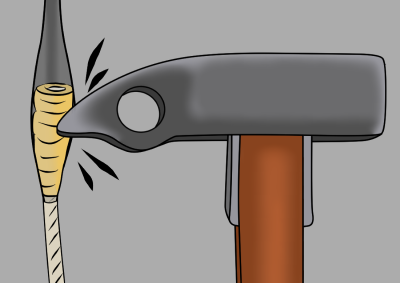
Dead-heads are copperheads which still have the ‘head’ stuck in the rock, but the cable has broken off. This typically happens if you try to remove a head using a funkness device.
The good news is that you can still use dead-heads as aid placements.
Gently tap a small beak or a pointed hook into the top of it. Just one or two soft taps will set it in place.
Bomber… right?
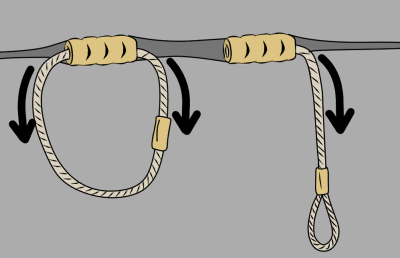
Circleheads
Circleheads are designed to fit in small horizontal flares or underneath roofs. In these places, a regular head will pull from one side, meaning that it’ll probably be levered out.
A circlehead pulls evenly from both sides and therefore is more stable.
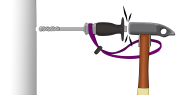
Removing Copperheads
It is possible to remove and re-use a head (depending on how much you chiseled it the first time), but it’ll be weaker the second time around. Trying to remove a well-placed head usually results in damage to the rock or the head staying in place while the cable pulls out, thus making the task of removing the ‘dead-head’ difficult for the next climber. Therefore, it is common courtesy amongst aid climbers to leave good heads ‘fixed’ in the rock for the next climber to use. However, never trust a fixed head. Be prepared to replace them.
To remove a head (or a dead-head), position your small punch underneath the head and tap it with your hammer. Do the same on the top to lever it out, being very careful not to damage the rock.
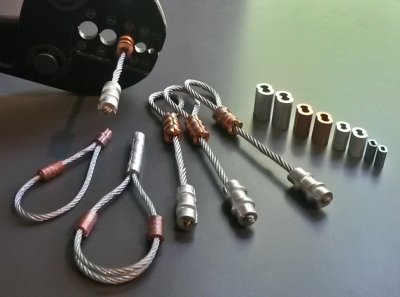
Making Your Own Copperheads
If you plan to place hundreds of heads, it’s worth investing in a good quality bench-mount swager to make your own. Nicopress is a good brand. Cheaper Chinese-made brands tend to have compatibility issues with sleeves and cables.
For the strongest heads, use galvanised aircraft cable and zinc-plated copper sleeves for all points which are not pasted (i.e: not the mashable head part of the head).
Having your own swager also means you can fix cam trigger cables, re-swage beak and rurp cables and make your own wire rivet hangers and funkness devices. If you can borrow a tensile-testing machine, it is wise to measure the strength of your swages before you trust your life to them.
Related Topics


The video above is part of a complete big wall course

– Safe and approved syllabus
– Structured and easy to navigate
– Lifetime access
– Download videos in 4K
– Regular updates
– Much more detailed than the book version
→ Get the course
The article above is part of the book – Big Wall and Aid Climbing

E-book (pay what you want)
Paperback
Kindle
Free Sample
Learn how to:
– Lead and follow aid pitches
– Use cam hooks and skyhooks
– Set up a big wall belay
– Use different hauling systems
– Descend with a heavy load
– Place pitons and copperheads
– Camp on a vertical wall
Plus much more.