How to Climb a Big Wall: Hauling (Part 2)
Docking the Haulbag
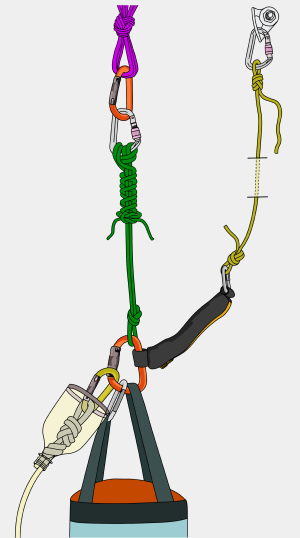
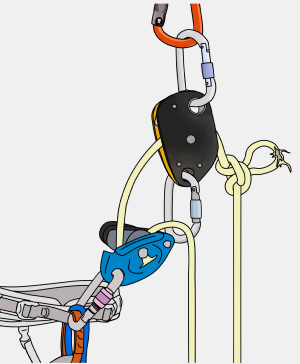
Once the haulbag is at the belay, you’ll need to ‘dock’ it. This means attaching the haulbag to the belay in such a way that it is secure and can also be released easily.
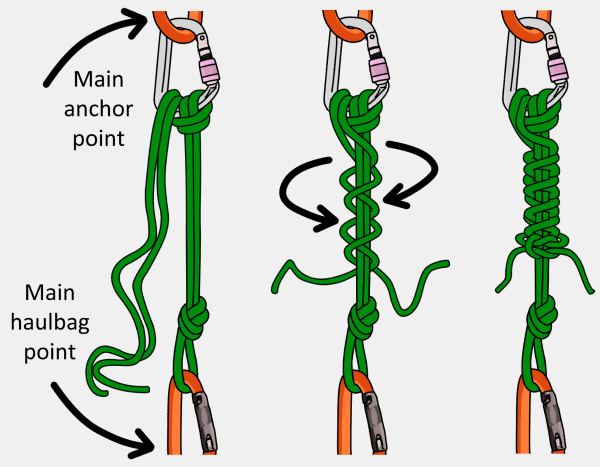
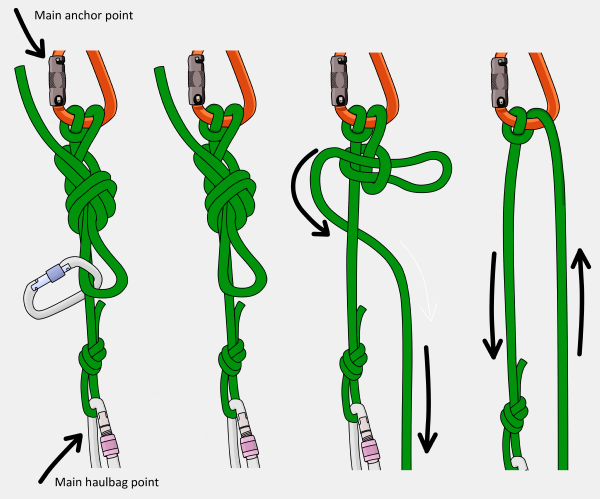
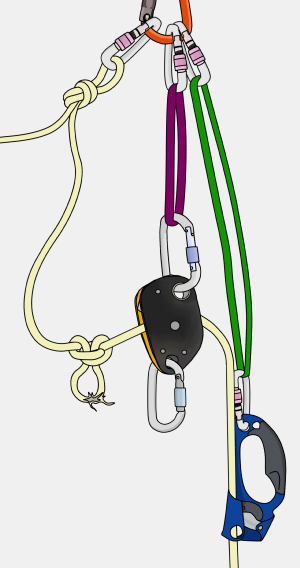
Step 1
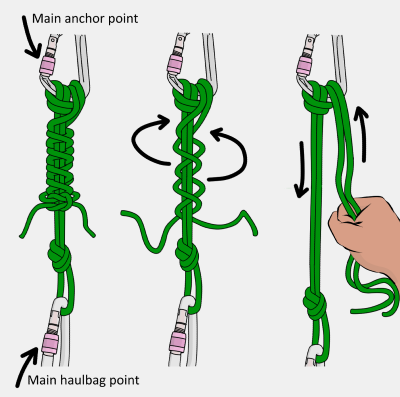
Attach a screwgate to the main anchor point and fasten your docking tether to it with a munter hitch. Tie the knot so that it won’t flip when weighted.
Step 2
Wrap the loose strands neatly around the docking tether beneath the munter hitch and finish off with a reef knot. The friction of these wraps stops the rope sliding through the munter hitch.
Note: Single Strand Docking Tether
If you are using a single strand docking tether, you can dock the bag with a releasable knot such as the munter-mule-overhand.
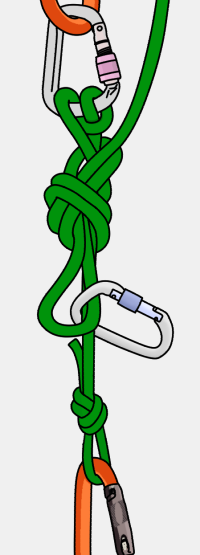
Step 3
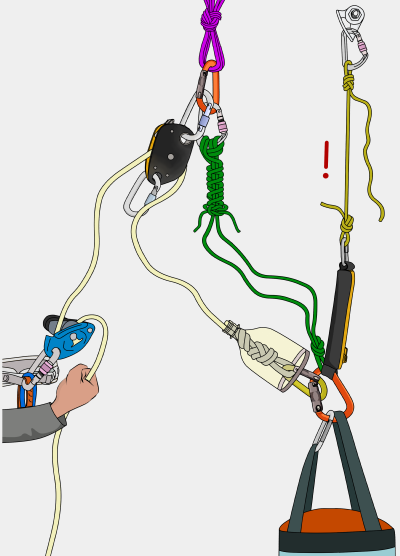
Attach your back-up cord to a bolt, making sure there’s the right amount of slack in the cord. It will need to be slack enough that the haulbag’s weight is fully on the docking tether, but not so slack as to cause shock-loading if the docking tether were to unfasten itself. It can be a little tricky to judge exactly how much the docking tether will stretch when loaded. If you prefer, you can attach the back-up cord after step 5. Just don’t forget to do it.
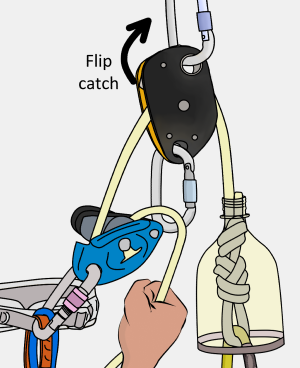
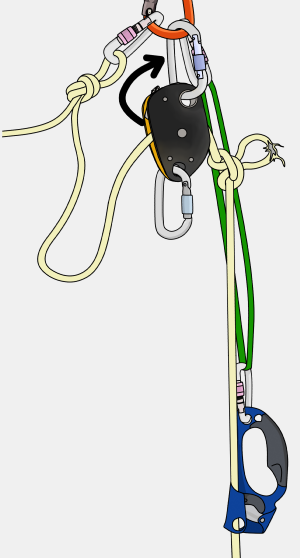
Step 4
Haul a few centimetres of rope through the hauling device whilst flipping up the catch. This releases the auto-lock on the pulley.
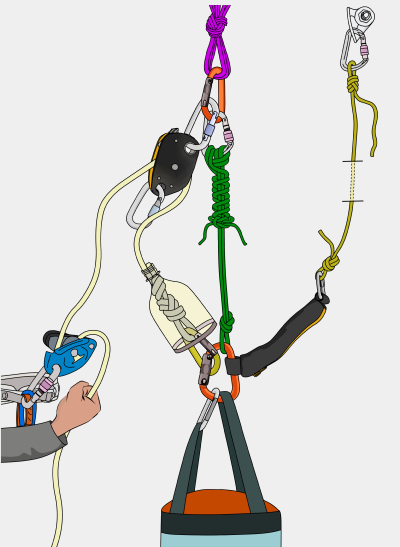
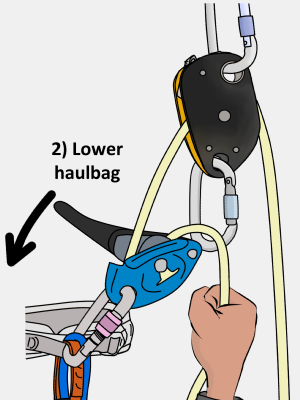
Step 5
Lower the haulbag using your GriGri until it is weighted on its docking tether. If your haulbag is super heavy, brace yourself so you don’t get sucked in to the pulley. Check that:
– The docking tether is fastened tight (push the wraps of cord together neatly)
– The haulbag’s weight is completely on the docking tether
– The back-up cord has the correct amount of slack – adjust it now if not
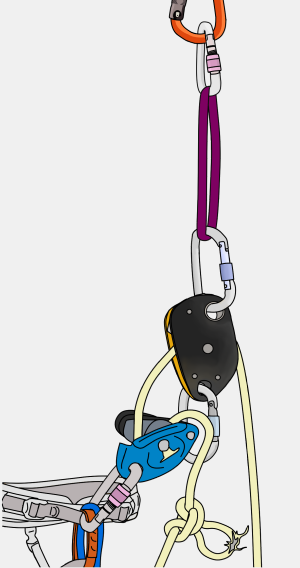
Step 6
The hauling pulley and GriGri can now be removed. The haul rope can be removed too if you:
– need to sort out a rope tangle.
– prefer to swap ends of the haul rope.
– need to tie the haulbag into a different part of the rope to haul the next pitch.
Otherwise, you can simply leave it attached where it is. If you remove the haul rope, make sure to attach the end of it securely to the belay so it cannot fall irretrievably out of reach.
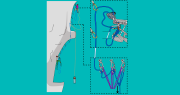
Docking Haulbags: Classic Mistakes
Docking the haulbag over a tie-in knot.
Manipulating this knot out of the carabiner will be a herculean task. Haul the bag up again and dock it somewhere better.
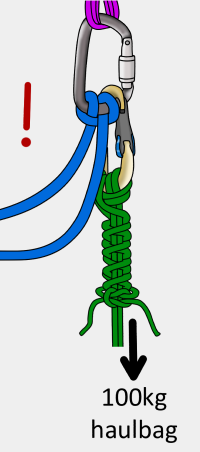
Docking the haulbag on the back-up cord.
You dock the haulbag, but the back-up cord takes some or all of the weight. This isn’t an immediate problem, but when it comes to hauling the next pitch you will have a great deal of difficulty releasing the haulbag.
To solve the problem:
1) Flip the catch back down on the hauling device
2) Mini-haul a short distance to unweight the back-up cord
3) Adjust the back-up cord appropriately
4) Lower the haulbag onto the docking tether
Releasing the Haulbag
When the leader has set up the hauling system at the upper belay, the belayer will need to release the haulbag from the lower belay. If communication is difficult, wait for the bags to be hauled up a bit to confirm that the leader has actually got the hauling device setup and ready. Visualize where the haulbag will go when you release it.
The haulbag will need to be lowered out slowly to avoid damaging its contents. Having a gallon of gatorade explode into your sleeping bag is not fun. On straight-up pitches, you can simply unfasten the docking tether. To lower the haulbag on a traversing pitch (most pitches traverse a little), you’ll need to use the remaining haul rope as a lower-out. Both methods are described below.
Releasing Haulbags on a Straight-Up Pitch
Step 1
Once the leader confirms that the hauling system is set up, you can make your final checks and then remove the back-up sling.
Step 2
Tell your partner you are ‘releasing the haulbag’, so they know to begin hauling. Begin unfastening the docking tether so you are just left with the munter hitch. Keep a firm grip on the docking tether as you do this.
Note: Single Strand Docking Tether
If using a single strand docking tether with a munter-mule-overhand, release the knot as shown so you are left with a munter hitch.
Step 3
Release the munter hitch slowly until the haulbag’s weight is transferred to the haul rope (the haulbag may already be weighting the rope if your partner has begun hauling). The haulbag is now free from the lower belay and ready to haul.
Top Tip
If you can reach, tuck the docking tether and back-up sling away into the top part of the haulbag to help prevent them being abraded during the haul.
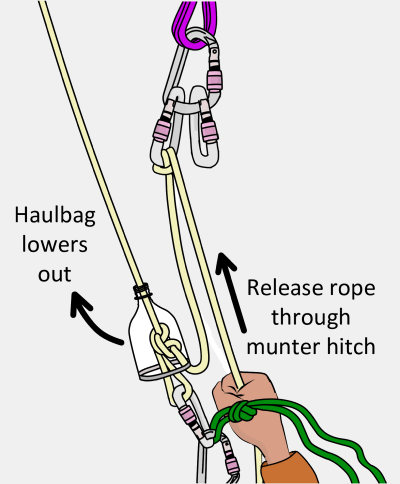
Releasing Haulbags on a Traversing Pitch
If your docking tether isn’t long enough to lower out the haulbag, you can utilize the haul rope too.
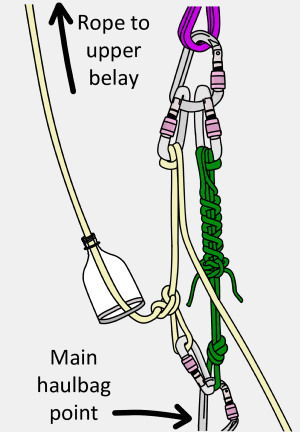
Step 1
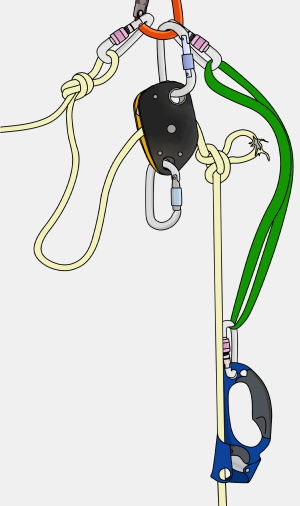
Allow the leader to pull up a few meters of haul rope (so they have enough to begin hauling) and then tie the haulbag in with an alpine butterfly. Remember to slide the knot protector above this.
Step 2
Use the loose end of the haul rope to tie a munter hitch to the belay. Tie this to the side of the belay so the taught haul line does not rub across you and the belay as you lower it out.
Step 3
Stack the haul rope so it will feed out smoothly and remove any knots (including the figure-8 from the end). Knots will get stuck in the munter hitch and probably also get stuck in cracks when you haul.
Step 4
Keep a firm grip on the haul rope and release the docking tether as described on the previous pages. The haulbag will then be weighted on the haul rope’s munter hitch.
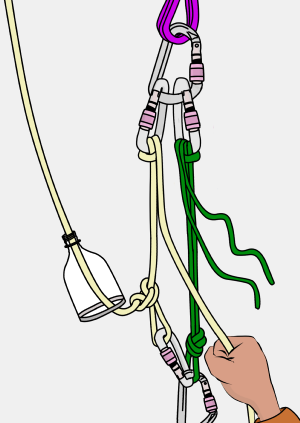
Step 5
Lower the haulbag out slowly on this munter hitch. When you reach the end of the rope, just let it drop.
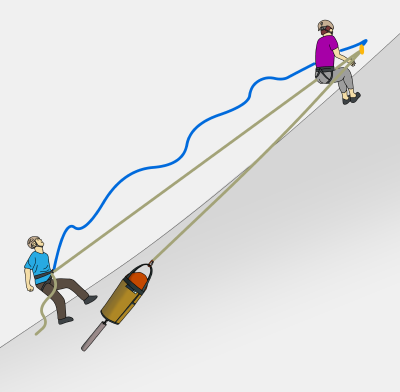
Hauling Low-Angled Terrain
Hauling up slabby ground (e.g: the final pitch) is much more difficult due to the added friction. To make it easier:
Space Haul
Follow these steps and make sure to be backed up with the lead rope. The lower climber should stay with the bags to guide them around obstacles and loose rock.
Split the Load
Divide your stuff into two or three more manageable loads and haul them separately. For example, haul the portaledge, rack bag and poop tube as the first load. Then abseil down and attach the main haulbag as the second load.
Shuttle Gear
On low-angled loose ground, you can reduce the chances of dislodging rocks by fixing the pitch and jumaring up with a bag on your back, or with stuff clipped to your harness. You’ll probably have to make several trips but it may be the easiest way, depending on the terrain.
Tag Lines
A tag line can be used to help reduce weight on the back of your harness while leading (essential for free climbing). Tag lines are full length static ropes which are typically 5.5-8mm in diameter.
Trailing a 5.5mm tag line (~ 1kg) is much easier than trailing a fat single rope (~ 5.5kg) – you’ll notice the difference towards the top of the pitch. While being very light, tag lines are fairly redundant – they cannot be used for jumaring, leading or heavy hauling.
Step 1
Trail the tag line instead of a haul rope while leading.
Step 2
Once you have finished leading the pitch, the belayer attaches the haul rope and anchor kit to the tag line. For long heavy hauls it’s nice to pass up water and snacks at this point too.
Step 3
The leader pulls up the tag line to retrieve the haul rope and gear. This can be pulled up hand-over-hand if you’re confident that you won’t drop it, or by using a locking pulley such as the Petzl Micro Traxion (only works with thicker tag lines). If using a rack bag, you could pass this up now too to reduce cluster and weight when hauling the main load.
Stuck Haulbags
If your haulbags get stuck (which they probably will), stop hauling and see what the problem is (if you can see them). Don’t force it – this might make the situation worse as your haulbag wedges itself farther up into a chimney or loose flake. If you can’t see what the problem is, first try wiggling and pushing out on the tensioned haul rope. The slight change in rope angle might be all that’s needed to release it. If that doesn’t work, lower them a short amount and try again.
Step 1
Open the catch.
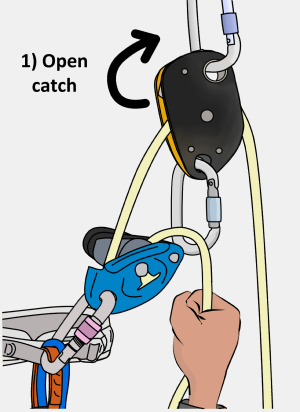
Step 2
Lower the haulbag.
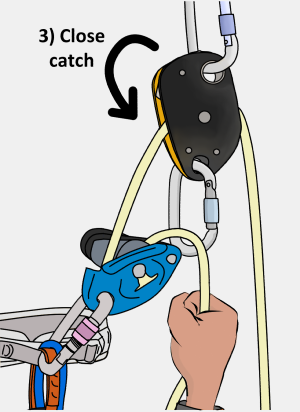
Step 3
Close the catch.
If that doesn’t work, someone will need to go down and manhandle them. In most cases, your partner will be close by and able to swing over. If not (e.g: because it’s a traverse), you’re better off waiting until they’ve finished cleaning the pitch. They can then descend on the lead rope to sort it out.
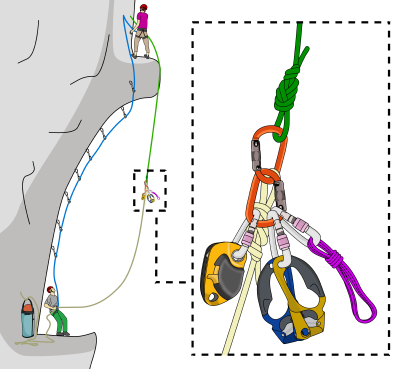
Hauling Past a Knot
Times when you may need to haul past a knot include:
– If you fix a few pitches with two or more ropes tied together.
– If you fasten a knot (alpine butterfly works best) to isolate a damaged section of the haul rope.
The following method works for 1:1, 2:1 or 3:1 haul setups.
Step 1
Haul the load until the knot is just below the hauling device.
Step 2
Attach an inverted jumar approximately 60cm below the knot and add a back-up as shown.
Step 3
Release the hauling device so the weight is transferred to the jumar.
Step 4
Extend the hauling setup with a sling and reassemble it so the knot is past the device.
Step 5
Check the system. Then remove the back-up and jumar, and continue hauling.
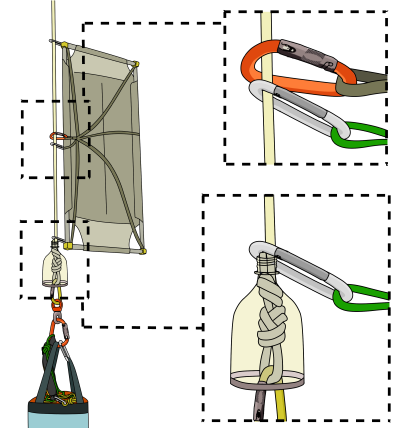
Flagging the Portaledge
For harder routes with time-consuming pitches, it is much more pleasant to belay from the comfort of a portaledge than to be crunched up on a belay seat. When it is time to haul, you can leave the portaledge fully set up and ‘flag’ it as shown.
Simply clip the corners and middle of your portaledge around the haul rope, making sure to clip the portaledge’s main point around the rope too. By clipping around the haul rope (not to the haulbag) the portaledge is free to spin around independently of the haulbag, and is therefore less likely to cause problems during the haul, especially if it’s windy. Tie pieces of 6mm cord to the corners of your portaledge to create clip-in points, if it doesn’t already have them.
Flagging works best on vertical or overhanging terrain. On slabby ground, your portaledge will likely get stuck, damaged and could dislodge loose rock.
Un-flagging the Portaledge at the Top Anchor
In high winds, a flagged ledge will behave perfectly… until the moment you remove it from the haul line. Attach a back-up sling so you can’t drop your portaledge and have a plan of where you will put it while you complete the final part of the haul. If it’s super windy, slide it behind the tensioned haul rope to tame it until the haulbags are docked.
Big Wall Hauling: Summary
Hauling is hard work, but it gets much easier with practise. Practise at your local crag, climbing wall or large tree. Line your haulbag with cardboard or foam mats and fill it with rocks and water bottles. Start with a light weight first (20-30kg) to get used to the different systems and then add more weight to simulate what you will take on your chosen climb.
Figure out exactly where to position yourself for each system and focus on developing a smooth rhythm that you can sustain for quite a while. Haul with your bodyweight, not by pulling with your arms. Practise makes perfect.
Related Topics


The article above is part of the book – Big Wall and Aid Climbing

E-book (pay what you want)
Paperback
Kindle
Free Sample
Learn how to:
– Lead and follow aid pitches
– Use cam hooks and skyhooks
– Set up a big wall belay
– Use different hauling systems
– Descend with a heavy load
– Place pitons and copperheads
– Camp on a vertical wall
Plus much more.