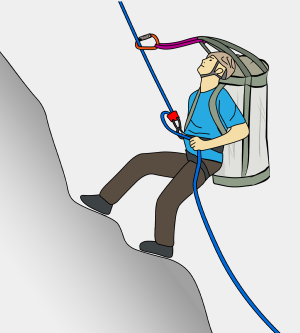
How to Climb a Big Wall: Descending
The same principles are used when descending from a big wall as when descending from a multi-pitch trad route. The only real difference is the added weight you need to take down.
Some walls have a walk-off descent, some have sections of fixed ropes and some require you to abseil the route you climbed, which may involve overhanging or traversing terrain. Descending from a big wall can take a whole day (or longer) depending on where you are and how involved the descent is. Before you go up, it’s important to know how to get down.
If retreating, it is usually better to descend the route you climbed, rather than follow mystery anchors. This way, you’ll know the anchors are good and will be familiar with what is coming next. If you have topos of nearby climbs (which you should), you may find an easier descent. However, be aware of descending an old route which rarely gets climbed – the anchors may be poor or non-existent.
Organise your haulbag so you have the necessary items handy – spare rack, warm clothes, food, water, headlamps and a first aid kit should be kept near the top. Pour out surplus water, but obviously save enough for the way down. Pack everything inside your haulbags (poop tube, rack bag, portaledge) so you have less stuff to tangle with your ropes.
Rappelling with Haulbags
Step 1 – Divide the Weight
The first person down should take a light load – swinging across the wall to reach the next anchor, or re-ascending is much easier with a lighter load. Having the means to ascend the ropes will be essential if you abseil the wrong way, or go past the next anchor.
Both climbers should keep the following gear with them during the descent:
– Two full strength daisy chains or slings
– Two aiders
– Two jumars
– Two prusik cords
– A couple of spare slings
– Knife
– Spare screwgates and snapgates (about 4 of each is useful)
The first person down should also take:
– Hauling device
– Enough rack to down-aid sections and set up the next anchor
– Cheater stick (if you have one)
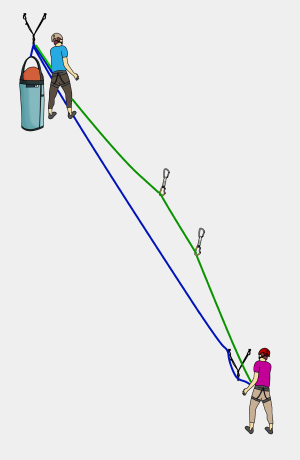
Step 2 – First Climber Descends
The first climber abseils down using an ATC and prusik on both ropes, just like a normal abseil. You may have to swing around or cheater-stick to reach the next anchor. You should clip the ends of the ropes to yourself so you can’t abseil off the ends and also to keep the rope under control in the wind.
On overhangs, kick out from the wall so that you bounce outwards as you descend. If you don’t kick out hard enough each time, you’ll end up dangling in space, and will have to re-ascend.
On traverses, keep a sideways swing as you descend, making sure your rope stays away from sharp edges. On very steep/traversing pitches, you’ll have to down-aid (place directionals). Place gear and clip it to your abseil ropes.
Use gear that is easy to clean, and place the minimum amount needed to reach the next anchor. The aim is for the second climber to abseil with the haulbags as easily as possible. However, for pitches like this it may be easier for the second person to lower the haulbags, rather than abseil with them.
If directionals have been placed, the ropes should be fixed tight to the next anchor (use a releasable knot such as the munter mule). Allow the second climber to attach their belay device before you pull the ropes tight.
A releasable knot is preferred so you can adjust it as the second climber descends – there will be extra slack when they remove directionals and pull stretch out of the rope lower in the abseil.
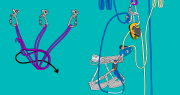
Step 3 – Second Climber Setup
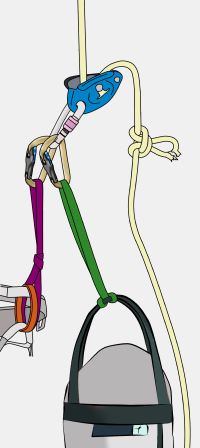
The second climber needs to attach the haulbag to themselves and to their belay device. Two ways of doing this are shown.
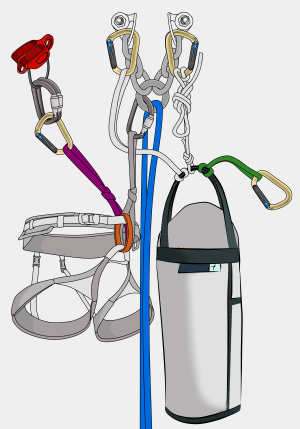
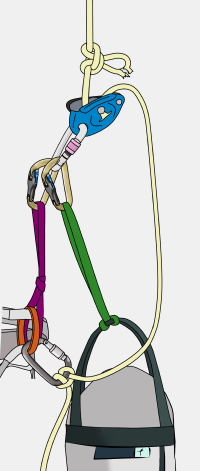
Light Loads
Hanging the haulbag from your belay loop is simple, but is uncomfortable with a heavy load.
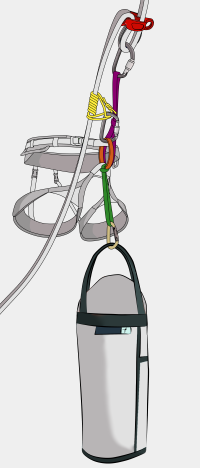
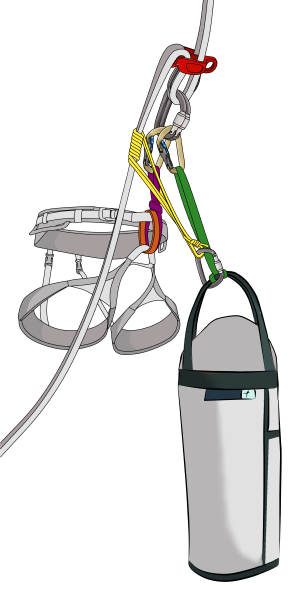
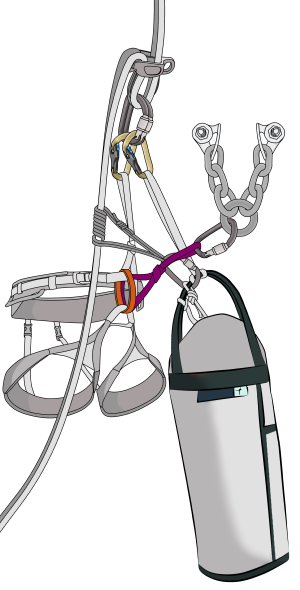
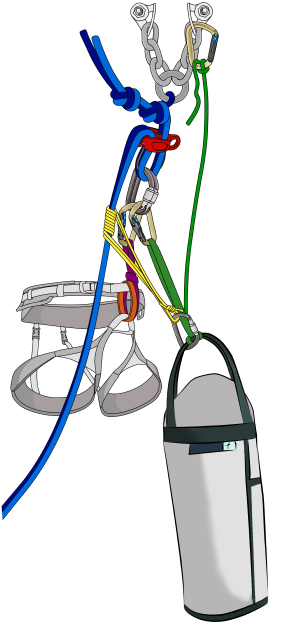
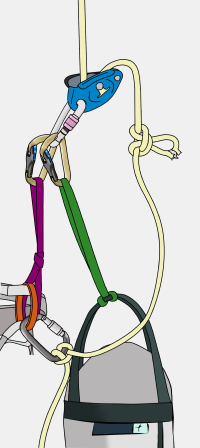
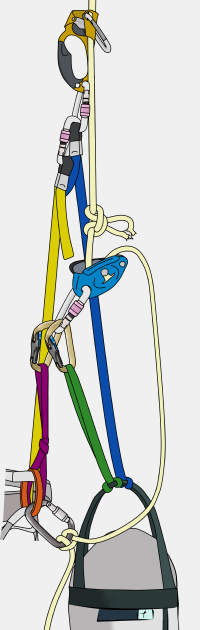
Heavy Loads
This setup keeps the weight of the haulbag off your harness and allows you to escape from the haulbag easily.
Having two carabiners through your ATC adds friction and more control.
Alternatively, set up your ropes for a single-strand pull-down and abseil with a GriGri.
Step 4 – Second Climber Descends
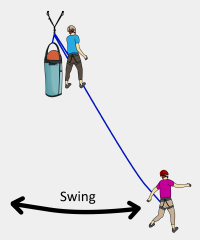
If no directionals have been placed, the second climber abseils down, being very careful not to go below the level of the next anchor. When almost level with the anchor, use your jumars to pull yourself in, or get your partner to haul you in. Make sure not to descend too far or the difficulty of this task will be greatly increased.
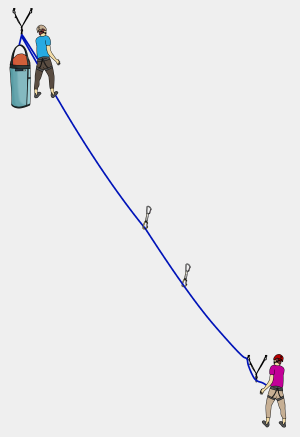
If directionals have been placed, they will need to be removed on the way down. Because the ropes are fixed tight to the lower anchor, it is possible to pull across to retrieve them. Make sure not to descend below the level of the gear.
You may have to un-weight the rope for a moment in order to remove gear. This is done by swinging, holding onto nearby features or temporarily weighting a hook while you clean the piece. Be ready to swing out a little when doing this. If it is too difficult to remove the gear, you’ll have to unclip the rope, swing out and leave the gear behind.
Step 5 – Attach Yourself
When you reach the anchor, attach yourself to it.
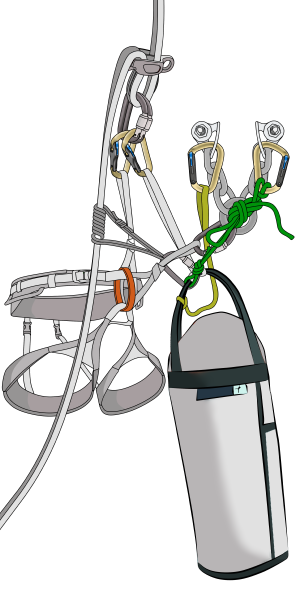
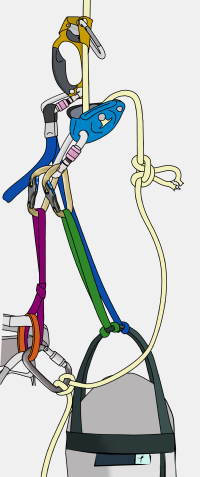
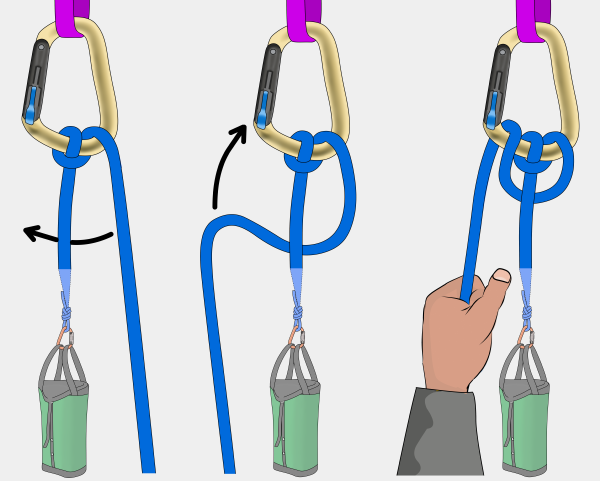
Step 6 – Attach Haulbag
For heavy loads, you’ll need some kind of releasable system so you can easily transfer the haulbag to the next abseil by yourself.
When approaching the belay, dock the haulbag as normal (with a releasable knot and a back-up sling), then continue down a little further until the weight is on the docking tether.
Step 7 – Pull Ropes
Remove your ATC and prusik. Thread your ropes through the anchor and pull them down.
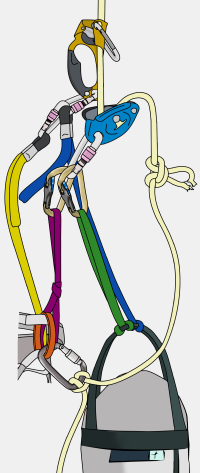
When Leaving the Belay
Get everything else ready and then release the docking tether.
Alternatively, some types of adjustable daisy can be used instead of a docking tether.
Rappelling with a Damaged Rope
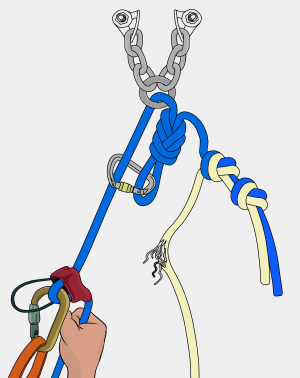
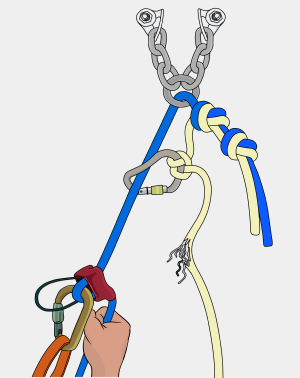
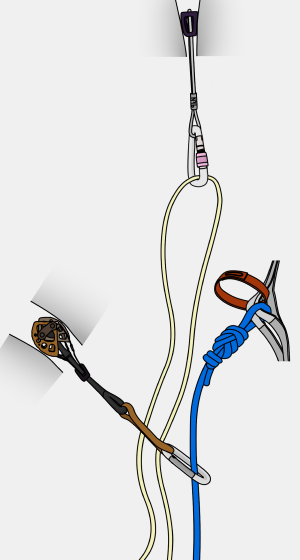
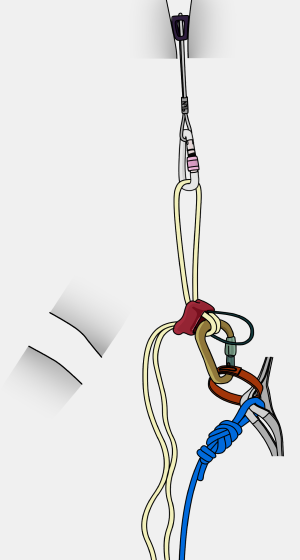
Step 1
Attach the rope through the anchor. Two methods are shown here, but many other knots could be used. The point is to have a knot which physically cannot pull through or get stuck in the main anchor point. The important part of this setup is to clip the rope back to itself with a screwgate carabiner to make a closed loop around the main anchor point. This way, the system wouldn’t fail completely if the knot slipped through. You would, however, have to jumar back up to solve the problem.
Step 2
Attach your abseil device to the good strand of rope. Follow the same safety precautions as you would when abseiling at any other time: tie a knot in the bottom end of the rope, use a prusik and weight the rope to check the system before you commit to it.
Step 3
Abseil down the good strand while keeping hold of the pull-down cord. It’s a good idea to keep the end of the pull-down cord clipped to you.
Watch the setup as the first climber descends. If the knot gets jammed or slips through, you’ll need to tie a bigger knot or change the main anchor point to something smaller (small maillons/ quick-links are good for this).
Step 4
Pull your ropes down.
On a multi-pitch descent, remember that you will have to thread the same rope through each anchor.
Top Tips
– Add slings and cordelettes to the end of the pull-down cord if you need a little extra distance on your abseils.
– If both of your ropes are damaged, the best option may be to salvage the longest section of undamaged rope as the ‘good’ rope and join the rest together as the pull-down cord. You won’t be able to abseil as far but this may be better than not being able to abseil at all.
– Another option is to fix one end of the rope to the anchor and abseil on a single strand, passing knots (see below) on the way. You will not be able to retrieve your ropes, so this only works if your ropes reach to the ground.
Rappelling Past a Knot with a Heavy Haulbag
If you climb enough walls, you will at some point end up abseiling down a fixed rope with a heavy haulbag only to discover a knot in the rope, or a core-shot that requires isolating with a knot. Or maybe you have tied all your ropes together and are retreating to the ground in an emergency. Either way, you’ll need to pass a knot in the rope.
Step 1 – Stop
Stop about 30cm above the knot. Don’t abseil into it!
Step 2 – Back-up
Tie a back-up knot in the rope and attach it to your belay loop. This ensures that you can’t become detached from the rope even if your jumars and daisies disintegrate in the following steps.
Step 3 – Transfer Haulbag
Attach a jumar to the rope just above your GriGri. Clip the haulbag to the jumar with an adjustable daisy or a docking tether (or both for extra safety) and cinch it tight so the weight of the haulbag is taken by the jumar.
Step 4 – Transfer Yourself
Repeat this for yourself. For added redundancy, use a separate jumar. The weight of you and your haulbag should now be taken by the jumar(s).
Step 5 – Move GriGri
Remove your GriGri and position it immediately below the knot. Check that you and your haulbag are still attached to the GriGri correctly.
Step 6 – Transfer to GriGri
Slowly release the haulbag’s adjustable daisy so the weight is transferred back to the GriGri.
If the adjustable daisy is too short, remove it first and use the docking tether to lower the haulbag onto the GriGri. Repeat this step for yourself (easier if you have an aider to stand in).
Step 7 – Check the System
Do a mini test-abseil to check the system, then remove the jumars.
Once you are certain you have passed the knot correctly, remove the back-up knot and continue your descent.
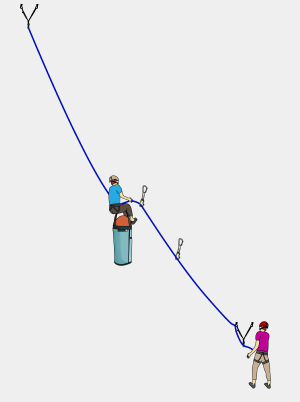
Lowering Haulbags
Sometimes it is better to lower the haulbags instead of abseiling with them. This may be because:
– They are too heavy
– The next anchor is through a roof or across a big traverse
– You are close enough to lower them all the way to the ground
Step 1
The first climber abseils on one rope which is fixed to the anchor.
Step 2
This rope is then fixed tight to the lower anchor (with a releasable knot) to create a taut zip line between belays.
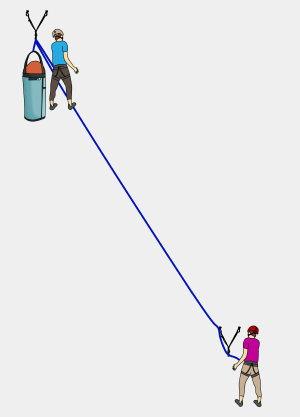
Step 3
The haulbag is clipped to the tensioned rope with two screwgates and lowered down using the second rope. Lower the haulbag with a munter hitch (or a monster munter for extra friction) directly off the belay to keep the weight off your harness.

Step 4
The first climber docks the haulbag and fixes the ropes to the lower anchor with enough slack for the second climber to descend.
Step 5
The second climber re-ties the ropes at the upper anchor so they can be pulled, and then abseils on both ropes as normal.
If Placing Directionals
The previous technique won’t work if you had to place directionals on the rope to get to the lower anchor – the haulbag will get stuck at the directional piece and cause a helluva problem.
If you need to place directionals, you can use a third rope. The system is the same, except the first climber abseils with two ropes fixed to the upper anchor. One rope is used for directionals, the other is used as the zip line.
Lowering Haulbags Past a Knot
Times when you might need to lower haulbags past a knot include:
If your lowering rope is damaged
Tie a knot over the damaged section and use the following technique to lower the haulbag down the zip line.
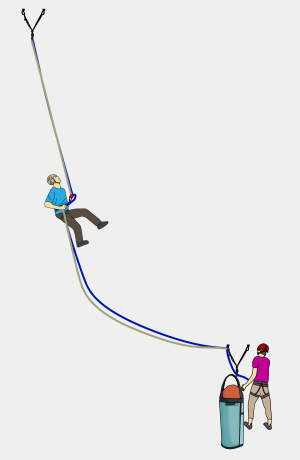
If you are close to the ground
It may be easier to tie 2 or 3 ropes together and lower your haulbags all the way to the ground. This should only be done on overhanging terrain where the haulbags cannot possibly get stuck on their way down.
Step 1
Tie your ropes together with overhand knots with 30cm tails. Make sure the knots are neat and tight. Stack them into rope bags so they feed out without tangles when lowering.
Step 2
Tie a munter hitch directly on the anchor, and make it into a monster munter as shown below. This adds a lot more friction, which will be needed for a heavy load.
Step 3
Attach the haulbags to the end of the rope and begin lowering. When the overhand knot reaches the monster munter, it will manipulate itself through. If it gets stuck, encourage it around with a carabiner. Be careful to keep your fingers away from the knot – you could sever your finger if it gets dragged in.
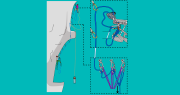
Retreating Mid-Pitch
The following technique allows you to bail when mid-way through leading a pitch without leaving all your gear behind.
Note
If you (or your partner) plan to return to this high-point to continue leading, then use the fixing mid-pitch technique instead.
Step 1
Clip the middle of the haul rope (white in this diagram) into a good piece of gear. Equalize a bunch of gear if necessary.
Step 2
Abseil on the haul rope while getting belayed down on the lead rope. If the top piece fails, you will be protected by the gear you placed on the lead rope. Remove this protection as you descend.
Step 3
This technique allows you to descend up to half the length of the haul rope. At this point, you will need to create an anchor and repeat the process.
Descending Low-Angled Terrain
You can carry a light haulbag on your back if doing a short abseil on loose ground, where you are trying to minimize dislodging rocks. To reduce the possibility of being flipped upside-down, clip an upper haulbag strap around the ropes above you.
On anything steeper than a low-angled slab, or with a monster load, the weight of the bag will cause you to invert and create further problems. In this case, hang it from your harness as described here.
Walking Off
You won’t actually have walked anywhere for a few days or weeks and so your leg muscles won’t be happy when faced with a long downhill hike loaded down with a huge bag.
If you have a heavy load, consider taking half of it down, have a day off, then come back for the rest. Take valuables (wallet, car keys) and scented items first so you don’t attract wildlife into your unattended stuff.
Related Topics


The video above is part of a complete big wall course
– Safe and approved syllabus
– Structured and easy to navigate
– Lifetime access
– Download videos in 4K
– Regular updates
– Much more detailed than the book version
→ Get the course
The article above is part of the book – Big Wall and Aid Climbing

E-book (pay what you want)
Paperback
Kindle
Free Sample
Learn how to:
– Lead and follow aid pitches
– Use cam hooks and skyhooks
– Set up a big wall belay
– Use different hauling systems
– Descend with a heavy load
– Place pitons and copperheads
– Camp on a vertical wall
Plus much more.