How To Climb a Big Wall > Descending
How to Climb a Big Wall: Descending The same principles are used when descending from a big wall as when descending from a multi-pitch trad route. The only real difference is the added weight you…

How to Climb a Big Wall: Descending The same principles are used when descending from a big wall as when descending from a multi-pitch trad route. The only real difference is the added weight you…
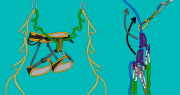
Improvised Aid Climbing * This article is about using improvised basic aid techniques while trad climbing. To learn more about aid climbing on big walls, see these articles. Using protection pieces as hand or foot…
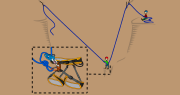
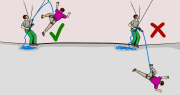
Pendulums and Tension Traverses What are Pendulums and Tension Traverses? Pendulums and tension traverses are great techniques for moving sideways across a section which is too difficult to climb. A pendulum involves swinging across the…
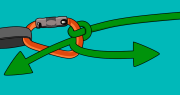
The Munter Hitch: How to Belay without a Belay Device Uses:– Belaying without a belay device– Abseiling without a belay device– Creating a releasable knot when escaping the belay The munter (Italian) hitch tends to…
How to Be a Better Belayer Just as people pick up ‘bad habits’ after they pass their driving test, climbers often get lazy with belaying once they have learnt the basics. Here are some tips…
Multi-Pitch Trad Climbing A multi-pitch route is one that is split into two or more pitches. This may be because it is longer than your rope. Or it could be a wandering route that would…

Multi-Pitch Sport Climbing A multi-pitch route is one that is split into two or more pitches. This may be because it is longer than your rope, or it could be a wandering route that would…