Trad Climbing > Accident Prevention

This article about preventing climbing accidents is part of the book - The Trad Climber's Guide To Problem Solving.

VDiff trad climbing self rescue book

The First Bad Decision

The vast majority of climbing accidents are preventable. They typically happen due to a series of bad choices. A single bad decision is often not a problem – if you realize it straight away and can do something about it. The problem begins when you allow your bad decision to lead onto another, and another. When combined, these decisions can result in disaster.

In the summer of 2010, I decided to rope solo a long multi-pitch in Yosemite, California. I chose to use two ropes; a lead rope to belay myself with and a haul rope to pull up a haulbag containing my food, water and other equipment. I’d practised this self-belaying system before, but I didn’t have time to become competent at it before the climb (first bad decision).

El Capitan Yosemite

I knew the theories of self-rescue, but I hadn’t actually practised the techniques in real life (second bad decision). In Yosemite, the temperature was a blistering 100°F and forecast to stay that way for the duration of my climb. My chosen route was in direct sunlight all day, but I decided to climb it anyway (third bad decision). Despite knowing how much water I should bring, I decided to save weight and bring less (fourth bad decision), thinking that I would somehow just be able to climb faster.

I eventually ran out of water, of course, still with many pitches above. The combined effect of my four bad decisions had left me exhausted, dehydrated and completely uncertain that I’d actually be able to retreat to the ground by myself. My mouth was so dry it felt like I was constantly inhaling boiling sand. This caused me to make my fifth bad decision – to rush upwards as fast as I could, placing minimal gear and taking massive risks.

And that’s when it all went wrong.

My haulbag was stuck, 30 meters below. I had to abseil down to dislodge it.

I would just be able to reach by abseiling on the other side of my 60 meter haul rope. Due to some combination of fear, delusion and panic caused by my five previous bad decisions, I neglected to use my other rope as a back-up.

how to big wall climb

The haulbag acted as a counter-weight as I descended.

But only because it was stuck, not because of its weight (it was almost empty).

hauling big wall climbing

I pulled the haulbag free, then realized my sixth bad decision the moment it slid away from my fingertips.

The fall started slow. I tried to keep pace by running down the rock but I immediately tripped over and forward-rolled down the wall in a tangle of slings, screams and wide-eyed terror.

big wall climbing

The haulbag picked up speed exponentially and was soon rocketing up towards the belay, while I tumbled out of control.

It felt like I was falling forever.

Luck was on my side. Instead of hitting ledges and spiky blocks, I fell in between them. The haulbag jammed into the belay and I survived the 30 meter fall with just a few scrapes and a bruised ego.

I continued up, teetering on the brink of a peculiar kind of madness. A few pitches higher, I found an ancient gallon of water on a small ledge. I sat there and drank the whole thing. Life became good again and I made it to the summit.

It’s a good skill to be able to catch yourself making that first bad decision. Think about how this decision narrows your choices further on in the climb and the problems it may create. If you can master that, you are well on your way to having a safe climbing career.

how to haul big wall climbing

VDiff climbing self rescue book

Climbing Accidents - Risk

Risks are part of the climbing game. Falling is an obvious risk, but others are more subtle.

For example, if you don’t know how to escape the belay with your chosen setup, you risk being unable to help your partner in an emergency.

The more problems you can solve, the more ‘risks’ you can take.

This doesn’t mean you can climb more dangerous routes. It means you can climb bigger routes in more remote places while being competent enough to solve any problems that you may encounter.

Before making a decision, ask yourself this: If you take the risk and it doesn’t go in your favour, can you solve the problem that it creates?

Climbing Accidents - Exhaustion

Climbers often make decisions differently when tired, hungry, cold or in a rush for whatever reason.

Shortcuts are made. Safety is compromised. Accidents become more likely to happen.

In some situations (such as finishing that final pitch when a huge storm is just starting), it can be safer to cut corners and speed things up. However, in most situations the safer option takes longer.

It is important to understand why you are making a potentially dangerous decision. Have you ever abseiled off a poor anchor because you were cold or tired and wanted to get down faster?

Having the ability to make good decisions when exhausted is a great skill to have.

Climbing Accidents - Confidence Vs Competence

Most accidents involving leader falls happen because the leader did not protect the route as well as they could.

Protection was available, but the leader either placed gear poorly or chose not to place any when they had the option.

There are three types of climber who do not protect routes well:
- Beginners (because they haven’t yet learnt how to place gear properly)
- Competent climbers on easy routes (because the chance of falling is near zero)
- Over confident climbers (because they are trying to appear competent to their belayer or impress whoever is watching)

Climbers often mistake confidence for competence, or to put it more simply – how good you think you are with how good you actually are.

Being overconfident is fine in a safe environment, such as the indoor gym. Confidence will cause you to try hard moves and improve your physical technique.

However, it will not cause good gear placements to appear when you need them, or that loose flake to hold your weight when you stand on it.

Being humble about your ability and immortality will help you make better decisions and prevent problems in the first place.

Heroes

It is often seen as more heroic to climb a route in a more dangerous style, with the ultimate heroes being those who can free-solo everything.

The climbing media only reinforces this message. Photos of helmet-less climbers and videos of Alex Honnold free-soloing El Cap may be impressive to watch, but it encourages everyday climbers to adopt poor safety standards.

It’s important to understand why you are choosing a particular style of ascent. Are you doing something dangerous because you are competent?

Or are you just trying to be a hero?

Fisher Towers climbing

How To Practise

It is essential to practise the techniques described on this website before you actually use them in real life situations. You should aim to reach a level of competence where you can set up any system without needing to refer back to this book.

Some of the skills can be practised at ground level (e.g: tying knots or building anchors), whereas others require a top rope to be set up. This could be done inside at the gym or outside at the crag. Many skills can be practised with the same top rope. For example, with a single rope fixed to an anchor, you can practise the Z-abseil, tandem abseiling, the carabiner brake, abseiling past a knot and prusiking.

However you choose to practise, always go with a partner and always make sure to back up any system which you are not familiar with.

how to top rope climb

There are thousands of poor situations you could encounter when trad climbing, most of which do not have a textbook solution. At the crag or in the mountains, there are an endless amount of ever-changing variables. Problems may be solved much differently depending on what gear you have available, how windy it is, how close you are to the ground or how loose the rock is. These website articles introduce the basics of problem solving and encourage you to develop the flexibility to craft a solution for each unique situation.

However, this website alone is of limited use. An essential part of the learning process is to go to the crag with your climbing partner and physically practise the techniques described. Challenge each other to improvise different solutions for each problem. The more times you solve similar problems with similar variables, the easier they are to solve again. Over time, these common problems will be solved subconsciously. When you combine the theories with real-life practise, your decisions will, hopefully, start to get better and become more subconscious. That is the aim of this website.

See you out there,

Neil Chelton
VDiff Founder

Self Rescue > Escaping the Belay

The belay escape is a technique whereby the belayer frees themselves from the responsibilities of belaying. This fundamental skill is necessary for many rescue situations.

Situations when you may need to escape the belay include:
- If your partner needs hauling through a crux while following
- If you need to descend to your partner to give immediate first aid
- If your partner falls and is injured while leading
- If you need to detach yourself from the rope to get outside help

The Belay Escape – How it Works

Any safe version of the belay escape involves the same four checkpoints:
- Get hands-free
- Transfer climber’s weight to anchor
- Transfer climber’s belay to anchor
- Remove all excess prusiks, carabiners and knots

The belayer can detach from the rope completely if needed. The end result is a system which can be released under load and can be used again as a belay. Returning to belay mode is often needed once a rescue has begun.

The full belay escape system is described in this article. Depending on the situation, you may not need to complete all of the steps (e.g: the process is much simpler if your partner is able to un-weight the rope). However, it’s important to know the complete system before taking shortcuts.

Three different methods are described. These cover belaying:
1) From your harness (anchor is within reach)
2) From your harness (anchor is out of reach)
3) Directly from the anchor (e.g: using guide mode)

The Belay Escape – First Considerations

Before starting a belay escape, make sure it is the best course of action for the situation. Maybe a much simpler option exists, such as lowering your partner to a ledge, or getting them to prusik up.

Depending on the direction of loading and your course of action after escaping the belay, you may need to make your anchor stronger. Some rescue techniques (such as hauling) exert high forces on the anchor. Beefing up the anchor is straightforward if you are belaying a second and there are protection points available within reach. With some creative sling craft and fine tuning, you may be able to equalize a few extra pieces to the belay.

If you are belaying a leader on a multi-directional anchor where there is only a single piece holding an upwards pull (example shown), you will need to add gear or build a new anchor before escaping the belay.

upwards pulling trad belay anchor

This is very difficult (or impossible) if the leader has the whole rack with them. However, you may be able to adjust the existing anchor pieces and cordelette to hold an upwards pull. Make sure the anchor still protects you from a fall while you are adjusting pieces.

As a last resort, you might be able to rope solo or prusik a short distance to retrieve gear for backing up the anchor.

The Belay Escape – When Belaying from your Harness (Anchor within Reach)

belay escape trad climbing escaping the belay

Step 2
Tie a prusik hitch on the weighted rope with a long cordelette. Make sure the double fisherman’s bend which joins the cord is close to the prusik hitch.

If you don’t have a long cordelette, you could use a short prusik cord attached to a double-length sling.

belay escape trad climbing

Step 3
Clip a screwgate to the master point of the anchor.

Step 4
Tie a munter hitch with the cordelette to the screwgate. Flip the munter so it’s in the lowering position and pull all the slack through.

trad climbing escaping the belay

Step 5
Tie a mule-overhand backup in the cordelette.

Step 6
Slide the prusik along the rope towards the climber to take up any remaining slack in the cordelette.

trad climbing belay escape

Step 7
Carefully release your tied-off belay device and let a small amount of slack through so the climber’s weight is transferred onto the cordelette.

Keep hold of the brake rope for the next 3 steps.

escaping the belay trad climbing

Step 8
Attach a screwgate (yellow carabiner in this diagram) to the master point and tie a munter hitch on it with the brake rope.

Pull most of the excess rope through so there is just enough slack to remove your belay device.

belay escape

Step 9
Keeping hold of the munter’s brake strand, remove your belay device.

Step 10
Pull the extra slack through the munter hitch and flip it so it’s in the lowering position. Finish the munter with a mule hitch and an overhand backup.

escaping the belay

Step 11
Release the mule-overhand from the cordelette and use the munter to transfer the climber’s weight from the cordelette to the rope.

Step 12
Once the weight is fully on the rope, remove the cordelette completely. You have now escaped the belay and can move on to the next step of your rescue.

belay escape trad climbing escaping the belay

Note
The same steps can be followed to escape the system if you are belaying from your harness and using a re-directional through the anchor.

redirected trad belay

VDiff self rescue course

The Belay Escape – When Belaying from your Harness (Anchor out of Reach)

belay escape trad climbing escaping the belay

Step 2
Fasten a prusik on the weighted rope as shown and attach a screwgate to it.

belay escape trad climbing

Step 3
Reach back to your tie-in at the anchor and grab the free end of your tie-in. If you can’t reach, run through the rope stack until you get to it.

Step 4
Tie a munter-mule-overhand on the screwgate with this part of the rope.

trad climbing escaping the belay

Step 5
Slide the prusik down the rope towards the climber to take out excess slack.

Step 6
Transfer the weight onto the prusik by releasing your tied-off belay device. Be prepared for a bit of rope stretch before the prusik takes the weight.

Keep hold of the brake rope for the next 3 steps.

belay escape trad climbing

Step 7
Move back to the anchor and tie a munter hitch to it with the brake strand of rope.

escaping the belay climbing

Step 8
Remove your belay device.

Step 9
Bring in the excess slack and finish the munter with a mule-overhand.

escaping the belay

Step 10
Release the mule-overhand from the rope which is attached to the prusik. Use the munter to transfer the climber’s weight from the prusik to the munter-mule-overhand on the anchor.

Step 11
Once the weight has been transferred, you can remove the prusik and the munter hitch.

belay escape climbing

The Belay Escape – When Belaying Directly from the Anchor

When belaying directly from the anchor with a self-blocking belay device (such as an ATC in guide mode) or an assisted braking belay device (such as a GriGri), you have already escaped the belay.

These belay methods are not completely hands-free – a light hand must be kept on the brake strand while belaying. Therefore, the only step remaining is to back up the device. Simply tie-off the device with a mule-overhand as shown below.

guide mode belaying
how to belay in guide mode

Self Rescue > Hauling Your Partner

This section describes methods of hauling your partner up part of a climb.

Times when you may need to set up a hauling system include:
- Assisting your partner through a short crux.
- If your partner falls while following a steep pitch and is left dangling in space.
- During a multi-pitch rescue for an injured climber, where descending would be more difficult or dangerous.

In most cases, it is easier for the follower to prusik up the rope than it is for the leader to haul them. However, hauling may be the best option if they are injured or cannot use prusiks.

Warning – Unconscious Climber
Dragging a climber up a cliff may cause additional injuries. If the climber is unconscious, they should not be hauled unless directly attended. If a long or complicated haul is required, utilizing search and rescue professionals is usually the best course of action.

Mechanical Advantage

The hauling systems in this section are described using their mechanical advantage. A 3:1 means that for every three meters of rope that you haul, your partner moves up one meter. With a 6:1, six meters of rope must be hauled to move your partner one meter.

In theory, a 3:1 is three times easier than just pulling on the rope (1:1). In reality, improvised hauling systems are fraught with inefficiencies, creating a significant difference between theoretical and actual mechanical advantage. This is primarily due to friction around carabiners and stretch in the rope (explained here). Taking this into consideration, a 3:1 setup is still a simple and effective solution for many situations.


VDiff self rescue course

Hauling Your Partner – Drop Line 1:1

Best Use
- Assisting your partner through a short crux near the top of a pitch

Advantages
- Simple

Disadvantages
- Only possible when the climber is less than 1/3 of the rope length from the belayer
- Must be able to drop a rope to the climber easily. Getting your rope stuck will add more problems

Step 1
Tie off your belay device so you can go hands-free.

mule overhand belay device

Step 2
Attach the standing end of the rope to the master point. Often it already is depending on your belay setup.

Step 3
Lower the rope stack to the climber.

rock climbing belay setup

Step 4
Release your tied off belay device. They can now pull on the standing end of the rope while you belay them up – they do all the hard work! Make sure the climber pulls on the correct side of the rope. You could also pre-tie some loops in the rope so it is easier for them to pull.

rock climbing trad belay

Hauling Your Partner – Drop Line 2:1 / 3:1

Best Use
- Assisting your partner through a short crux near the top of a pitch when belaying in guide mode

Advantages
- Simple

Disadvantages
- Only possible when the climber is less than 1/3 of the rope length from the belayer
- Must be able to drop a rope to the climber easily. Getting your rope stuck will add more problems

Step 1
Attach a screwgate to the rope stack and lower it down to the climber.

Step 2
The climber clips this to their belay loop.

Step 3
Tie a back up knot (such as a figure-8) to the anchor. This back up knot should be adjusted every few meters.

Step 4
The climber pulls down (with a 2:1 advantage) while the belayer pulls up (with a 3:1 advantage).

self rescue how to haul your partner guide mode

Hauling Your Partner – Simple 3:1

Best Use
- Hauling your partner through a crux when passing the rope to them is not possible

Advantages
- Only requires a few meters of rope to set up

Disadvantages
- The climber cannot assist


Step 1
If belaying from your harness, you’ll need to escape the belay.

Step 2
Tie a prusik on the weighted rope and clip it to the master point with a screwgate (depending on how you escaped the system, you may already have this).

self rescue hauling your partner

Step 3
Tie another prusik to the weighted rope as far down as you can reach. Clip this to the loose brake strand with a screwgate (Use a pulley here if you have one).


Step 4
Connect the rope to the master point with a screwgate as shown.


Step 5
Tie a back up knot (such as a figure-8) in the slack rope and attach this to the anchor.

self rescue how to haul your partner

Step 6
Transfer the load onto the upper prusik by slowly unfastening the munter-mule. Make sure you keep hold of the brake rope from now on.


Step 7
Remove the carabiner which the munter-mule was tied to. Pull in all slack.


Step 8
You are now ready to haul. Keep one hand over the upper prusik to maintain its position while pulling upwards on the rope. (Make sure the prusik does not get sucked through the carabiner)

self rescue hauling your partner

Step 9
The lower prusik will eventually join the upper prusik. At this point you will need to reset it. With the weight on the upper prusik, push the lower prusik down the rope as far as you can.

This would be a good time to re-tie your back-up knot (Tie a new one before untying the old one). Repeat as necessary.


Step 10
When your partner is able to continue climbing, re-attach your belay device and remove the prusiks.

self rescue how to haul your partner

Hauling Your Partner – 3:1 Tips

Self-Sliding Prusik
If an ATC is available, you can add it to the master point during Step 4.

The ATC will not add friction, but it can help to prevent the upper prusik from getting sucked through the carabiner.

self rescue hauling your partner

Downwards Hauling
If pulling upwards is difficult, you can re-direct the rope through the anchor to change the hauling direction. This will allow you to more easily put your weight into the haul.

The disadvantage is that it adds more friction to the system without adding any mechanical advantage.

self rescue hauling your partner

Hauling Your Partner – 3:1 with Guide Mode

You can easily set up a 3:1 system if you are belaying directly from the anchor in guide mode.

Advantages
- Quick to set up. There is no need to escape the belay or attach the upper prusik

Disadvantages
- Adds more friction to the system


Step 1
Attach a prusik to the rope as previously described.

Step 2
You are now ready to haul.

self rescue hauling guide mode belay

Hauling Your Partner – 3:1 with a Garda Hitch

A garda hitch is an improvised ratchet pulley.

Advantages
- Eliminates the need for the upper prusik

Disadvantages
- Adds more friction to the system
- The garda hitch is almost impossible to release when loaded. It is essentially a one-way hitch


Step 1
Instead of tying a munter-mule when escaping the system, tie a garda hitch with a back-up as shown.

Step 2
Attach a prusik to the rope as previously described, and you are ready to haul.

garda hitch alpine clutch

Hauling Your Partner – 3:1 from Your Harness

The same system can be set up from your harness.

Advantages
- Can be used with non-cordelette belay setups
- No need to escape the belay

Disadvantages
- The weight of the climber hanging from your harness can be uncomfortable
- Your range of motion is restricted. Pulling the rope and adjusting prusiks is much more difficult


Step 1
Tie-off your belay device to get hands-free.

Step 2
Follow steps 2-10 of 'Simple 3:1'.

self rescue hauling your partner 3:1

Hauling Your Partner – Adding More Advantage

Endless variations are possible by adding more prusiks, slings and carabiners. Two of the most common systems are shown below.

5:1 System

A 3:1 can be converted into a 5:1 by adding a sling and 2 carabiners.

5:1 hauling

9:1 System

A 3:1 can be converted into a 9:1 by adding 2 carabiners and a prusik.

9:1 hauling

Hauling Your Partner – Forces, Friction and Efficiency

Forces on the Anchor
Mechanical advantage hauling systems place increased forces on your anchor. If you continue hauling with something stuck (e.g: a prusik or carabiner gets caught in a crack), the forces on the anchor increase exponentially.

Don’t force the haul if it feels like something is stuck. It may be wise to beef up your anchor with more gear prior to hauling.

Friction
More friction means harder hauling. Friction is increased by:
- More weight on the rope
- More carabiners in the system
- Rope running over more surfaces

In a simple 3:1 setup, the weighted rope runs around 2 carabiners. This is the minimum number for a 3:1 haul, and therefore this system has the least friction.

Creating a 5:1 or a 9:1 may not necessarily make the haul easier, especially if your anchor is built on the ground and the rope is zigzagging over rough rock. Not only does this generate a lot of friction, it also means that you will have to haul five (or nine) meters of rope to get your partner one meter up.

Depending on how far you can reach to reset the prusiks, you may only get your partner up a few inches between each reset. If set up on an awkward stance, it could literally take hours to haul a person half a rope length.

Carabiner and Pulley Efficiency
Pulleys significantly reduce friction in hauling systems, but are rarely taken on climbs because they are unlikely to ever get used.

A good compromise is the DMM Revolver Carabiner which features a tiny pulley. It reduces friction and can be used as a normal carabiner too.

dmm revolver carabiner

Hauling Your Partner – Summary

Keeping your system simple, straight and away from unnecessary friction will help more than adding mechanical advantage to an inefficient system.

If you can throw some rope to your partner, the drop line techniques will be quickest. If not, a 3:1 will be the next best option. It is often more efficient to pull harder on a 3:1 than it is to add carabiners (and friction) to set up a 9:1. Only add more mechanical advantage if you need it.

Complicated belays and loose rock on belay ledges can add more problems than a hauling setup may solve. Consider alternative solutions (such as lowering your partner, or getting them to prusik up) before you set up a hauling system.

Self Rescue > Mid-Pitch Retreat

Sometimes, a climb may prove to be too difficult, forcing you into a mid-pitch retreat. This is fairly straightforward if you:
- Can downclimb
- Are less than half a rope length up a pitch
- Can reach an anchor by french-freeing, aiding or penduluming

However, if you are more than half a rope length up a pitch, cannot downclimb or make a belay, you can still get down.

Mid-Pitch Retreat with a Single Rope

This method assumes that the gear you lower from is very reliable. It is recommended that you back up the lower-off piece either by equalizing it with another or by leaving a couple of protection pieces below the top piece.


Step 1
Get lowered to a place where you can make an anchor.

self rescue bail from climb

Step 2
Attach to the anchor with a sling.

self rescue bailing from climb

Step 3
Pull a bight of rope through the anchor, tie a figure 8 and attach it to your belay loop.

self rescue mid-pitch retreat from climb

Step 4
Untie from the end of the rope, pull the rope through and re-tie back into the end.

self rescue retreating from climb

Step 5
Remove the figure 8 on a bight and ask the belayer to take in the slack. If there is a huge amount of slack, consider tying intermediate knots while the slack is being taken in.


Step 6
Once the slack has been taken in, you can unclip your sling attachment and lower down to the belayer, or to another anchor to repeat the process.

self rescue get down off climb mid-pitch retreat

If the route traverses or overhangs, make sure to lower down with a sling attaching you to the rope. This prevents you from getting stranded.

You’ll have to clip past any gear that you are leaving.

self rescue climbing

VDiff self rescue course

Mid-Pitch Retreat with Two Ropes

If you are climbing with a lead rope and trailing another rope (e.g: a lightweight ‘tag’ rope for hauling or adding distance to your abseils), it is possible to use a different technique which is slightly safer (if you protected the pitch well) and means you can leave less gear behind.

To set up the two rope retreat:

Step 1
Clip the middle of the tag rope (green in this diagram) into your highest good piece of gear.

self rescue trad climbing

Step 2
Abseil on the tag rope while getting belayed down on the lead rope. Remove protection as you descend.


Step 3
This technique allows you to descend up to half the length of the tag rope. At this point, you will need to create an anchor and repeat the process.

self rescue descent climbing

The Cost of Leaving Gear Behind

These methods involve leaving gear behind. When deciding on which pieces or how many to leave behind, remember that the cost of climbing gear is far less than the cost of being seriously injured. It is obviously very dangerous if the lower-off piece fails. Leave behind solid gear and worry about replacing it later.

Depending on the location, it may also be possible to retrieve your gear later by abseiling in from the top on a fixed rope and then prusiking out.

Self Rescue > Tandem Abseiling

Tandem abseiling means two people descending with the same device. It is most useful when descending with an injured climber.

A simple tandem abseil setup:
- ‘Lead’ abseiler is attached to the belay device with a shoulder-length sling girth-hitched through their belay loop.
- Lead abseiler uses a prusik.
- Second abseiler is attached to the belay device with a shoulder-length sling doubled through their harness. This allows the climbers to be staggered slightly.
- Both climbers are attached with separate screwgates to the belay device. The two carabiners add extra friction therefore making it easier to control the descent. They also allow each climber to be on independent systems.

Because of the doubled weight, you might benefit from adding extra friction to the abseil.

self rescue tandem abseiling rappelling

Multiple Tandem Abseils

If your partner is incapacitated, you should attach them to each station with a releasable clip-in (such as a length of cord tied with a munter-mule-overhand), backed up with a sling.

Pre-attach this to their harness before you begin the descent.

self rescue tandem rappel

VDiff self rescue course

Tandem Abseiling > Chest Harness

You could make an improvised chest harness to keep your partner in a better position during the descent.


Step 1
Tie an overhand knot in the middle of a double-length sling.

rock climbing sling

Step 2
Insert your partner’s arms into the loops, as if you were helping them put a jacket on.

self rescue chest harness

Step 3
Clip the two ends of the sling around the abseil rope (no knot is needed – the carabiner should run freely down the ropes).

chest harness rock climbing

An alternative is to clip the chest harness to your partner’s abseil sling.

Be careful not to descend past your next abseil station – prusiking back up with an extra person hanging from your harness may be impossible.

self rescue tandem abseiling

Self Rescue > Rope Soloing

This article, Self Rescue > Rope Soloing, is part of the book - The Trad Climber's Guide To Problem Solving.

VDiff trad climbing self rescue book

Rope soloing is a technique where you belay yourself instead of being belayed by your partner. You can use this technique to lead or top rope belay.

More complicated techniques are needed to solo an overnight alpine route or aid-solo a big wall. These skills are outside the scope of this article. Only the basic technique is described here.

Times when you may need to rope-solo include:
- Climbing up to reach an injured leader after escaping the belay
- Assisting an injured partner who cannot belay and when the easiest way out is up
- Setting up a top rope anchor by yourself

rope solo el cap shortest straw

Photo: Neil Chelton rope soloing The Shortest Straw, El Cap. Photographer: Tom Evans.

Rope Solo Devices

Devices exist which are specifically designed for rope-soloing (such as the Silent Partner). Assisted braking belay devices (such as the GriGri) work to some extent, but are fairly unreliable for rope soloing and must be backed up with the technique described here anyway.

In keeping with the improvised character of self-rescue, we will assume that you don’t have a rope-solo device with you.


VDiff climbing self rescue book

How To Rope Solo – The Basics

Step 1
Build a bomber, multi-directional anchor (a bolted anchor is best when first learning this technique) and tie one end of the rope to it. This anchor primarily needs to hold an upwards pull.

You can maintain the position of the anchor by tying a clovehitch to a separate piece of gear above the anchor as shown (other knots work too, such as the alpine butterfly, but the clovehitch is much easier to cinch tight).

Alternatively, you can use a prusik to maintain the anchor’s position. Be aware that prusiks may slip when left on an unattended, moving rope like this.

If it is critical that your anchor stays in position, use the clovehitch technique instead.

self rescue rope solo

Step 2
Tie in to the other end of the rope.


Step 3
Stack the rope neatly so that it feeds out from both ends.
The rope will feed out twice as fast from the anchor side than from your tie-in side, so factor this in when stacking.

self rescue how to rope solo

Step 4
Pull a few meters of rope through from the anchor side and tie a clove hitch to a screwgate. Attach this to your belay loop. This is your primary tie-in point.


Step 5
Tie another clove hitch a couple more meters further down the rope. This is your back up.

rope soloing rescue

Step 6
You are now ready to climb. As you ascend, place gear on the rope between your primary clove hitch and the anchor.


Step 7
You’ll need to adjust your clovehitch just before the rope comes tight. Pull up a few meters of slack rope, tie another clove hitch, then remove the old one.

Remember that the extra slack from untying will add to the distance you can fall as well as the distance you can climb up. Re-tie the clove hitches as often as you need to keep yourself safe.

rope solo climbing

Alternative Rope Solo Method

The main reason to be tied into the end of the rope is so that it’s impossible to become completely detached from the system. Depending on your level of competence with rope-soloing, you may choose to only be attached to the system via the clovehitches. This means you have less rope hanging from your harness and therefore less chance of a loop getting caught on something out of reach below.

A good compromise is to carry the rope with you in a backpack while climbing. Tie into the end of the rope and stack it inside the backpack (your tie-in end is stacked at the bottom). Keep your backpack open so you can pull rope out easily while you climb.

Rope Soloing Dangers

Rope Management
One of the main difficulties of rope soloing is judging the amount of rope you need to get to the next gear placement or good stance.

Due to the extra slack in the system, you will need to place gear more frequently than you would when being belayed by a partner, especially when climbing off the ground or a ledge. It’s a hard balance between having enough rope to move up, and keeping fall potential to a minimum.


Dynamic Belay
Without a partner, you will not have a dynamic belay. This means more force is applied to your gear in a fall – another reason to place solid gear more frequently.


Stuck Ropes
Another common problem (especially on lower-angle terrain, or if it’s windy) is getting a loop of rope stuck on something.

You can reduce these dangers by:
- Placing good gear more frequently than you normally would.
- Identifying upcoming gear placements before you reach them.
- Making sure you don’t need to re-tie your clove hitches in the middle of a difficult move.
- Only climbing terrain you find easy.
- Having a sling pre-attached to your belay loop. This allows you to quickly clip in to a piece of gear – useful for getting your hands free to adjust knots.
- Managing your rope well. If your rope is likely to get stuck far below, you could carry it in coils on your harness (this works better higher up the pitch when there is less rope to deal with), or take it with you from the start in a small backpack.

Top Rope Self-Belaying

Other situations exist where you may need to self-belay up a rope above you. For example, if the rope above gets stuck when you’re following a pitch. A solution would be to self-belay to the point where the rope is stuck.

In most situations like this, the rope remains still while you ascend. Simply climb up and tie backup knots as you go.

Depending on the situation, you may reach a point where you can be put on belay. In this case, you should adjust the backup knots while the belayer takes in rope. This ensures that you do not create unnecessary fall potential while the rope is being taken in.

self rescue rope solo climbing

Self Rescue > Prusiking Up a Rope

Knowing how to prusik up a rope transforms a potential epic into a mere inconvenience.

This article explains how to ascend a rope using prusiks, assuming that you already know how to tie one. If you don’t know how to tie a prusik knot, you can learn here.

Prusiking is most commonly needed when:
- You abseiled too far
- You abseiled the wrong way
- Your ropes get stuck after abseiling
- If you fall while leading or following a steep pitch.

abseil and prusik up a rope

Before You Prusik up a Rope

Only prusik up a rope which is properly attached to an anchor
Sounds obvious, but many accidents have happened because a climber was ascending a ‘stuck’ rope which then came free.

Another fatal mistake is to ascend only one rope on a double rope abseil, hoping that the knot will remain jammed in the anchor. Never do this! When under load, even large knots can squeeze through carabiners and certain types of chains or rings. If you descended both ropes, you’ll need to ascend both too. Remember that prusiks work equally well on one rope or two.

Always back up your prusiks.
Prusiks are not full-strength attachment points. Tie a back-up knot in any rope which you are ascending. Clip this knot to your belay loop and re-tie it frequently as you ascend. When you re-tie it, make sure to tie the new back-up knot before removing the old one.

how to prusik up a rope

VDiff self rescue course

How To Prusik up a Rope: The Standard Technique

Advantages
- Safe to use in almost any rope-ascending situation.

Disadvantages
- Often more strenuous than other methods, such as the slingshot.

Step 1
Tie a back-up knot (clovehitch, overhand or figure-8 on a bight work well) in the slack rope(s) beneath you. Clip this knot to your belay loop with a screwgate. If you are ascending two ropes, make sure to tie back-ups in both of them.

If you are mid-abseil, simply weight your prusik and tie the back-up knots.

If you are abseiling without a prusik and dangling in space, you can wrap the rope around your leg at least three times, tie a prusik, release the rope from around your leg, weight the prusik and then tie the back-up knots. Whatever you do, make sure to keep hold of the brake rope until you have tied the back-up knots.

how to prusik up a rope

Step 2
Attach two prusiks (classic or klemheist types work well) to the rope(s) above you.

how to prusik up a rope

Step 3
Girth-hitch a 60 cm sling to your belay loop and clip it to the top prusik (if it’s too long you can tie a knot to shorten it).

Use screwgate carabiners for all connections. If you don’t have enough screwgates, you can substitute two snapgates with gates opposite and opposed.

how to prusik up a rope

Step 4
Girth-hitch another sling to your belay loop and clip it to the bottom prusik.

how to prusik up a rope

Step 5
Make a foot loop by clipping a long sling/piece of cord to the bottom prusik.

how to prusik up a rope

Step 6
Now the hard work begins. To ascend, push the top prusik up the rope as far as you can, then sit back in your harness to rest your weight on it.

Step 7
Slide the unweighted bottom prusik up the rope and stand in the foot loop. As you stand up, slide the now unweighted top prusik up the rope.

Step 8
Repeat this process, making sure to adjust your back-up knots as you ascend.

how to prusik up a rope

How To Prusik up a Rope: The Slingshot Technique

The ‘slingshot’ is a similar technique to the one used when winching yourself back up to your high point after falling on a steep sport route.

Advantages
- Less strenuous to ascend the rope than the standard technique.

Disadvantages
- Only works in an abseiling situation. You cannot use this technique to regain your high-point if you fall into space when leading or following a steep pitch.
- Difficult to set up if you can’t unweight the rope.
- Causes the rope to rub over the main anchor point. Never use this method if your rope is threaded through webbing, a sling or any fairly worn-out anchor point. The sawing action of this technique can cause the rope to cut the sling!

Step 1
Anchor yourself independently of the abseil ropes (if you’re not already on the ground) and remove your belay device.

Step 2
Tie a figure-8 on a bight in both strands of rope. Clip both of these to your belay loop, each with their own screwgate. One of these will remain weighted as you ascend, the other is your back-up knot.

how to prusik up a rope

Step 3
Tie both prusiks on the side of the rope which has the knot joining the two ropes. Attach yourself to both prusiks and rig a foot loop as previously described.

If you anchored independently from the abseil ropes, you will need to detach yourself from the anchor at this point.

how to prusik up a rope

Step 4
Prusik up the rope, using the same technique described above. As you pull down on one side of the rope, the opposite side will pull up, assuming there isn’t much friction at the anchor point. This makes the ascent easier, but slower, than using the standard method.

Re-tie your back-up knot as you ascend (on the blue rope). Make sure to get the right knot though - do not untie the weighted knot!

how to prusik up a rope

Step 5
In most cases, you’ll have to pass the knot which joins the two ropes. Simply re-tie your prusiks past this knot one at a time.

how to prusik up a rope

How To Prusik up a Rope: Using an Extended Belay Device

Advantages
- Fairly quick to set up.
- Great for ascending a short distance, such as if you abseil past an anchor.

Disadvantages
- Only works if you are abseiling with an extended belay device which has a guide mode function.

Step 1
Fasten a prusik knot (klemheist works well) around both ropes above your belay device with a long piece of 5mm or 6mm cord. This will be your foot loop.

Step 2
Step into the foot-loop and stand up, taking the weight off your belay device. Make sure to keep hold of both brake ropes as you do this.

how to prusik up a rope

Step 3
Connect your belay loop to the auto-block hole on your belay device with a screwgate.

how to prusik up a rope

Step 4
Sit your weight onto your now auto-blocked belay device.

how to prusik up a rope

Step 5
Slide the top prusik up the rope and stand in the foot loop again. This takes the weight off your belay device, allowing you to pull the slack rope through it.

Step 6
Repeat steps 4 and 5 until you reach the anchor.

how to prusik up a rope

Prusiking up a Rope - Summary

Knowing how to prusik up a rope is an essential skill for any trad climber. It is strenuous and awkward at first, and it may take a while to figure out the exact lengths of cord you need. But with a little practise, you will soon become a prusiking pro.

how to prusik up a rope

The Munter Hitch – How To Belay Without a Belay Device

This 'Munter Hitch' article is part of the book - The Trad Climber's Guide To Problem Solving.

VDiff trad climbing self rescue book

Uses:
- Belaying without a belay device
- Abseiling without a belay device
- Creating a releasable knot when escaping the belay

The munter hitch tends to 'kink' the rope when used for abseiling or belaying. It can also cause slight abrasion to the rope's sheath, especially if the leader falls.

It is a useful skill to know, but is not intended for long-term use.

drop belay device climbing

How To Tie a Munter (Italian) Hitch

Step 1
Clip the rope through a large, pear-shaped (HMS) screwgate. Smaller screwgates work too, but will make belaying more difficult.

Munter italian hitch rock climbing

Step 2
Twist a loop in the climber's end of the rope as shown.

How to tie an italian hitch rock climbing

Step 3
Clip the loop into the screwgate.

How to tie a Munter hitch rock climbing

Step 4
Clip the carabiner to your belay loop and fasten the screwgate.

Munter hitch belaying

Warning!
Make sure the brake strand is on the 'spine' of the screwgate. If the brake strand is on the 'gate' side, it could rub against the gate and potentially open it.

Italian hitch belaying

Step 5
Test the knot by pulling tight on either end of the rope. The knot should flip through the carabiner easily both ways.

Munter italian hitch rock climb belay

VDiff climbing self rescue book

Belaying With a Munter Hitch

Belaying with a munter hitch is similar to using an ATC: you must keep hold of the brake rope at all times. The main difference is that you 'lock-off' in the opposite direction (see below). This goes against a climber's natural reaction, so make sure to practise this technique well before using it.

When bringing up the second on a munter hitch, it's easier to belay directly from the anchor (if your anchor setup allows), rather than from your harness.

Italian hitch belaying top rope

To Lock Off
The Munter hitch creates a lot of friction. Depending on the situation (rope thickness, weight of climber, rope drag, etc..), it can be locked off in any direction. However, for maximum friction, you must hold the brake rope forward (so that both strands of rope are parallel to each other).

Munter hitch belaying

To Give Slack
Hold the brake rope loosely and pull through slack rope, similar to giving slack with an ATC.

Italian hitch belay

To Take In
Pull the brake rope so that the knot 'flips'. More rope can now be taken in by continuing to pull rope through forwards.

Munter italian hitch rock climb belay

To Lower
Lock the rope off in the maximum friction position described above. Slowly move the rope back and lower as you would with an ATC. It can be tricky to find the 'sweet spot', so make sure to move position slowly.

Munter italian hitch belaying

How To Tie-Off a Munter Hitch - The Munter-Mule-Overhand

Uses:
- Tying off a munter hitch when belaying or escaping the system.

Step 1
Form a loop in the brake-strand of rope as shown.

Munter-mule hitch rock climbing

Step 2
Feed a bight of the brake rope around the climber's rope and through the loop as shown.

Pull the knot tight, either by easing the climber's weight onto the rope if they are weighting it, or by pulling up on the climber's strand of rope if they're not weighting it. The munter hitch is now tied-off, but not backed-up (see next step).

Munter-mule hitch belaying

Step 3
To complete the knot, you must back it up. One way of doing this is to tie an overhand around the climber's strand of rope. To start, wrap the loop around the back of the rope.

Munter-mule hitch

Step 4
Then feed it back through as shown.

Munter-mule hitch climbing

Step 5
A carabiner completes the hands-free munter-mule-overhand.

Munter mule overhand knot

To Release
Unfasten the overhand knot Then pull forwards on the brake strand of rope until the knot pops free.

If the rope is weighted, you can expect a few centimetres of rope to slip through the munter hitch. Prepare for this by holding the brake strand tight with both hands.

Munter-mule hitch release

Munter Hitch Belaying - Top Tips

When using a small diameter rope, it's worth using two carabiners to increase belay friction.

Munter hitch belaying skinny rope

To belay the second with half ropes, you can treat them as one and tie them together in the same munter hitch. If you need to pull one rope through faster than the other, you should use two separate knots (see next tip) instead.

Munter hitch belay two ropes

To lead belay with half ropes, you'll need to use two separate screwgates with a munter hitch on each. This can be difficult at first, especially giving slack on one rope while simultaneously taking in the other. Practice well before you use this technique.

Munter hitch two rope belaying

Abseiling > How To Abseil with a Damaged Rope

If you climb long enough, you will inevitably end up having to abseil with a damaged rope at some point. Unfortunately, getting a core-shot (when the white core is visible) seems to be more common on long multi-pitch climbs where the terrain is blocky and the abseil descent is complicated.

How you solve this problem depends on the severity of the rope damage and where you are when it happens.

climbing with damaged rope abseil with a damaged rope core shot ropes

Climbing with Damaged Ropes

If it is more practical to continue up than descend (e.g; If you are ten pitches up a steep face, but only one pitch away from an easy walk-off descent), you can continue climbing on the longest section of undamaged rope. You’ll have to do shorter pitches, but this may be the best option.

If using the rope in a situation where it will not pass through any gear (such as hauling on a big wall, or moving together on a glacier), you can tie an alpine butterfly over the damaged section to return the rope to its full strength.

climb with core shot climbing ropes

How to Abseil with a Damaged Rope

If a small amount of core is showing through the sheath, and the core is in perfect condition, you can wrap a piece of finger-tape tightly around this abraded section. This helps to hold the sheath together and prevent the core from being further exposed. Use just a small amount of tape so that your abseil device still feeds through easily.

It is not safe to lead on a damaged rope like this, whether taped or not. This technique is only suitable for abseiling. It enables you to get down safely, but is not a permanent solution. The rope should be retired afterwards.


VDiff self rescue course

Abseiling with a Core-Shot Rope

If the core is damaged, you’ll need to abseil on a single ‘good’ strand of rope, and treat the damaged part as the pull-down cord. You don’t need to cut your rope. Here’s how:

Step 1
Attach the rope through the anchor as shown. A figure-8 is shown in our diagram, but you could also use other knots (such as the overhand, figure-9, clovehitch or alpine butterfly). The point is to have a knot which physically cannot pull through or get stuck in the main anchor point.

The important part of this setup is to clip the rope back to itself with a screwgate carabiner to make a ‘closed loop’ around the main anchor point. This way, the system wouldn’t fail completely if the knot slipped through. You would, however, have to prusik back up to solve the problem.

The same setup applies if you are abseiling on two ropes. Tie them together and use the damaged rope as the pull-down cord.

how to abseil with core shot ropes

Step 2
Attach your abseil device to the good strand of rope.

Follow the same safety precautions as you would when abseiling at any other time: tie a knot in the bottom end of the rope, use a prusik and weight the rope to check the system before you commit to it.


Step 3
Abseil down the good strand while keeping hold of the pull-down cord. It’s a good idea to keep the end of the pull-down cord clipped to you.

Watch the setup as the first climber descends. If the knot gets jammed or slips through, you’ll need to tie a bigger knot or change the main anchor point to something smaller (small maillions/ quick-links are good for this).


Step 4
Pull your ropes down.

It’s possible that the knot and carabiner could get stuck. As when abseiling in a normal situation, keep an eye out for cracks and features where this could happen before you pull your ropes.

On a multi-pitch descent, remember that you will have to thread the same rope through each anchor.

Top Tip – Abseil Extra Distance

Add slings and cordelettes to the end of the pull-down cord if you need a little extra distance on your abseils.

Top Tip – Add Extra Friction

There will be less friction when abseiling on a single strand of rope, which can be harder to control. To make a smoother descent, see our article on increasing abseil friction.

how to rappel with core shot ropes

Top Tip – Two Damaged Ropes

If both of your ropes are damaged, the best option is to salvage the longest section of undamaged rope as the ‘good’ rope and join the rest together as the pull-down cord. You won’t be able to abseil as far, but it is better than not being able to abseil at all.

Another option is to fix one end of the rope to the anchor and abseil on a single strand, passing knots on the way. You will not be able to retrieve your ropes, so this only works if your ropes reach to the ground.

Abseiling > How To Abseil Past a Knot

How To Abseil Past a Knot is part of the book - The Trad Climber's Guide To Problem Solving.

VDiff trad climbing self rescue book

Times when you might need to abseil past a knot:
- When descending a single strand ‘fixed’ rope, where a knot has been tied to isolate a damaged section
- Passing a knot joining two ropes during an emergency retreat

As always, first try to utilize the terrain to make passing the knot easier. For example, if you have a ledge to stand on, you can bypass the knot without needing prusiks. However, if you are dangling in space with a heavy pack pulling you backwards, you’ll need to follow all the steps described.

(If you are abseiling with your own damaged ropes, it may be better to use this technique.)


Here’s how to abseil past a knot:

how to abseil past a knot

Step 1 – Stop

Stop abseiling when your prusik is about 30-40cm before the knot. Allow the prusik to take your weight.

If you are abseiling without a prusik (not recommended), you can wrap the rope around your leg a few times. This adds friction but does not lock your belay device, so make sure to keep hold of the rope for the next couple of steps. And use a prusik next time.

If your belay device jams into the knot, you’ll need to ascend a short amount.

how to abseil past a knot rock climbing

Step 2 – Back Up

Pull up about two meters of rope and fasten a back up knot (clovehitch or figure-8 work well).

Attach this to your belay loop with a screwgate carabiner.

how to rappel past a knot

Step 3 – Add Prusik

Fasten a prusik above your belay device (classic or autoblock types work well) and attach it to your belay loop with a short sling.

Abseil down a few inches to allow your weight to be taken by this prusik.

how to rappel past a knot rock climbing

Step 4 – Pass the Knot

Detach the un-weighted lower prusik from your leg loop but keep it in position on the rope.

Remove your belay device and reattach it to the rope immediately beneath the knot. Lock your belay device by tying it off with a mule-overhand.

Step 5 – Add Foot Loop

Clip a short sling to the lower prusik. Stand in this sling to un-weight the upper prusik.

how to abseil past knots

Step 6 – Remove Prusiks

Remove the upper prusik and sit back to weight your tied-off belay device.

If you can’t weight your belay device from this position, you may have to down-prusik a couple of times until you can weight it. Alternate between weighting the upper prusik and standing in the lower foot loop. Adding an extra sling to the lower foot loop makes this easier.

how to rappel past knots

Step 7 – Descend

Reposition the remaining prusik back to your leg loop (without the foot loop sling), unfasten your back up knot and then release your tied-off belay device.

You can now continue your descent.

how to abseil past a knot when climbing

VDiff climbing self rescue book

Abseil Past a Knot - Top Tips

Before you pass the knot, assess if it would be better to:
- Unfasten it
- Re-tie a better knot (alpine butterfly is recommended)
- Ascend back to the anchor and find a different way down

The same technique can be used when abseiling with an extended belay device. During step 6, you will need to down-prusik a few moves to ease your weight onto your tied-off belay device.

If you know there are knots in the rope before you descend, you can speed things up by abseiling with a pre-attached prusik above your belay device.

Abseil Past a Knot - Summary

There are many variations of this same technique. The most important thing to remember is to fasten a back-up knot before you detach your belay device.

It’s highly recommended to practise this technique before you actually need to use it.

Dangling in space with your belay device jammed into the knot and a prusik out of reach above is a common error for first-timers.

Try it out on different angles of rock, with your prusiks at different heights and attached to different lengths of sling.

Abseiling > The Carabiner Brake – How To Abseil Without a Device

This article about The Carabiner Brake is part of the book - The Trad Climber's Guide To Problem Solving.

VDiff trad climbing self rescue book

Dropping your belay device at the top of a ten-pitch abseil descent isn't recommended. But if you do, knowing how to use the carabiner brake will change your descent from epic to easy (You can use a munter hitch to abseil, but it tends to kink the rope and causes abrasion to the sheath).

You Will Need:
- 1 screwgate
- 4 snapgate carabiners.

Full size oval or D-shaped carabiners provide the smoothest descent, but almost any carabiner can be used. Really small or sharp-spined carabiners should only be used as a last resort.

drop belay device climbing

How To Set Up The Carabiner Brake

Step 1
Clip a screwgate to your belay loop and fasten it. Then clip two snapgates to the screwgate, making sure the gates are facing opposite directions and they are opposed.

Carabiner brake abseil rappel no belay device


Step 2
Push a bight of both ropes through the snapgate carabiners.

Carabiner brake abseil rappel no belay device


Step 3
Clip another snapgate around the ropes and also through the loop as shown.

Carabiner brake abseil rappel no belay device


Step 4
Clip a second snapgate next to this, with the gates on the same side, but facing opposite ways.

Carabiner brake abseil rappel no belay device


Step 5
Pull down on the rope until the carabiners align over each other.

Carabiner brake abseil rappel no belay device


Step 6
Make sure the rope runs over the spines (not the gates) of the outer carabiners.

You can now add a prusik and abseil as you would with an ATC.

As always, remember to check the system before you detach from the anchor.

Carabiner brake abseil rappel no belay device

VDiff climbing self rescue book

Abseiling > How to Deal with Stuck Ropes

This article, How to Deal with Stuck Ropes, is part of the book - The Trad Climber's Guide To Problem Solving.

VDiff trad climbing self rescue book
eiger north face russian route

You try to retrieve your ropes after abseiling and they get stuck. What do you do?

Stuck Ropes – Prevention

If you are about to abseil down complex terrain, consider the following prevention strategies before you throw your ropes.

Reduce Anchor Friction

If there is a lot of friction at the abseil anchor, you can reduce it by:

1) Adding a carabiner if the rope was previously threaded through cord.

stuck ropes abseiling

2) Extending the main abseil point over the lip of a ledge.

extend abseil cord

3) Moving the knot so it is over the lip of a ledge.

abseiling

Rope Angle

Avoid abseiling from anchors that are low down and far away from an edge, forming a right-angle in the rope. The added friction from the rope running around the edge will make it more difficult to retrieve the rope.

Also, if there is mud or snow on the edge, the rope will cut into it, causing the knot to get stuck.

stuck ropes abseiling

If you must use an anchor like this, you can extend it with cord so that the main point hangs over the edge. If this is not possible, you could make a short abseil over the edge and then set up a second anchor on the face.

Check While Abseiling

As you abseil down, look for places where the knots could get caught as they are pulled down during retrieval.

Flakes, cracks, spikes, trees or constrictions between boulders are classic places for ropes to get stuck.

Flick your ropes so they don’t run over these features.

abseiling single pitch rappel

Windy Abseils

When throwing your ropes down in high winds, they are unlikely to drop where you want them. To combat this, clip the rope to yourself in short loops. Release the loops one at a time as you descend.

Test Pull

If there is a lot of friction between the ropes and the rock or anchor, it is worth doing a test pull. Once the first climber is down, they pull on the retrieving rope.

If the ropes don't move, the second climber can reduce friction at the anchor (see above). Do another quick test pull to see if that solved the problem.

If the ropes still won’t pull, the second climber could abseil part way down the face and make an intermediate anchor to abseil from, before joining the first climber at the lower anchor.

This, however, may cause more problems if the ropes get stuck during retrieval, since it is much harder to retrieve ropes alone.

pulling ropes abseiling

Shorter Abseils

When abseiling down terrain where ropes are likely to get stuck, it is much better to do shorter abseils.

This will allow you to have more control over where the ropes run, and will also mean that you won't have to climb back up as far to retrieve stuck ropes.

When Pulling Ropes

By standing further out from the wall when pulling ropes, the knot is pulled through the air instead of against the rock, meaning that it is less likely to get caught.

It also helps to flick the rope to guide the knot around obstacles.

how to avoid stuck ropes when abseiling

VDiff climbing self rescue book

Stuck Ropes - How To Retrieve Your Ropes

Sometimes, no matter what you do to prevent it, your ropes will get stuck anyway. How you retrieve them depends on:

- If you have both strands within reach
- How much rope you have pulled through
- How easy it is to climb up
- What the rope is stuck on

First Considerations

Be aware that when a stuck rope comes free, it could dislodge loose rock. Try to get yourself into a position where you can move out of the line of rock fall and not shock-load the belay which you are hanging from.

If you have just started pulling the ropes, first make sure you are pulling the correct one, and are not pulling the knot up into the anchor.

Resist the temptation to immediately pull hard on a stuck rope, as this may jam it further. Instead, flick the ropes to see if you can dislodge them from wherever they’re stuck. You can also pull on the other end to see if reversing the ropes unsticks them.

If this doesn’t work, try pulling as hard as you can on the stuck rope. To make this easier, wrap a prusik cord around the rope and lean back with it clipped to your belay loop, or get more weight on the rope by having your partner pull too.

Climbing up to reach a stuck rope

If a stuck rope cannot be freed from below, you must climb back up to deal with whatever is holding it in place. There are two main ways to do this; leading and prusiking.

Leading is the preferred method since it avoids the obvious danger of releasing loose rock if the rope suddenly comes free.

Tie into the end of the rope that you have managed to pull down, then get belayed on this end as you lead back up to the problem. The obvious limitation is that you can only climb back up as far as you have rope available.

If the rock you abseiled down is unclimbable, you will have to climb the rope itself using prusiks.

what to do when your climbing ropes are stuck

Prusiking up to reach a stuck rope

Just because you and your partner have been pulling on the rope doesn’t mean that it won’t suddenly come free while you are prusiking up.

This is especially true when you get higher up and change the direction of pull in the ropes. Therefore, it is essential that you keep yourself safe while you ascend.

The method you use to do this depends on if you have one or both ends of the ropes.

Prusiking - If you have both ends of the ropes

Having both ends of the ropes within reach is much better than just having one. You can either wrap your prusiks around both ropes (described here), or just the ‘pulling’ rope (described below).

Whichever method you choose, make sure to keep re-tying back-up knots (figure 8 on a bight or clovehitch work well) in the ropes as you ascend.

how to prusik for climbing

If you prusik up just one rope, you’ll need to counterbalance it with your partner’s weight in order to be safe. Do this by getting them to attach to the other rope. This closes the system so that you won’t fall if the ropes suddenly come free.

The advantage of this method is that your partner will be able to feel your weight pulling on their harness at the point when the ropes can move freely. This gives you a better idea where the ropes are stuck.

Once you reach the anchor, or a point where the ropes move freely, you can avoid getting them stuck again by re-routing the ropes, building an intermediate anchor or extending the original anchors over an edge.

how to prusik up a rope

Warnings:
1) If the ropes are running through cord at the abseil station (instead of a carabiner), make sure to prusik on both ropes. The sawing action of you prusiking on one rope could melt the cord and cause it to fail.

2) Bouncing up and down on the ropes while prusiking generates more force on the anchor than the force you applied when abseiling from it. If you are uncertain about the quality of your anchor, you can place gear on the rope which you are ascending, while being belayed (described below).

abseil cord

Prusiking - If you only have one end of the ropes

If you were able to pull quite a lot of rope through, you can tie into the end of the rope and get belayed up on this. Place gear and clip it to the lead rope as you prusik up the stuck rope.

Once you have reached the end of the other rope, it will be safer to switch your prusiks to be around both ropes. Make sure to back up your prusiks with a knot on both ropes if you do this.

Before committing to prusiking up a single rope, assess how many gear placements there are above and how much rope you have available to lead with compared to where you think the rope is stuck. If you have a lot of rope, the safest option could be to cut the rope and abandon the section which is stuck above you. You will then be able to make a series of shorter abseils.

how to prusik up a climbing rope

Prusiking - If you only have one end of the ropes but not enough to lead back up

This is a poor situation to be in. One option is to cut whatever rope you have managed to pull down and use this to protect sections of downclimbing and to make short abseils.

You can add extra distance to your abseils by descending on one rope and joining together a collection of slings/cord to use as a pull down cord (learn how here).

A second option is to prusik up the stuck rope, placing gear on it as you go. Your partner belays you on this rope. Here’s how:

Step 1
Tie a clovehitch (figure 8 on a bight is fine too) on a screwgate and attach it to your belay loop.

This is your tie-in point.

clovehitch rock climbing

Step 2
Your partner ties into the end of the stuck rope (to close the system) and then puts you on belay.

close the system climbing

Step 3
Prusik up the rope. You will need to re-tie the clovehitch as you ascend. Tie a new one before untying the old one.

You could also shuffle rope through the clovehitch to adjust it, but be aware that if the stuck rope pulls free while you are mid-shuffle, there is a real danger of severing your finger in the suddenly tightened knot.


Step 4
Place gear as you ascend and clip this into the rope between you and your partner. If the stuck rope suddenly pulls free, you will fall and be protected by the gear you placed.

Your belayer will need to give slack as you ascend and take in slack when you adjust your clovehitch.

ascend climbing rope

Stuck ropes - Summary

The techniques described in this article are merely a guideline to the basics of staying safe in standard 'stuck ropes' situations.

There are endless possible situations of varying complexity and danger. Practise the basic skills outlined above in a safe environment and use your judgement.

Abseiling > How To Increase Friction

Whether you're abseiling down a skinny rope at the sport crag, or retreating down a multipitch with rain-slicked ropes and a heavy pack, the following techniques will help you increase friction when abseiling, and get down safely without rope-burnt palms.

How To Increase Friction when Abseiling

Method 1 - Reverse
Many belay devices are asymmetrical, offering more friction if reversed. Try it out both ways around to see which way provides the most friction for your device.

Which way to use belay device. Belay device direction orientation

Method 2 - Double Up
Try attaching your belay device to your belay loop with two screwgate carabiners, instead of just one. Large carabiners work best for this.

Using two carabiners on belay device

Method 3 - Extend
Extend your belay device with a sling. This puts your belay device further away from your body, making it a little easier to control.

How to extend belay device

Method 4 - Prusik
We recommend always using a prusik knot for abseiling. A prusik won't provide ‘consistent’ extra friction during the abseil, but it will autolock if set up correctly. This means you can 'rest' mid-abseil and provides added security for tricky descents. You can use a prusik in conjunction with any of the other described methods to further increase friction when abseiling.

Using prusik cord on belay device

VDiff self rescue course

Maximum Friction: The Z-Abseil

The Z-abseil is quick to set up and provides excellent friction, meaning that you can abseil rain-soaked skinny ropes confidently.

Step 1
Set up your belay device for abseiling as normal, staying attached to the anchor with a sling.

Rock climbing abseiling

Step 2
Clip a screwgate to one of your leg loops and clip another screwgate around the ropes above your belay device.

Increase friction abseiling

Step 3
Run the ropes down from your belay device through the leg-loop screwgate, up through the upper screwgate and back down to your brake hand. Make sure the ropes are running neatly next to each other.

Increase friction rappeling abseil

Step 4
Fasten up the screwgates and make a final check of the system. Then detach yourself from the anchor to enjoy a maximum friction descent.

Increase friction rappeling increase friction when abseiling

The Z-Abseil: Top Tips

* Make sure your screwgates are fastened tight. Vibrations in the rope can cause some types of screwgate to unfasten. Check them during your descent.

* If you don't have enough screwgates, you can use two opposite and opposed snapgates instead.

* You can use the same method for single rope abseils. Simply set up the system in the same way.

* Don’t use this method when abseiling with a GriGri. The top carabiner will hold the handle down and prevent it from locking.

* It's possible to set this system up mid-abseil – useful on the last half of a long abseil when the weight of the rope below you has decreased. This will be easier if you pre-attach the two screwgates before you leave the anchor; one on your leg loop and one sliding down the ropes above you.

* As always, make sure to practise this in a safe environment before abseiling down those icy 7.8mm ropes.

Abseiling > Pendulums

This article, Pendulum Abseils, is part of the book - The Trad Climber's Guide To Problem Solving.

VDiff trad climbing self rescue book

Multi-pitch descents are not always straightforward. The next abseil station may be far to the side of the previous one (they often are when descending loose ground). Or maybe you need to bail down an overhanging wall.

Being able to swing or tension across to reach the next abseil station is key in these situations.

(You can pendulum when leading too).

It is recommended to abseil with an extended belay device and a prusik for tricky abseils like these. Being able to go hands-free is crucial.

extend rappel device

Step 1
To swing to an abseil station on overhanging ground, you’ll need to start the pendulum early. Push out from the rock with your legs as you descend. Keep your momentum and be ready to clip or grab the next anchor.

If you end up stranded in space, you’ll need to prusik back up and try again.

On traversing ground, it’s often better to tension across (semi-climb while weighting the rope), so your rope isn’t rubbing over possible sharp edges of rock. If this is too difficult, a pendulum will get you further across, but be very careful of loose rock and sharp edges when doing this.

pendulum abseil swinging rappel

Step 2
Once you have made it to the next station, tie the end of the ‘pulling’ rope (the one you will pull to retrieve your ropes) to the anchor.

This gives your partner something to grab so they can get to the anchor without having to pendulum there. It also ensures that you cannot drop your ropes.

On long traverses, you can help by belaying them in too.


Step 3
Once all climbers are at the lower station, pull your ropes and repeat.

pendulum abseil rappel

VDiff climbing self rescue book

Pendulum Abseils - Top Tips

* It’s better for the first climber to descend with the minimum gear needed. The other climber(s) should take the heavier loads since it is much easier to follow than ‘lead’ a descent like this.

* To avoid getting your ropes stuck when traversing, consider abseiling with them in coils clipped to your harness. Release them one at a time as you descend.

Climbing on Loose Rock and Runout Routes

This article, Climbing on Loose Rock and Runout Routes, is part of the book - The Trad Climber's Guide To Problem Solving.

VDiff trad climbing self rescue book

Climbing on Loose Rock

Accidents involving loose rock fall into three main categories:
1) Belayers being hit by rocks from the leader
2) Leaders falling because they held/ stood on loose rock
3) Being hit by random rockfall from above (either from other climbers, natural rockfall or from your ropes when abseiling)

One of the major contributing factors to accidents when climbing on loose rock is known as ‘positive reinforcement'. You climb a chossy route, place gear behind loose flakes and climb on loose blocks. They stay in place and you’re fine. You climb another chossy route without falling. And another and another. Success! There’s nothing like positive reinforcement.

However, the truth is that in most near misses, the climber has no idea they even had a near miss. Maybe you didn’t weigh quite enough to pull that huge block off. Climbing on loose rock is a bit like playing football on a minefield. Stay away, but if you end up stuck in a band of choss, take your time and be very gentle.

fisher towers rock climbing utah

Photo: Keiko Tanaka on the first ascent of The Watchtower, Fisher Towers, Utah.

There are precautions you can take (such as wearing a helmet, not starting a route beneath other climbers, or just avoiding loose routes altogether), but if you climb enough alpine rock, you’ll eventually encounter an unavoidable loose section.

The real skill is to learn how to deal with choss. You can place gear in loose rock, you can pull on loose blocks. But you first have to factor the following into the equation:
- Exactly how loose the features are
- How sharp the edges are
- How big the loose rock is
- Where the rock would fall if it broke
- If you have gear beneath you in solid rock
- How your partner will follow the pitch

It is fairly safe to climb through a small band of brittle flakes if your belayer is out of the rockfall zone and you have good gear in solid rock just below you. Place gear appropriately so that your rope runs clear of any loose blocks or sharp edges. Communicate with your partner so they know where the loose sections are.

It is not safe to climb a massive, teetering jenga-tower of sharp-edged death-blocks with your belayer and another team directly below.

Testing Rock Quality

Visual Test
Look at the feature and figure out how it is attached to the main part of the wall. If it looks detached, don’t touch it.

Some features have very thin fracture lines around them, which suggest poor rock quality. These fracture lines are sometimes covered in lichen or otherwise hard to see, so look carefully.


Tap Test
If you are still uncertain about the quality of a rock feature, give it a gentle tap and listen to the noise it makes. Loose rock ‘echoes’ and sounds hollow.

If you must climb through a small band of brittle flakes, determine which are the best holds and selectively distribute your weight between them. Pull down on holds, rather than out.

neil chelton fisher towers aid climbing

Photo: Neil Chelton on the first ascent of Sandromeda, Fisher Towers, Utah.

Runout Routes

Runout routes (climbs with little or no protection) should only be attempted by experienced climbers who understand the risks involved.

You can obviously reduce your chances of an accident by not climbing a sparsely protected route. However, if you are lured in by the appeal of danger, or if you end up on a runout by mistake, you will be safe if you abide by the two golden rules:
1) Do not climb up something that you cannot climb down
2) Do not fall!

Here are some tips to help you stick to these two rules:
1) Choose a route which is well within your comfort zone.
2) Make slow, controlled movements, keeping three points of contact at all times.
3) Place gear at every possible opportunity. Go off-route if you have to.
4) Equalize gear to make a stronger point of protection. A lot of bad gear equalized together is better than no gear.
5) Test the quality of each hand and foot hold before you use them. Stay away from loose rock.
6) Remember that you can always downclimb if the route gets too sketchy.

Following a Runout Traverse

The consequence of falling on an unprotectable traverse is likely to be a horrendous pendulum. Depending on the route, this could be much worse for the follower than the leader.

To reduce fall potential, the leader should place protection as high as possible before and after the traverse.

If the follower still faces a serious fall, they can use a ‘back rope’.

following a runout climb

VDiff climbing self rescue book

Back Roping

Back roping works best when climbing on two ropes (such as half ropes). If you only have one rope consider the safer lowering out technique instead.

Step 1
Leave one of the ropes clipped into the last reliable piece of gear. This piece of gear should be capable of taking a sideways pull. You will have to leave this gear behind.

runout rock climbing

Step 2
Clip a carabiner or quickdraw to your belay loop and to the rope which you are back roping from. This ensures that you can retrieve your rope after the next steps.

how to climb a runout route

Step 3
As you climb across the traverse, the leader takes in on one rope (red) and gives slack on the other (blue). If you fall, you will be suspended between the ropes.

how to climb a runout route back roping

Step 4
After the traverse, untie from the back rope and pull it through the gear. Make sure there is no knot in the end of the rope!

Step 5
Tie back in to the end of the rope and allow your partner to take in the slack before you continue climbing.

how to climb runout routes

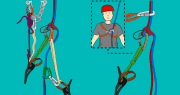
Leading > Pendulums and Tension Traverses
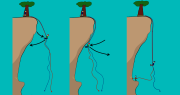
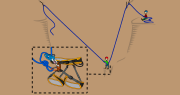
This article, Pendulums and Tension Traverses, is part of the book - The Trad Climber's Guide To Problem Solving.

VDiff trad climbing self rescue book

Pendulums and tension traverses are great techniques for moving sideways across a section which is too difficult to climb.

A pendulum involves swinging across the wall to reach a certain point. A tension traverse involves climbing across while assisted by a tight rope.

Knowing how to ‘bail sideways’ is a good skill to have. Maybe you’ve climbed off-route and now have a blank expanse between you and the right route, or maybe you’re halfway up a pitch and the climbing gets too difficult. Your problems may be solved if you can swing across to easier ground.

Pendulums can also be used when abseiling (see our article here).

Step 1
Place a piece of gear which can hold a downwards and a sideways pull (you may want to equalize a few together). This gear needs to be bomber, and you may not be able to retrieve it later.

Step 2
Clip your rope into the gear and get your belayer to take you tight on the rope.

rock climbing cam

Step 3
Get your belayer to lower you. If you plan to pendulum, you can start swinging as you are being lowered. Do this by running sideways across the wall. Communicate with your belayer so you don't get lowered too far – make sure you know where you're trying to swing to!

Step 4
Keep your momentum and swing a little higher each time. Often, you'll need to grab a hold at the pinnacle of your swing, so be ready for this.

Once you've stuck the pendulum, continue climbing as normal, making sure to extend the next few pieces of gear after this to reduce rope drag. A tension traverse is similar but involves semi-climbing across with some of your weight on the rope.

tension traverse pendulum rock climbing

Pendulums and Tension Traverses > Top Tips

* Your partner will need plenty of slack rope to follow the traverse (around twice the diagonal distance of the pendulum). This usually isn't a problem, but if you climb a full rope length with a pendulum at the start of a pitch, your partner won’t have enough rope to follow it safely.

* If using half ropes, clip one to the pendulum point and the other to the pieces after the traverse. This will reduce your rope drag and make it easier for your partner to follow.

tension traversing pendulum rock climbing

VDiff climbing self rescue book

Following Pendulums and Tension Traverses

Following is easy if the leader did a short traverse and extended gear well afterwards. Just follow the pitch as normal and gently swing/tension across the traverse section.

If the traverse section is long but easy enough to climb, you may choose to use the simpler
back rope technique.

However, for longer traverses across unclimbable terrain, you won’t be able to remove the gear which the leader traversed from or else you'll swing uncontrollably across the wall. To avoid this, you'll need to do a 'lower out'. It’s important to communicate well with your partner during this process.

There is no completely safe way to follow a long traverse because there is always the danger of the lower-out piece failing. Using a belay device as described on the following pages significantly reduces the consequences of a fall if the piece fails during the lower out. If it fails, your belay device (in most cases) will lock, stopping you from falling to the end of the rope. You will still swing across the rock, but much less than if you had lowered out without a belay device.

GriGri’s (or similar) will lock in the majority of cases that they are suddenly loaded. However, they are not actually designed for this. Depending on the distance, difficulty and consequences of the traverse and the quality of your lower-out piece, you may want to backup your attachment with a prusik.

Step 1
When you reach the gear which the leader traversed from, clip into it with a sling. If you have a good hands-free stance, you don’t need to clip in. Make sure the gear is still bomber after being pulled sideways by the leader. If you’re not certain about it, back it up with another piece.

Step 2
Attach an assisted-braking belay device to the rope as shown.

tension traverse climbing

Step 3
Tell your partner that you are ready to lower. They will pull in the slack so the rope comes tight.

You can now remove your clip-in sling if you are using one.

Step 4
Communicate with your partner as they lower you down and across. If semi-climbing (tension traversing) across, your partner may have to alternate between taking in and lowering out.

pendulum rock climbing

Step 5
Once you make it across, you’ll need to retrieve your rope from the lower-out point and then transition back to normal climbing. This is much easier if you have a hands-free stance. If you don’t, you could clip directly into a piece of gear to un-weight the rope. Either way, tie-off your belay device and remove any prusiks.

Step 6
Untie from the end of the rope and pull it through the lower-out point. Make sure to remove the knot before you let go of the rope!

tension traverse pendulum climbing

Step 7
Tie back in to the end of the rope.

Step 8
Release your tied-off belay device and belay the slack rope through while your partner takes it in at the same time. This protects you from falling to the end of the rope should you fall at this point.

Step 9
Remove your belay device once your partner has taken in all the slack. You are now ready to continue following as normal.

If you have lowered down too far, or still cannot climb the pitch, you can prusik up the rope until you reach easier ground. It may be possible to retrieve the lower-out gear by penduluming to it when you are higher up.