Abseiling > Pendulums
Abseiling: Pendulums What is a Pendulum Abseil? Multi-pitch descents are not always straightforward. The next abseil station may be far to the side of the previous one (they often are when descending loose ground). Or…
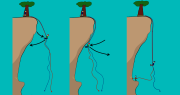
Abseiling: Pendulums What is a Pendulum Abseil? Multi-pitch descents are not always straightforward. The next abseil station may be far to the side of the previous one (they often are when descending loose ground). Or…

Abseiling Past a Knot Times when you might need to abseil past a knot:– When descending a single strand ‘fixed’ rope, where a knot has been tied to isolate a damaged section– Passing a knot…
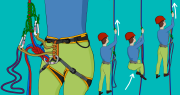
Self Rescue: Prusiking Up a Rope Knowing how to prusik up a rope transforms a potential epic into a mere inconvenience. This article explains how to ascend a rope using prusiks, assuming that you already…
How to Use Half (Double) Ropes Half ropes (also known as double ropes) are thinner than normal ‘single’ ropes, and are designed to be used as a pair. Best Situations to Use Half Ropes– When…
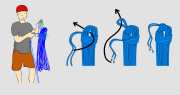
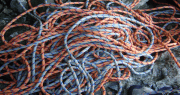
How To Coil a Climbing Rope If you are storing your rope for a while or stuffing it away in a back pack, coiling a climbing rope is worth the effort and will save you…
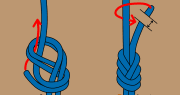
The Figure-8: How to Tie In to a Climbing Rope Unless you are bouldering, you’ll need to tie the end of the rope to your harness before you climb. The best way to do this…

Glacier Travel: Using the Rope It can be tempting to cross a glacier without bothering to get the rope out, especially if it looks easy or if other climbers have crossed without problems before. This…