Fall Factors and kN Ratings: What They Actually Mean
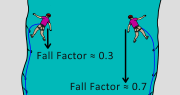
Fall Factors and kN Ratings: What They Actually Mean kN ratings are shown on all your climbing gear: nuts, cams, slings and carabiners. kN stands for kilo Newtons. 1kN is about 100kg (220lbs for the Americans)….