Trad Climbing Gear > Ball Nuts
Trad Climbing Gear: Ball Nuts Ball nuts are a seldom used type of climbing gear which offer protection in thin cracks, filling the void where even the smallest cams are too big to fit. They…
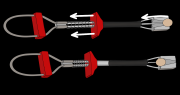
Trad Climbing Gear: Ball Nuts Ball nuts are a seldom used type of climbing gear which offer protection in thin cracks, filling the void where even the smallest cams are too big to fit. They…
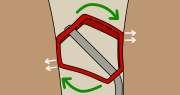
Learn how to place hexes; how to use them passively (like a nut) or actively so they cam into cracks. Learn how to place, remove and rack climbing hexes.