Trad Climbing Gear > What Do You Need?
In addition to the gear you use in an indoor wall or at a sport crag, you’ll need some more specialist kit to climb a trad route. This article explains all.
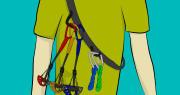
In addition to the gear you use in an indoor wall or at a sport crag, you’ll need some more specialist kit to climb a trad route. This article explains all.
Sport Climbing – Lead Skills Lead climbing a sport route is similar to lead climbing at the indoor wall, but with a few more factors to consider. These are described below. Quickdraw Ends Quickdraws have…
How to Lead Belay Step 1Attach your belay device so there is just a few meters of rope between it and the climber’s knot. Step 2When the climber is moving up the wall, you’ll need…
How to Lead Climb Before Lead Climbing Before you lead climb, there are 3 other things you need to do which you wouldn’t do if top roping:1) Stack the rope2) Close the system3) Attach quickdraws…