How To Abseil (Rappel)
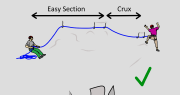
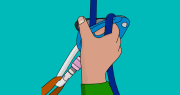
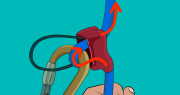
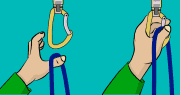
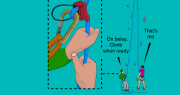
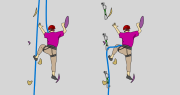
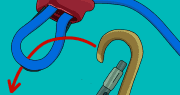
Abseiling (or rappelling) is a technique used to descend climbing ropes. This article explains how to attach yourself to the anchor, and abseil with an ATC.

Abseiling (or rappelling) is a technique used to descend climbing ropes. This article explains how to attach yourself to the anchor, and abseil with an ATC.
Leading Trad > When To Place Gear Trad gear is normally placed in cracks, behind flakes and around blocks. The important thing to remember is that these features are weaknesses in the rock. Some of…

What Is Trad Climbing? Trad climbing is adventurous. When trad climbing, the leader must place their own gear in the rock. Typically, there are no pre-existing bolts. To be safe when trad climbing, the leader…
How To Belay with a GriGri Belaying at the crag is more difficult than belaying indoors. Uneven ground, falling rocks, strong sunlight, wind, insects, stray children and dogs are just some of the factors which…

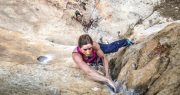
What is Sport Climbing? Sport climbing is physical. It’s a relatively safe form of rock climbing in which you push the boundaries of your physical capabilities, often achieving goals that you previously thought were impossible….
How To Lead Belay Step 1Attach your belay device so there is just a few meters of rope between it and the climber’s knot. Step 2When the climber is moving up the wall, you’ll need…
How To Lead Climb Before you lead climb, there are 3 other things you need to do which you wouldn’t do if top roping:1) Stack the rope2) Close the system3) Attach quickdraws to your harness…

Top Rope Climbing: How To Belay This article explains how to belay for top rope climbing. Using a belay device makes it possible for the belayer’s limited grip strength to control the large forces generated…
Top Rope Climbing Calls Climbing calls are certain words that climbers use so everyone knows exactly what is happening. These calls may seem a bit excessive when you’re standing next to each other in the…
The Difference Between Top Rope and Lead Climbing There are two main types of climbing system; top roping and leading. Both of these use the rope and gear to catch a fall, but in different…

Bouldering Basics Bouldering is a simple form of climbing low down without using ropes. Indoor boulders are generally around three or four meters tall with padded mats beneath them to absorb your fall. There are…
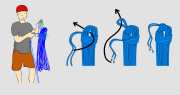
How To Coil a Climbing Rope If you are storing your rope for a while or stuffing it away in a back pack, coiling a climbing rope is worth the effort and will save you…
Basic Rock Climbing Technique With good climbing technique, you’ll be able to cruise up the wall with minimum effort. The climbing technique you use will differ depending on the angle of the climb, the shape…
A belay device is a metal tube that you feed a climbing rope through, used with a screwgate carabiner, in order to belay a rock climber.
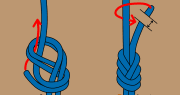
The Figure-8: How to Tie In to a Climbing Rope Unless you are bouldering, you’ll need to tie the end of the rope to your harness before you climb. The best way to do this…
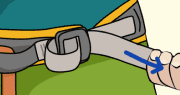
Learn how to wear a climbing harness correctly, how to use them and choose them. This article explains everything you need to know.

Your rope is the main part of the climbing system. Learn what climbing ropes are and how to use them for rock climbing, abseiling and belaying.
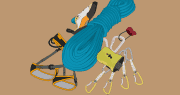
Climbing Gear: What Do I Need To Get Started? RopeYour rope is the main piece of climbing gear. It connects you, via your harness, to the quickdraws on the wall and to your climbing partner….
What is Rock Climbing? Rock climbing is awesome. It’s an activity in which you push the boundaries of your physical and mental capabilities, often leaving you bursting with a vibrant excitement that you never knew…