Advanced Trad Anchors > The Quad Anchor
Advanced Trad Anchors > The Quad Anchor The ‘Quad Anchor’ is an anchor system which self-adjusts to keep an equal force on each anchor point. It can be better than other methods of equalizing in…
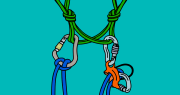
Advanced Trad Anchors > The Quad Anchor The ‘Quad Anchor’ is an anchor system which self-adjusts to keep an equal force on each anchor point. It can be better than other methods of equalizing in…
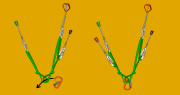
Advanced Trad Anchors > The Sliding-X AdvantagesThe main advantage of using a self-equalizing anchor is that it continues to distribute the load equally between the anchor pieces as the loading direction changes. This maintains a…
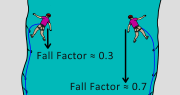
Fall Factors and kN Ratings: What They Actually Mean kN ratings are shown on all your climbing gear: nuts, cams, slings and carabiners. kN stands for kilo Newtons. 1kN is about 100kg (220lbs for the Americans)….
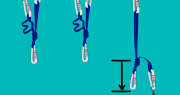
Trad Anchors – Equalizing Gear Let’s assume you’ve got two incredibly good pieces of gear or two bolts at the anchor. The easiest way to equalize them together is by using a long (120cm or…