Crack Climbing Technique
Crack Climbing Technique Cracks are often very striking lines. It’s no surprise that many classic routes follow crack systems. Some climbs have short crack sections which offer the security of a solid jam and the…
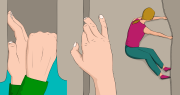
Crack Climbing Technique Cracks are often very striking lines. It’s no surprise that many classic routes follow crack systems. Some climbs have short crack sections which offer the security of a solid jam and the…
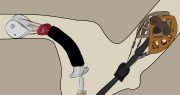
Learn how to place climbing cams. This article explains the physics of how climbing cams work, and also how to place, remove and rack them.