Improvised Aid Climbing
Improvised Aid Climbing * This article is about using improvised basic aid techniques while trad climbing. To learn more about aid climbing on big walls, see these articles. Using protection pieces as hand or foot…
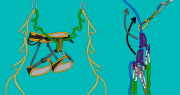
Improvised Aid Climbing * This article is about using improvised basic aid techniques while trad climbing. To learn more about aid climbing on big walls, see these articles. Using protection pieces as hand or foot…
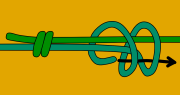
Prusik Knots: Different Types Explained A prusik (also known as a friction hitch) is a short piece of cord which can be wrapped around your climbing rope to add friction. They can slide up and…
Abseiling: How to Deal with Stuck Ropes You try to retrieve your ropes after abseiling and they get stuck. What do you do? Preventing Stuck Ropes If you are about to abseil down complex terrain,…

Abseiling Past a Knot Times when you might need to abseil past a knot:– When descending a single strand ‘fixed’ rope, where a knot has been tied to isolate a damaged section– Passing a knot…
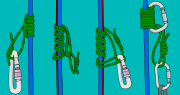
Self Rescue: Prusiking Up a Rope Knowing how to prusik up a rope transforms a potential epic into a mere inconvenience. This article explains how to ascend a rope using prusiks, assuming that you already…
Rock Climbing Knots: The Double Fisherman’s Bend The double fisherman’s bend is used to tie two ends of equal diameter cord together to make a prusik or cordelette. It can also be used as an…

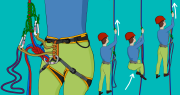
Crevasse Rescue: Prusiking Falling into the dark, icy depths of a crevasse sounds like a scene from a bad movie or a worst nightmare. But this is a real risk when travelling across a glacier,…