Self Rescue: Escaping the Belay
The belay escape is a technique whereby the belayer frees themselves from the responsibilities of belaying. This fundamental skill is necessary for many rescue situations.
Situations when you may need to escape the belay include:
– If your partner needs hauling through a crux while following
– If you need to descend to your partner to give immediate first aid
– If your partner falls and is injured while leading
– If you need to detach yourself from the rope to get outside help
The Belay Escape – How it Works
Any safe version of the belay escape involves the same four checkpoints:
– Get hands-free
– Transfer climber’s weight to anchor
– Transfer climber’s belay to anchor
– Remove all excess prusiks, carabiners and knots
The belayer can detach from the rope completely if needed. The end result is a system which can be released under load and can be used again as a belay. Returning to belay mode is often needed once a rescue has begun.
The full belay escape system is described in this article. Depending on the situation, you may not need to complete all of the steps (e.g: the process is much simpler if your partner is able to un-weight the rope). However, it’s important to know the complete system before taking shortcuts.
Three different methods are described. These cover belaying:
1) From your harness (anchor is within reach)
2) From your harness (anchor is out of reach)
3) Directly from the anchor (e.g: using guide mode)
First Considerations
Before starting a belay escape, make sure it is the best course of action for the situation. Maybe a much simpler option exists, such as lowering your partner to a ledge, or getting them to prusik up.
Depending on the direction of loading and your course of action after escaping the belay, you may need to make your anchor stronger. Some rescue techniques (such as hauling) exert high forces on the anchor. Beefing up the anchor is straightforward if you are belaying a second and there are protection points available within reach. With some creative sling craft and fine tuning, you may be able to equalize a few extra pieces to the belay.
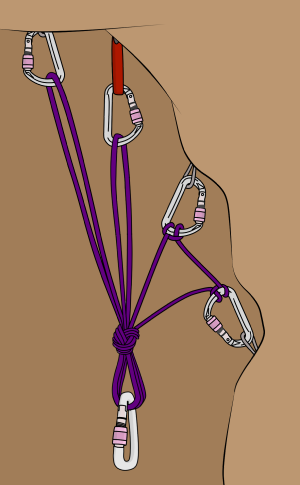
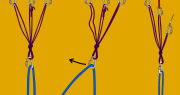
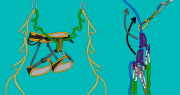
If you are belaying a leader on a multi-directional anchor where there is only a single piece holding an upwards pull (example shown), you will need to add gear or build a new anchor before escaping the belay.
This is very difficult (or impossible) if the leader has the whole rack with them. However, you may be able to adjust the existing anchor pieces and cordelette to hold an upwards pull. Make sure the anchor still protects you from a fall while you are adjusting pieces.
As a last resort, you might be able to rope solo or prusik a short distance to retrieve gear for backing up the anchor.
When Belaying from your Harness (Anchor within Reach)
Step 1
Get hands-free by tying off your belay device with a mule-overhand.
Step 2
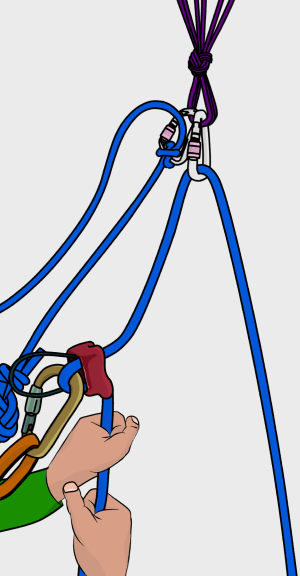
Tie a prusik hitch on the weighted rope with a long cordelette. Make sure the double fisherman’s bend which joins the cord is close to the prusik hitch.
If you don’t have a long cordelette, you could use a short prusik cord attached to a double-length sling.
Step 3
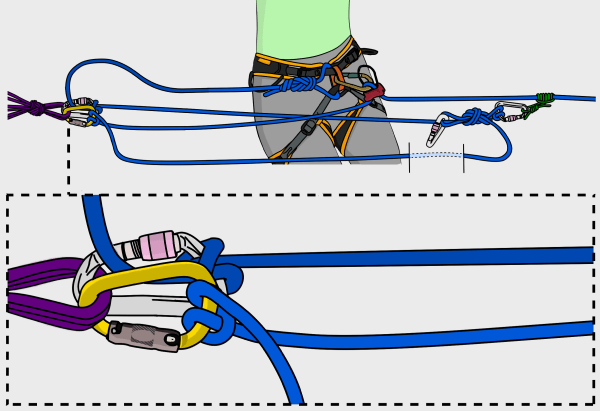
Clip a screwgate to the master point of the anchor.
Step 4
Tie a munter hitch with the cordelette to the screwgate. Flip the munter so it’s in the lowering position and pull all the slack through.
Step 5
Tie a mule-overhand backup in the cordelette.
Step 6
Slide the prusik along the rope towards the climber to take up any remaining slack in the cordelette.

Step 7
Carefully release your tied-off belay device and let a small amount of slack through so the climber’s weight is transferred onto the cordelette.
Keep hold of the brake rope for the next 3 steps.
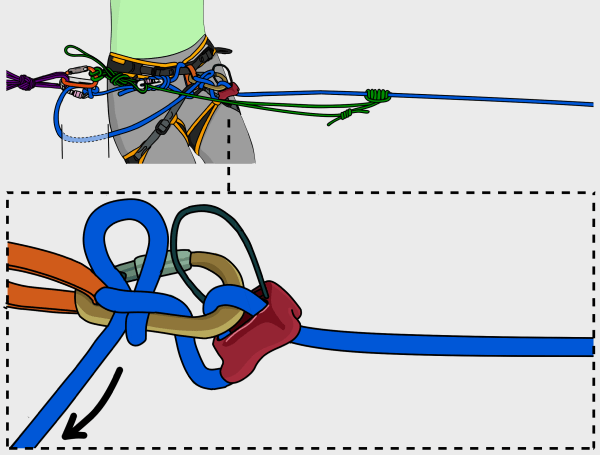
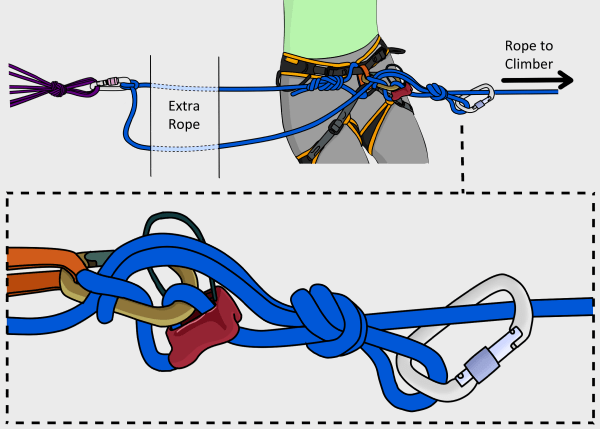
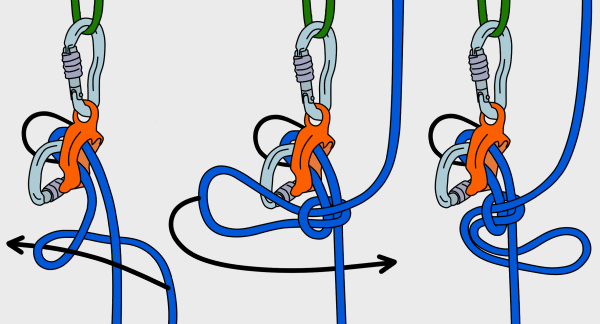
Step 8
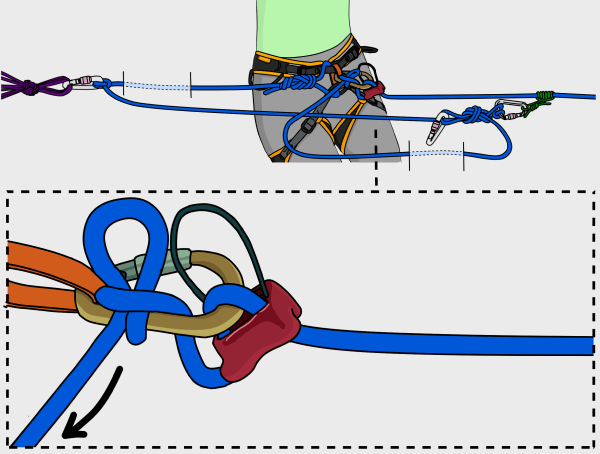
Attach a screwgate (yellow carabiner in this diagram) to the master point and tie a munter hitch on it with the brake rope.
Pull most of the excess rope through so there is just enough slack to remove your belay device.
Step 9
Keeping hold of the munter’s brake strand, remove your belay device.
Step 10
Pull the extra slack through the munter hitch and flip it so it’s in the lowering position. Finish the munter with a mule hitch and an overhand backup.
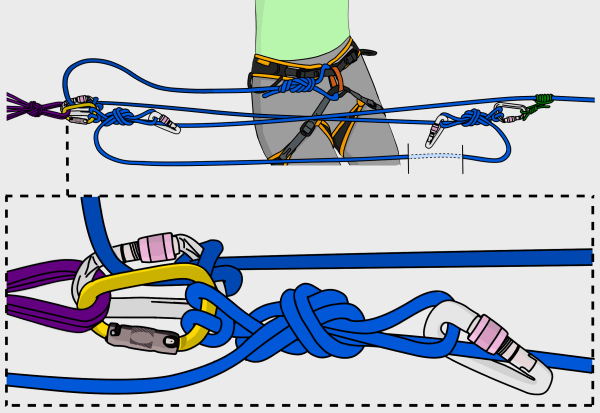
Step 11
Release the mule-overhand from the cordelette and use the munter to transfer the climber’s weight from the cordelette to the rope.
Step 12
Once the weight is fully on the rope, remove the cordelette completely. You have now escaped the belay and can move on to the next step of your rescue.
Note
The same steps can be followed to escape the system if you are belaying from your harness and using a re-directional through the anchor.
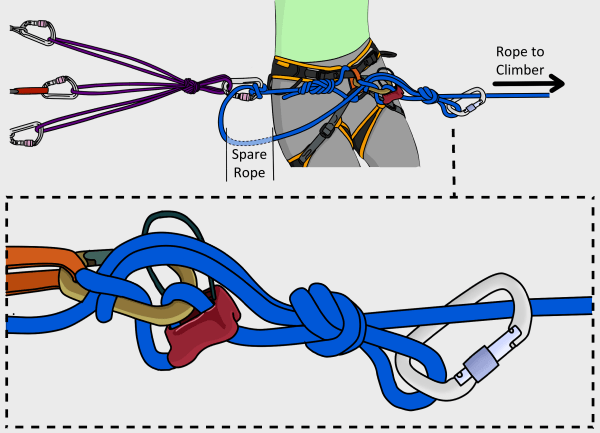
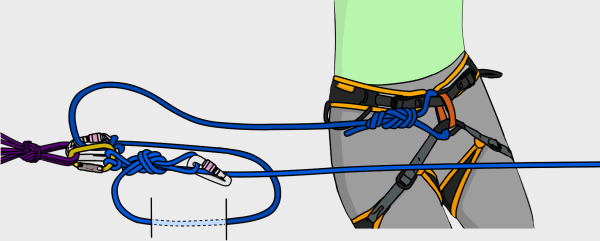
When Belaying from your Harness (Anchor out of Reach)
This method is great if you are far from the anchor and/or do not have a long cordelette available. The description below assumes that the belayer is tied in to the end of the rope and then attached to the anchor with a clovehitch or figure-8 on a bight.
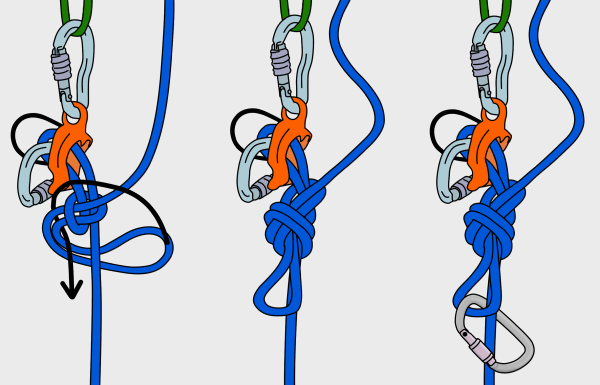
Step 1
Get hands-free by tying off your belay device with a mule-overhand.
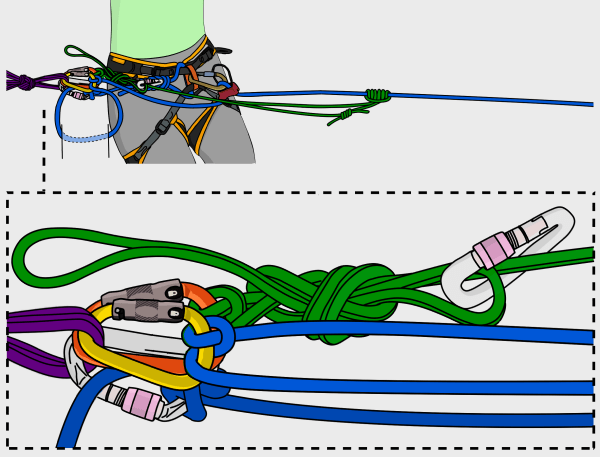
Step 2
Fasten a prusik on the weighted rope as shown and attach a screwgate to it.
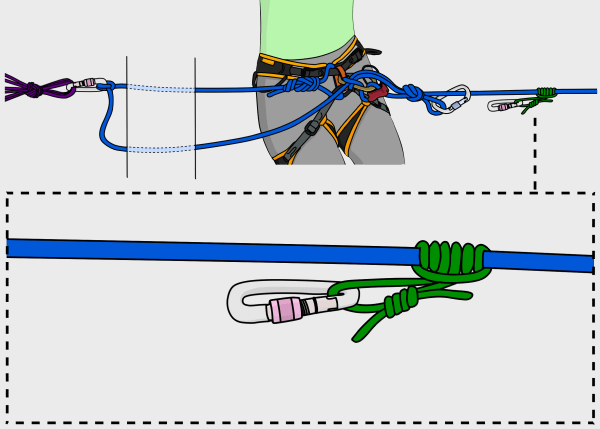
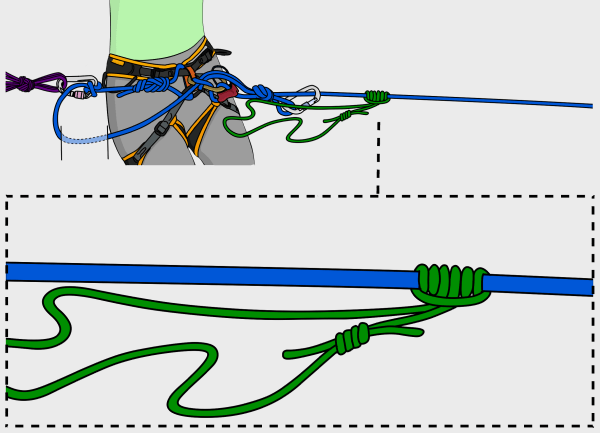
Step 3
Reach back to your tie-in at the anchor and grab the free end of your tie-in. If you can’t reach, run through the rope stack until you get to it.
Step 4
Tie a munter-mule-overhand on the screwgate with this part of the rope.
Step 5
Slide the prusik down the rope towards the climber to take out excess slack.
Step 6
Transfer the weight onto the prusik by releasing your tied-off belay device. Be prepared for a bit of rope stretch before the prusik takes the weight.
Keep hold of the brake rope for the next 3 steps.
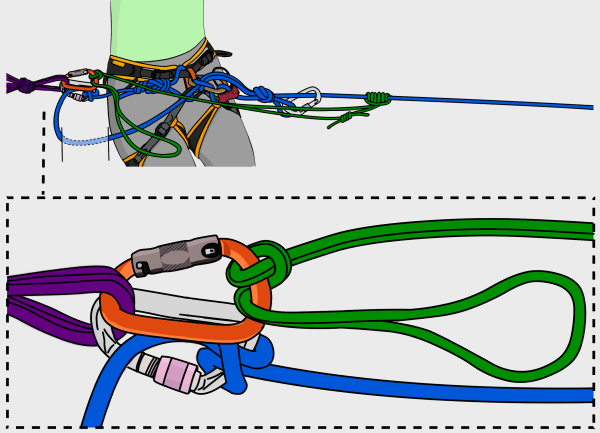
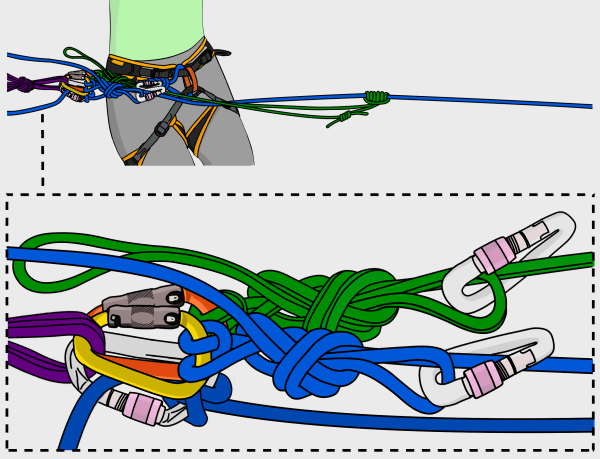
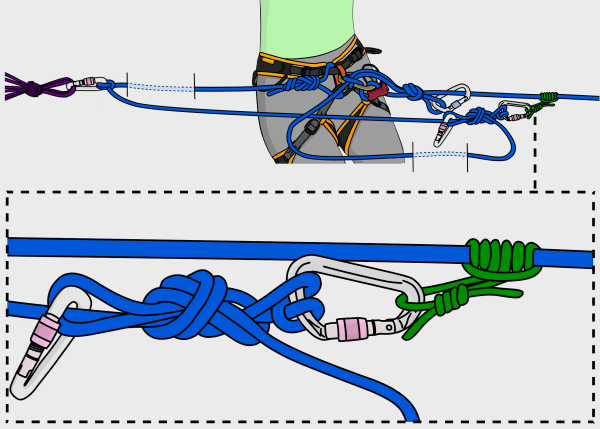
Step 7
Move back to the anchor and tie a munter hitch to it with the brake strand of rope.
Step 8
Remove your belay device.
Step 9
Bring in the excess slack and finish the munter with a mule-overhand.
Step 10
Release the mule-overhand from the rope which is attached to the prusik. Use the munter to transfer the climber’s weight from the prusik to the munter-mule-overhand on the anchor.
Step 11
Once the weight has been transferred, you can remove the prusik and the munter hitch.
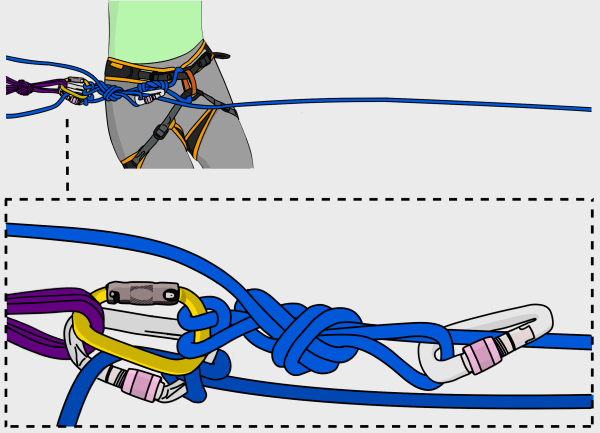
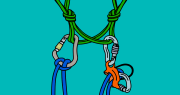
When Belaying Directly from the Anchor
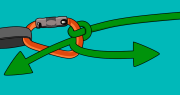
When belaying directly from the anchor with a self-blocking belay device (such as an ATC in guide mode) or an assisted braking belay device (such as a GriGri), you have already escaped the belay.
These belay methods are not completely hands-free – a light hand must be kept on the brake strand while belaying. Therefore, the only step remaining is to back up the device. Simply tie-off the device with a mule-overhand as shown below.
Related Topics
The video above is part of a complete self-rescue course
– Safe and approved syllabus
– Structured and easy to navigate
– Lifetime access
– Download videos in 4K
– Regular updates
– Much more detailed than the book version
→ Get the course
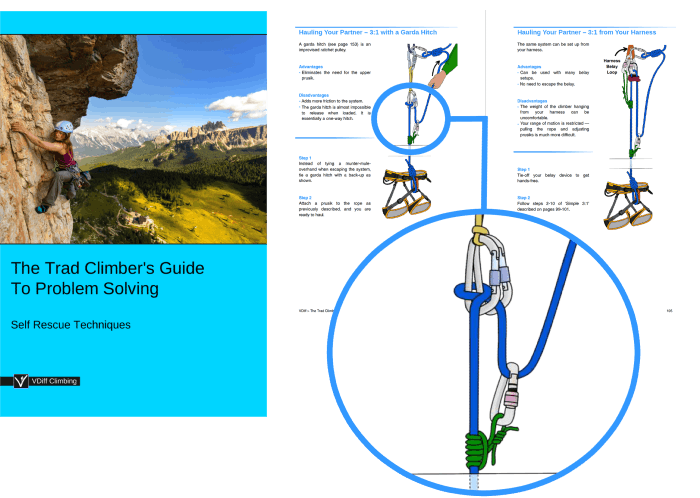
The article above is part of the book – The Trad Climber’s Guide To Problem Solving
E-book (pay what you want)
Paperback
Kindle
Free Sample
Learn how to:
– Use a variety of self-rescue techniques
– Build self-equalizing anchors with minimal gear
– Abseil without a belay device
– Abseil with damaged ropes
– Descend from bad anchors
– Negotiate loose rock
– Use basic aid techniques
– Simul-climb safely
– Prevent accidents from occurring in the first place
Plus much more.