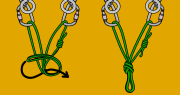
Attaching to the Anchor > Slings, Daisy Chains and Common Mistakes
Attaching to the Anchor – Slings, Daisy Chains and Common Mistakes The Top Shelf To free up space at the central point, you can clip in to the ‘top shelf’ of the cordelette. This is…
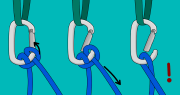
Attaching to the Anchor – Slings, Daisy Chains and Common Mistakes The Top Shelf To free up space at the central point, you can clip in to the ‘top shelf’ of the cordelette. This is…
Sport Climbing Anchors – Belaying from the Top For most sport climbs, you will belay from the bottom – just like you would at the indoor gym. However, you should belay from the top of…
Sport Climbing Anchors – Setting Up a Top Rope With the security of an anchored rope above, top-roping is the safest way to climb. A top-roped climber can rest on the rope whenever they are…
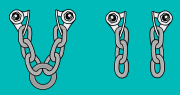
Sport Climbing Anchors – Introduction Many climbs have bolted ‘sport anchors’ at the top. This is the standard for sport climbs worldwide, but is also common at many North American trad climbing venues. These bolted…
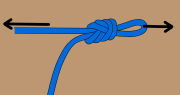
Rock Climbing Knots: Figure-8 on a Bight The figure-8 on a bight is used for:– Attaching the rope to a belay anchor– Creating a master point in a cordelette or sling– Attaching yourself to the…