The Girth Hitch

'Essential Knots: The Girth Hitch' is part of the book - Sport Climbing Basics.

VDiff learn to sport climb e-book book

The girth hitch (Larksfoot) is used for:
- Attaching slings to your belay loop
- Attaching slings together


Step 1
Feed a sling through your belay loop.

Girth hitch knot rock climbing

Step 2
Put one end of the sling through the other.

Girth hitch rock climbing

Step 3
Pull it tight.

how to tie a girth hitch rock climbing

VDiff sport climbing book

Strop Bend
You can also link two slings together using these same steps. Arrange the girth hitch as shown to create a strop bend. This is basically a neater version of the girth hitch.

larksfoot knot rock climbing

Advanced Trad Anchors > Part 2 of 5 > The Sliding-X

This article about the sliding-X knot is part of the book - The Trad Climber's Guide To Problem Solving.

VDiff trad climbing self rescue book

Advantages
The main advantage of using a self-equalizing anchor is that it continues to distribute the load equally between the anchor pieces as the loading direction changes. This maintains a lower force on each piece, therefore decreasing the likelihood of anchor point failure. This is especially useful when equalizing marginal pieces of lead protection.

Disadvantages
The main disadvantage of using self-equalizing knots at the anchor is that if one piece fails, the whole belay shifts. This shift is barely noticeable on a well set up anchor. However, with some setups the sudden jolt could cause you to lose control of your belay device. Be careful where you use self-equalizing anchors and make sure to tie appropriate extension-limiting knots to reduce the possible sudden shift in belay position.

Example
If two micro nuts are equalized with an overhand knot as shown, it is likely that one of them would take most of the force of a leader fall.

This could be due to a slightly off-centre adjustment of the knot, or a slightly different loading direction (you may not fall directly downwards). If the fall generates 4kN of force, it will cause the 3kN piece on the right to fail.

equalize climbing anchor

This will put 100% of the force on the remaining piece, which will most likely cause that to fail too.

equalise climbing anchor

If the same two micro nuts were equalized with a sliding-X, the knot would self-equalize during the fall and distribute 50% of the force (2kN) onto each nut. The nuts would then be much more likely to hold the fall.

sliding-x climbing knot

The Sliding-X

The sliding-X is useful for:

- Equalizing two pieces of trad gear as part of a more complicated anchor
- Equalizing two pieces of lead protection
- Equalizing a two-bolt anchor for top roping

Step 1
Clip a sling through two pieces of gear.

Make sure the sewn section of the sling is near the top of one of the pieces so it doesn’t interfere with the sliding-X knot.


Step 2
Twist the sling 180 degrees and then attach a carabiner to it. The central point will now be equalized even when the pull comes from different directions.

sliding-x equalizing climbing anchor

Step 3
Position the central point where you want it. Unclip the sling from one piece and tie an overhand knot near to the central point.

This is known as an extension-limiting knot. The closer to the central point you tie them, the less the anchor will extend if one piece fails.


Step 4
Clip the sling back into the piece.

equalize climbing anchor sliding x

Step 5
Repeat steps 3 and 4 with the other side.

You can now adjust the overhand knots so they are as far down as possible while still allowing the central point to move freely where it needs to.

sliding-x trad climbing anchor

If one piece fails, the central point will shift as shown.

how to tie a sliding x climbing anchor

Warning!
1) It’s essential that you twist the sling in step 2. If you don’t, the central point can become completely detached from the anchor if one piece fails.

how not to tie a sliding x climbing anchor

2) It can be difficult to clip another carabiner into the main point of a sliding-X when it is weighted. If you must do so, make sure you have clipped the carabiner through the sling in exactly the same way as the original carabiner. A much better alternative is to use the quad anchor.

Sliding-X Variations

There are many ways of incorporating the sliding-X into an anchor. However you do it, make sure that if any piece failed, the resulting anchor shift:
- Is minimal
- Causes the remaining pieces to re-equalize
- Will not cause you to lose control of the belay

The following arrangement uses one double-length sling to equalize three pieces.

Step 1
Clovehitch a double-length sling to the lower right piece.

how to tie a sliding-x climbing anchor

Step 2
Clip the sling through the upper right piece.

how to tie a sliding x climbing anchor

Step 3
Add two extension-limiting knots.

how to tie a sliding-x climbing anchor

Step 4
Clip the sling into the left piece.

Adjust the knots so they limit extension while allowing for some directional movement.

how to tie a sliding x climbing anchor

Step 5
Put a 180 degree twist in one of the master point strands and clip a carabiner through both loops as shown.

how to tie a sliding x climbing anchor

VDiff climbing self rescue book

You could also equalize four pieces by clovehitching another piece on the left.

You may need to adjust the extension-limiting knots after adding the fourth piece.

how to tie a sliding x climbing anchor

If your belay consists of one bomber piece (the bolt) and four mediocre pieces (the micro nuts), you could use an arrangement like this.

This method equalizes the pieces so the bolt takes 50% of the load and the four micro nuts take 12.5% each.

how to tie a sliding x climbing anchor

Advanced Trad Anchors > Part 5 of 5 > Minimal Gear Anchors

'Minimal Gear Anchors' is part of the book - The Trad Climber's Guide To Problem Solving.

VDiff trad climbing self rescue book

The following minimal gear anchors are great to know in case you reach the top of a pitch without a cordelette, only a meter of rope to spare and not quite enough slings to create a self-equalizing anchor.

Endless variations and combinations are possible depending on the equipment you have and where the gear placements are. A few examples are given below.

It’s hard to get any of these anchors equalized perfectly, but if you’re short on slings and rope, these are probably your best options.

Example 1

A double-length sling equalizes the two pieces on the left.

An overhand knot is tied in the shoulder-length sling on the right to equalize it with the others.

Trad anchors with minimal gear anchors

Example 2

A double-length sling can join three pieces, if two of them are in line with each other.

Simply tie an overhand knot in the sling above the lower piece.

Building trad anchors with minimal gear

Example 3

The upper cam is clipped through the sling of the lower cam. This isn’t ideal, but it’s better than just having one cam.

Often you can slide cams up or down a placement to fine tune their position.

Trad anchors with no gear


Example 4

The upper two pieces are equalized with a double-length sling.

The overhand knot is adjusted so the lower piece can contribute to the anchor.

minimal gear anchors how to make trad climbing anchor

Top Tip – Minor Adjustments

You can wrap a sling two or more times through a carabiner to shorten it slightly. Keep the wraps close together and away from the gate if possible.

If you need to shorten a sling more, it’s better to tie an overhand knot as shown in example 1.

rock climbing sling and carabiner

Advanced Trad Anchors - Summary

There isn’t a ‘best’ method of equalizing anchors, since every trad anchor situation is different. Understanding the advantages and limitations of a wide range of anchor systems gives you more options. Use your knowledge to select the best method for each unique situation.

Trad Climbing Gear > Slings

This 'Climbing Slings' article is part of the book - Trad Climbing Basics.

VDiff learn to trad climb e-book book

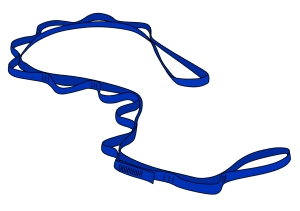
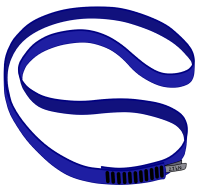
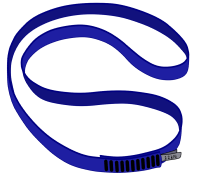
Climbing slings are strongly-sewn loops of nylon or dyneema tape. They're available in a range of lengths – your typical trad rack will have 60cm, 120cm and maybe a 240cm length sling on it, but bigger and smaller ones are also available. The length is given as the end to end distance, so the actual length of fabric will be double this.

Slings are incredibly versatile, light, strong and cheap. You'll find them useful on almost every trad route.

The most common uses of slings are to extend or equalize gear, either on lead or at the belay, but they can also be used as protection by themselves.

How to use climbing slings

Placing Climbing Slings - The Basics

The most common features to 'sling' are blocks and flakes. Simply put the sling over the feature and clip it to the rope with a carabiner. If your sling is big enough, you can tie it as a clovehitch around the feature. This reduces the chance of it being lifted off as you climb.

How to use climbing slings

After placing the sling, give it a gentle pull in the direction of loading and wiggle it around to simulate how it may be pulled in a fall or by movements in your rope as you climb above.

Placing Slings - Threads

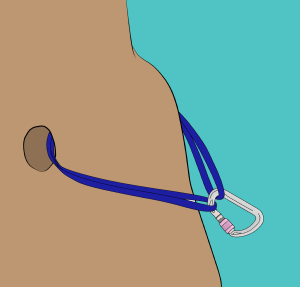
Slings can be threaded through a hole or behind a feature. Simply poke the sling through the hole, pull it until both ends are even, then clip a quickdraw to it.

Climbing sling threaded through hole in rock

VDiff trad climbing book

Placing Slings - Trees

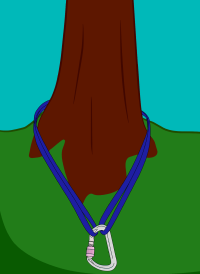
You can use slings as protection around trees. This is more commonly done at the belay, though many 'classic' British routes have mid-pitch trees.

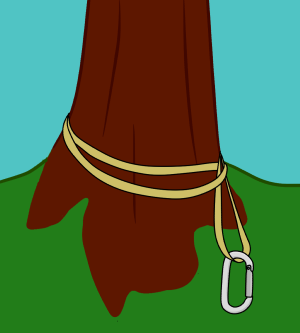
Simply pass one end of the sling around the tree and clip both ends together with a carabiner.

There will be less force on the tree if you attach your sling around the base of the trunk. This is especially important with weak or small trees.

Rock climbing sling clipped around a tree

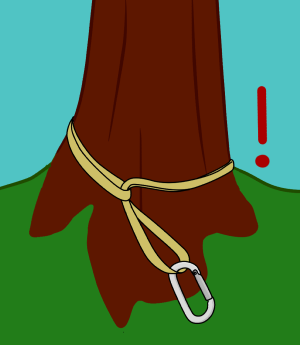
Although not ideal, you can girth hitch trees as shown.

girth hitch climbing slings

Make sure to adjust the girth hitch so it doesn’t bend across the sling, as this puts more force on it.

girth hitch climbing slings

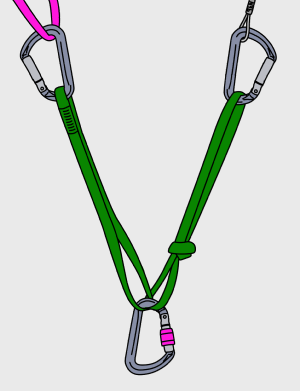
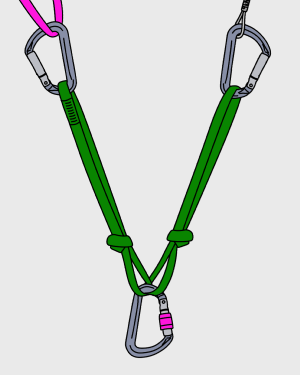
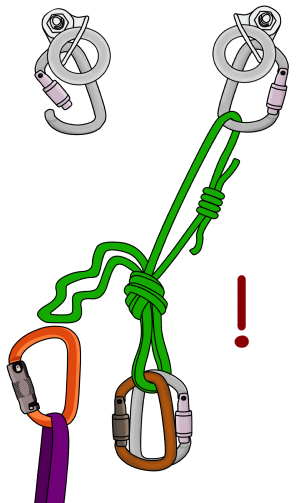
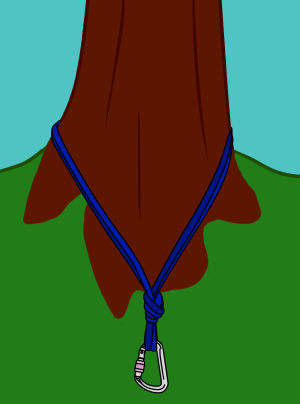
If you have a longer sling, it is much better to tie it off with an overhand knot.

This is stronger and more redundant than a girth hitch.

tie sling around tree

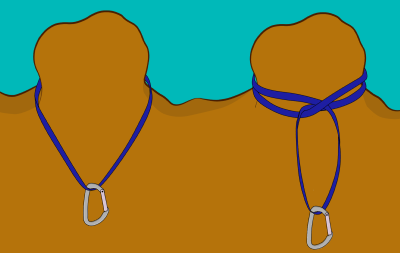
Placing Slings - Blocks and Flakes

A sling around a large block or flake can be a great piece of gear – if it’s solid. Inspect the rock and ask yourself how the feature is attached.

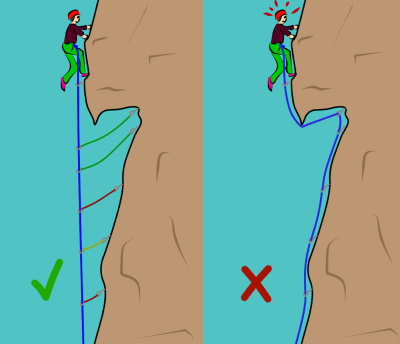
Sling flakes as low down as you can to reduce leverage and be careful of fracture lines which indicate the feature is detached.

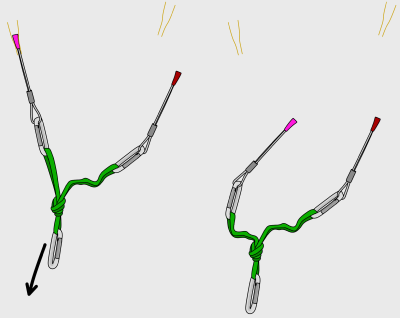
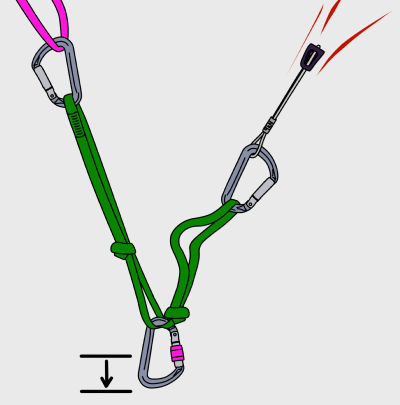
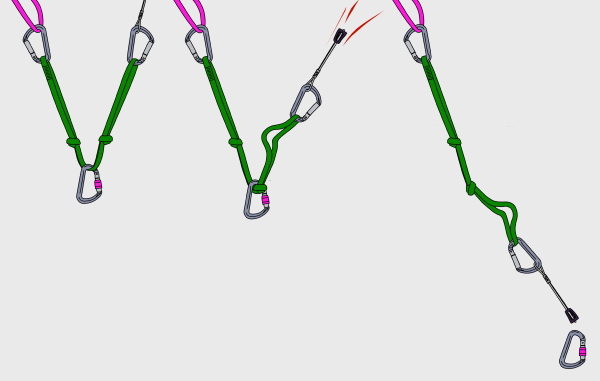
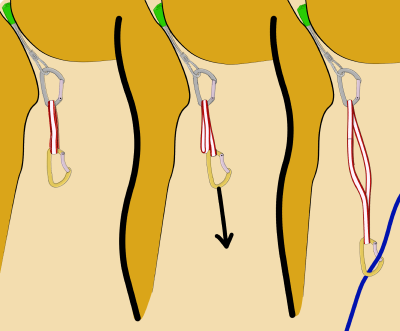
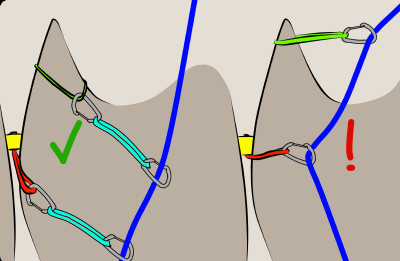
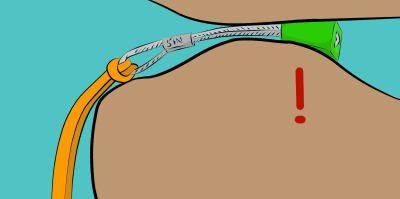
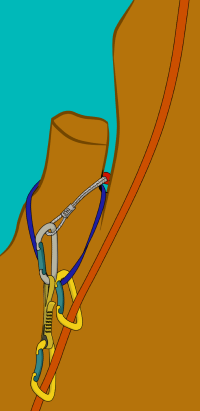
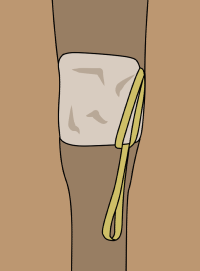
Slings can lift off once you climb above, especially if it's windy or if your rope is pulling on it. To help prevent this, you can wedge them in place with another piece of gear as shown.

Alternatively, weight the sling down by hanging something heavy from it, such as a large hex.

Rock climbing sling and nut

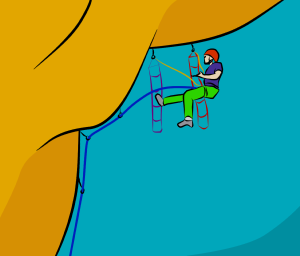
Placing Slings - Boulders

It is common to sling boulders as part of a belay. When choosing a boulder, consider the:
- Size
- Shape of its base
- Shape of the socket it rests in or the angle of slope it is on
- Ratio of its height to width

The most stable boulders are large, wide, flat-bottomed and are wedged in place by the ground they sit on. If a boulder rests on debris, is on a sloping ledge, or has a rounded base, it may not be stable.

Placing Slings - Chockstones

A chockstone is a rock which has become wedged in a crack. They are more commonly found in wider cracks and chimneys and can provide great protection when nothing else exists.

Assess how the chockstone is wedged in place and be careful of large ones which could roll out onto you.

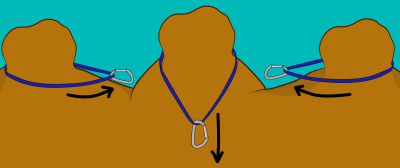
Sling chockstones with a girth hitch on one side. If you sling the middle, the force of a fall could lever it out of the crack.

girth hitch climbing sling

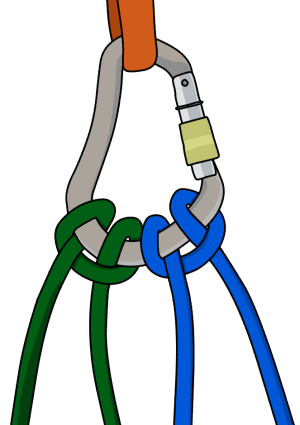
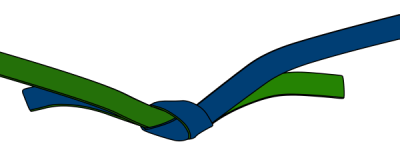
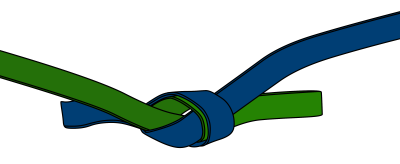
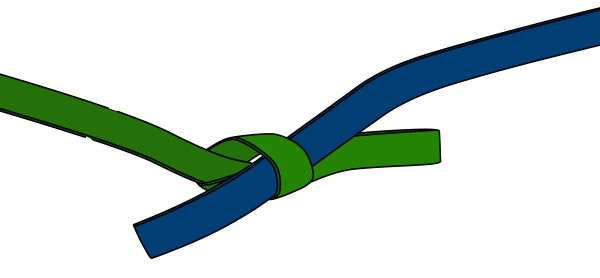
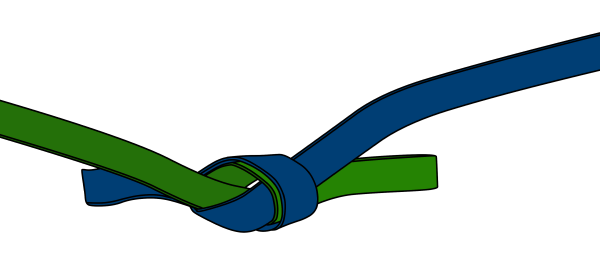
Joining Slings Together

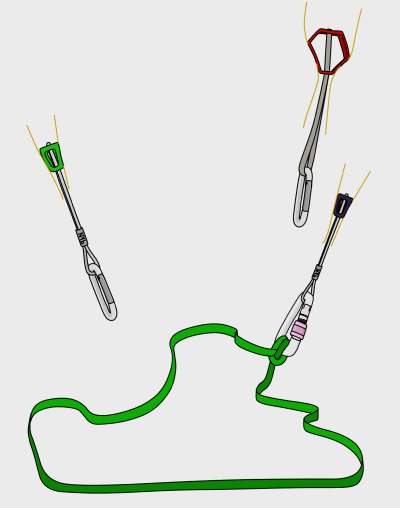
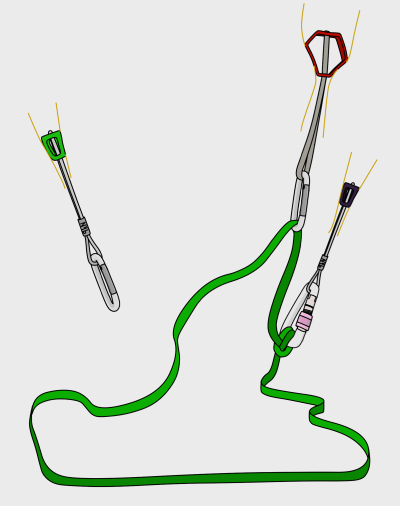
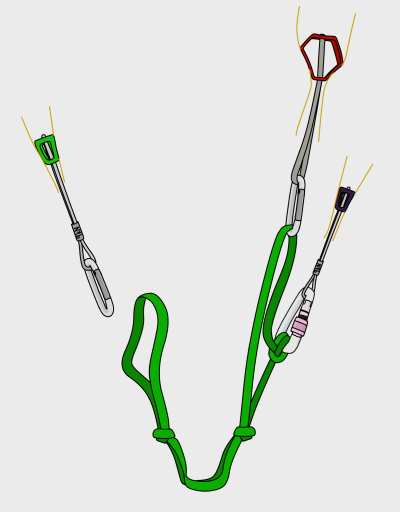
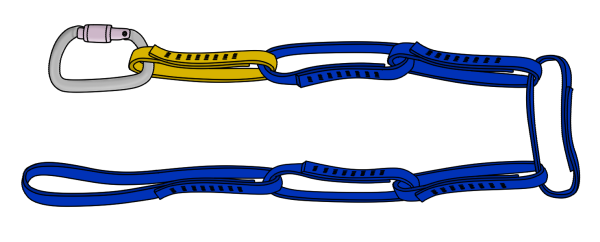
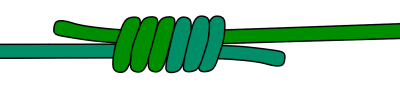
If you don't have one sling long enough to fit around a tree, you can join two together. Do this by using a strop bend – this is basically a neat version of a girth hitch.

Remember that tying any knot in a sling, including a strop bend or a clove hitch, reduces the strength of the sling by up to 50%.

Climbing sling tied in a strop bend similar to girth hitch

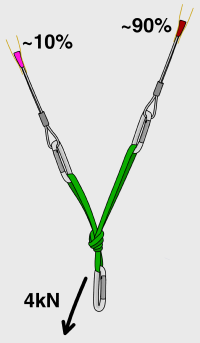
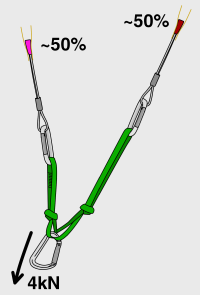
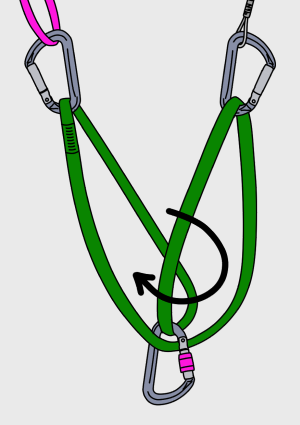
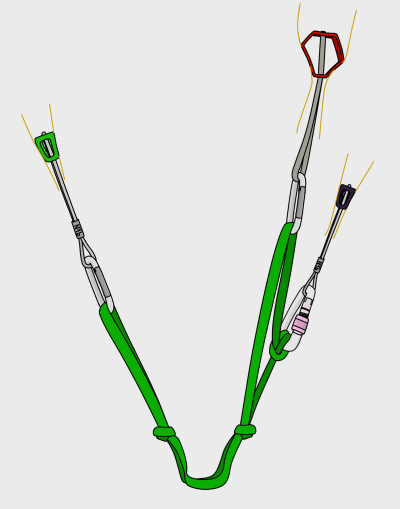
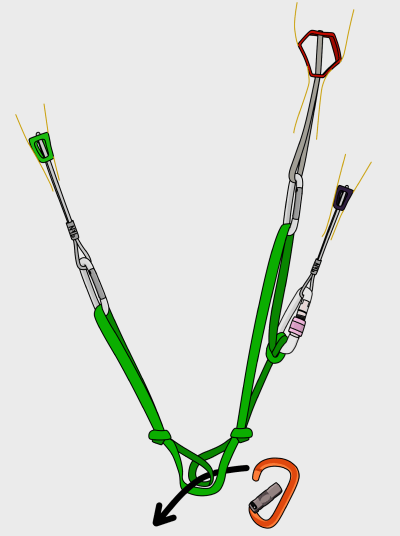
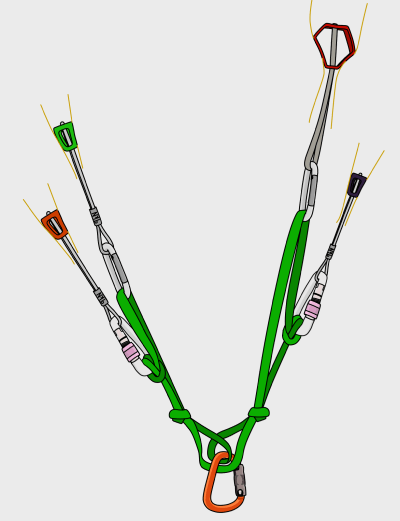
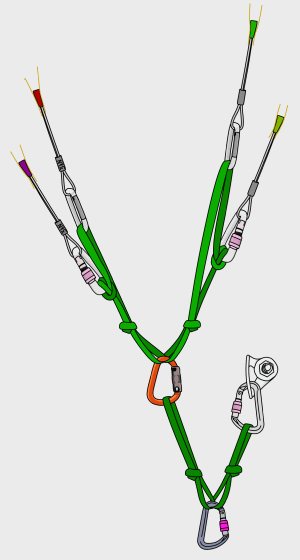
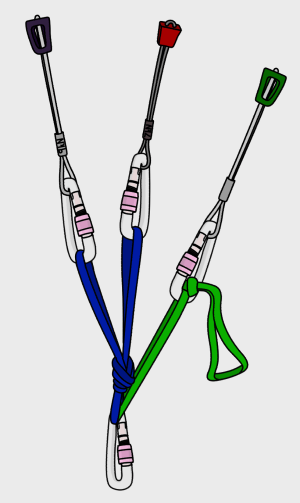
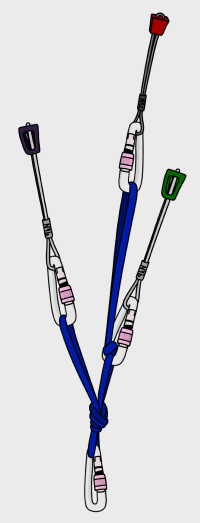
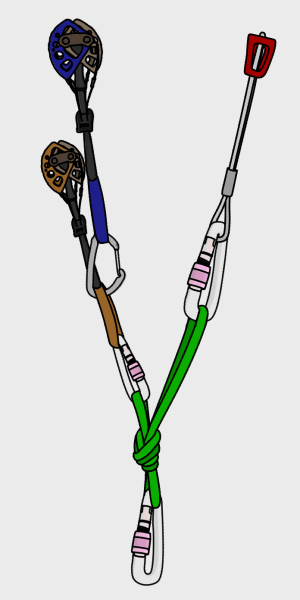
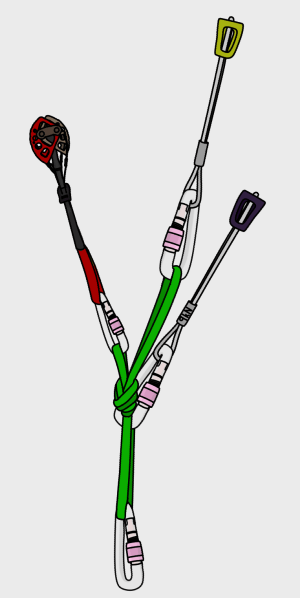
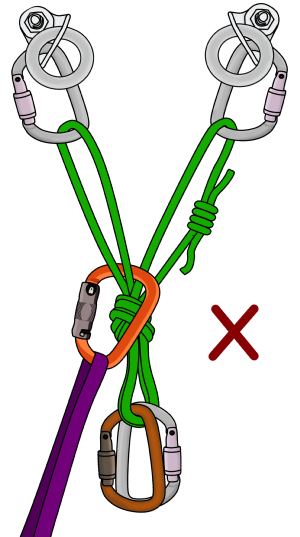
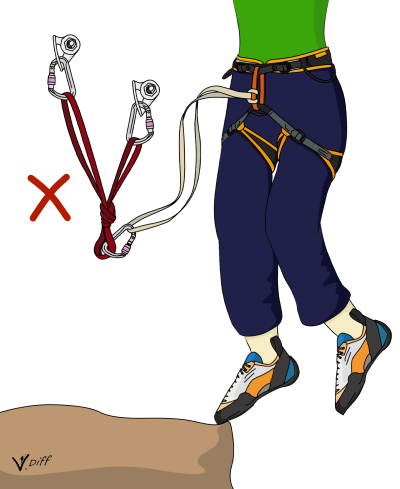
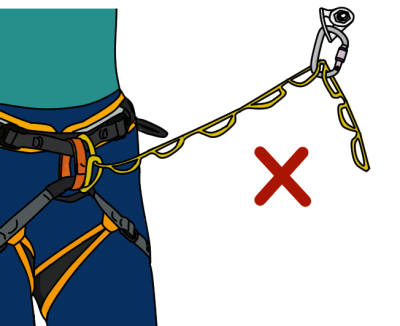
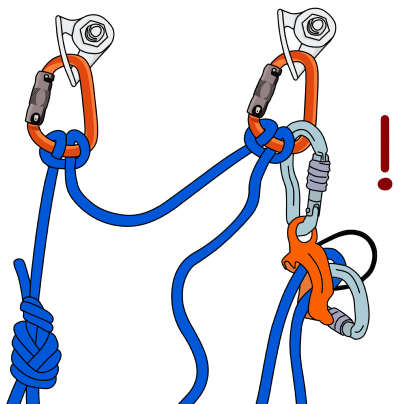
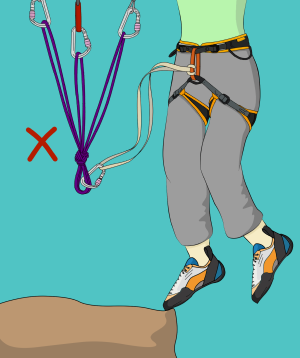
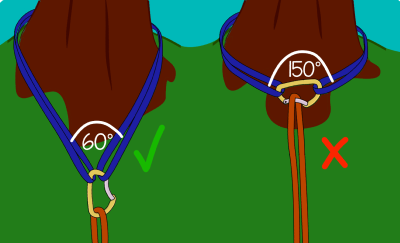
Climbing Slings - The V-Angle

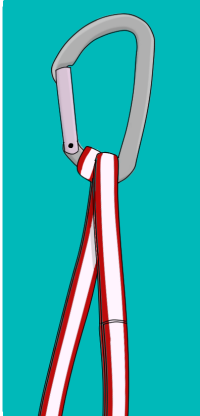
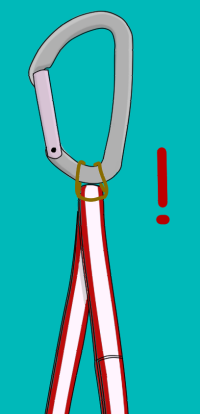
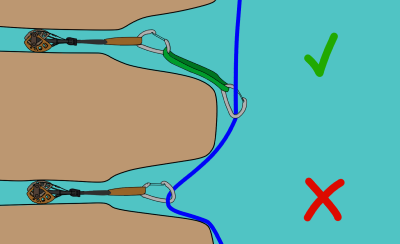
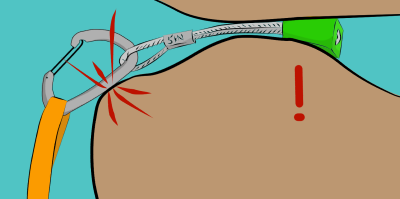
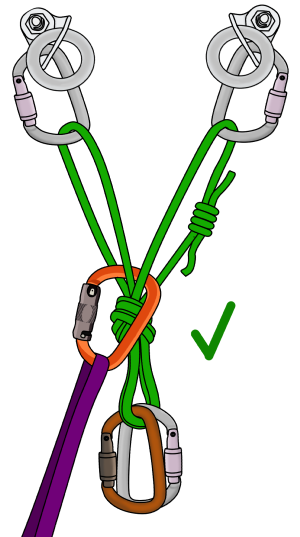
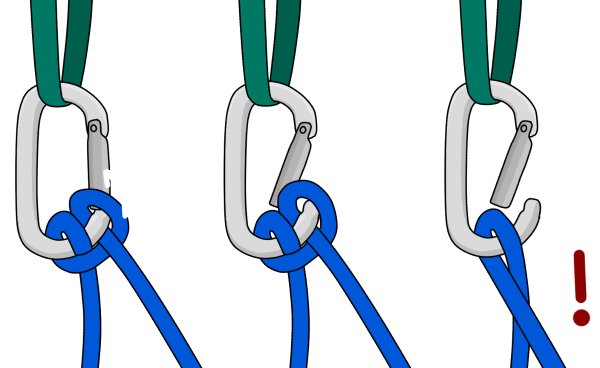
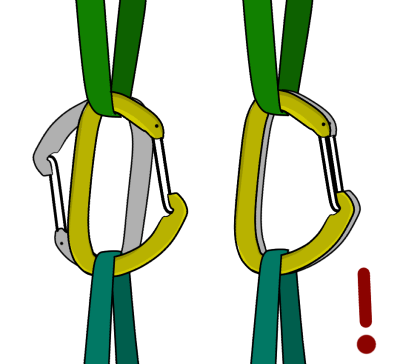
When placing a sling around a tree or rock feature, it's important to keep the V-angle less than 60 degrees. A greater V-angle could cause your carabiner to cross-load in a fall.

Climbing sling V-angles

How To Rack Climbing Slings

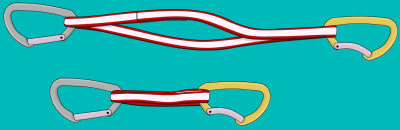
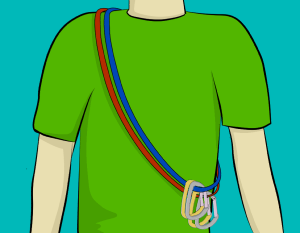
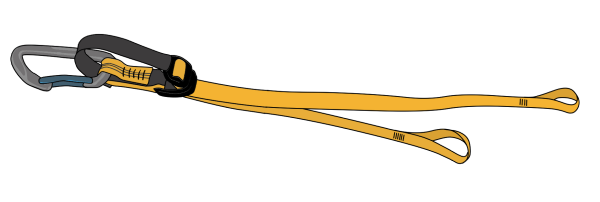
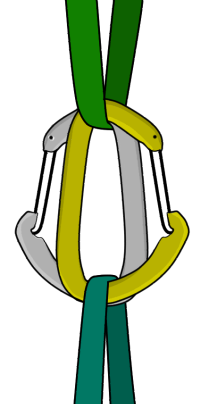
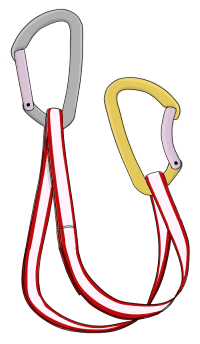
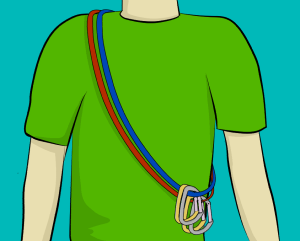
60cm slings are best racked either as extendable quickdraws or fit neatly over one shoulder. You can pull one off whenever you need it, but don't wear too many or they'll tangle together.

Wear rock climbing slings over shoulder
How to wear rock climbing slings over your shoulder

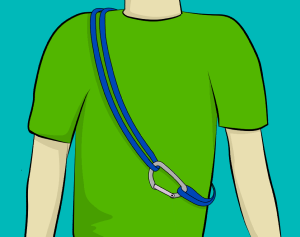
120cm slings can also be worn over the shoulder, with a carabiner clipping the two ends together. Instead of pulling them off over your head, simply unclip the carabiner and pull.

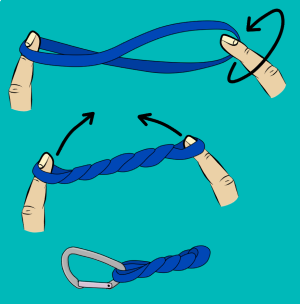
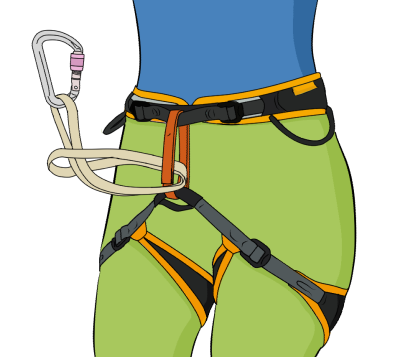
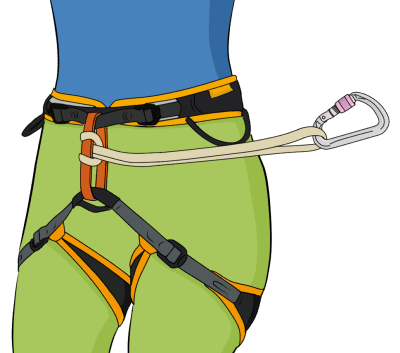
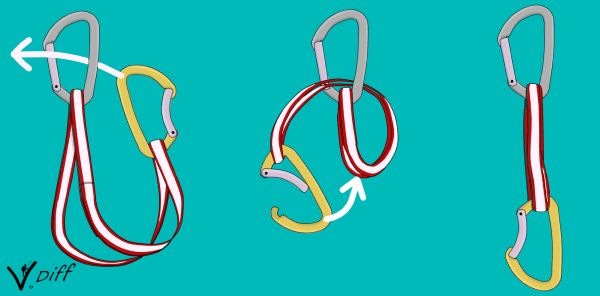
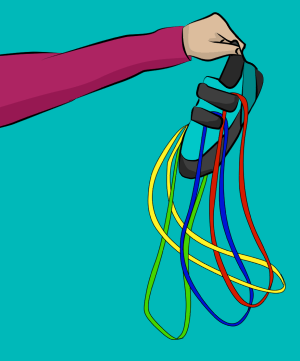
Either length can also be twisted to be racked onto your harness with a carabiner.

For a 60cm sling, hold it on one finger of each hand, and twist one end round a few times. Fold the sling in half and you'll find the strands twist together neatly. Just clip a carabiner through the two ends to rack it.

The same can be done with a longer sling, just double it up first for a 120cm, or double it twice for a 240cm.

Twist climbing sling and rack onto harness

Extendable Quickdraws

This 'Extendable Quickdraws' article is part of the book - Trad Climbing Basics.

VDiff learn to trad climb e-book book

Extendable quickdraws (or alpine draws) are usually made from a 60cm sling and two snap gate carabiners. They can be used either as a short draw or fully extended, meaning it's quick and easy to extend your gear to reduce rope drag without carrying extra slings.

Extendable quickdraws for climbing

It's great to carry at least a few of these on trad routes instead of fixed length, shorter draws. You could also opt to only carry extendable draws, particularly for alpine routes.

How To Make Extendable Quickdraws

To make an extendable quickdraw, simply attach both carabiners to the sling, then pass one biner through the centre of the other one, clipping the extra two loops of the sling through it at the other end. This can now be racked on your harness like any other quickdraw.

How to make extendable quickdraws for climbing

When choosing carabiners and slings for your extendable draws, there are a few things to bear in mind. You should have a gear carabiner and a rope carabiner, just like you would with normal quickdraws.

You'll need to pick different coloured carabiners so you can distinguish between them. Keeping them consistent between all your draws is good – try silver for the gear end and your favourite bright colour for the rope end. You could try marking one end with tape, but this could be really hard to see whilst hanging on by one finger, and can easily wear off.

We prefer making extendable draws with thinner dyneema slings (6 or 8mm) as they fold up more neatly than thicker dyneema or nylon, reducing bulk on your harness. They will wear out faster than thicker versions though, so be prepared to replace them more regularly.

Nylon dyneema quickdraws climbing

VDiff trad climbing book

How To Use Extendable Quickdraws

To use extendable quickdraws, clip the draw to your gear, then slip two loops of the sling out of the rope-end carabiner. Pull it out to full extension, then clip the rope in.

Extendable quickdraws for rock climbing
Extendable quickdraws climbing

Occasionally, the sling can become twisted which can result in it being looped around the gear carabiner. It's OK to use it like this if you're really pumped and need to make the clip quickly, but much better to sort it out if you can.

If you fall while the sling is tangled like this, the strands of it will slide over each other, causing it to weaken, just the same as if it was knotted.

Many short draws have a loop of elastic at the gear end to hold the carabiner firmly in place. It's important NOT to use one of these elastics on an extendable quickdraw. If it's twisted in the wrong way it can end up with the sling attached only with the elastic, not clipped through the carabiner. This is easily missed and would be disastrous if you fell on it!

Elastic on climbing quickdraws
Velcro climbing shoes with slings

Top Tip
The velcro on rock shoes quickly kills dyneema slings, so try not to bundle them all into your bag in one big messy heap!

How To Rack Extendable Quickdraws

When following a pitch where your leader has used extendable draws, you can either re-make the draw as you go and rack it onto your harness, or simply sling the whole thing over your shoulder – much easier in a tricky position. Some people prefer to carry them on lead like this too, rather than racking them on their harness.

Wearing climbing slings over shoulder

Extending Climbing Gear

This 'Extending Climbing Gear' article is part of the book - Trad Climbing Basics.

VDiff learn to trad climb e-book book

Extending climbing gear with a sling, quickdraw or extendable quickdraw has advantages in certain situations.

The disadvantages are fairly minor: you’ll have to carry extra slings/quickdraws, it'll take a little extra time and it increases your fall potential slightly.

Planning ahead is important. Visualize where you want your rope to run, and extend gear as necessary.

Extending Climbing Gear: When To Do It

Wandering Routes
When gear placements are not in a straight line, you'll have to extend them to avoid 'rope drag'.

You should aim to extend gear so that your rope runs as straight as possible without creating unnecessary fall potential.

For this type of route, it can be worth using half ropes too.

Extending rock climbing gear to reduce rope drag

Gear Position
Extending climbing gear helps to keep it in the position that you placed it.

If you don't extend gear appropriately, slings can lift off, nuts can be pulled out and cams can 'walk' out of position. This happens because of movements in your rope as you climb above.

Extending climbing gear to stop protection falling out

Deep Placements
Sometimes, gear must be placed far inside a crack, or around a corner. You'll need to extend the piece to avoid rope drag. This is especially important if the edge of the crack or corner is sharp.

Extending rock climbing cams with a quickdraw or sling

Sharp Edges
Extend gear to keep your rope away from sharp edges or loose rock.

Rope-Eating Cracks
Cracks at the lip of a roof or overlap are notorious for eating ropes and halting the leader. Even with gear correctly extended beneath the roof, your rope may get stuck if the route continues up low-angled terrain. Sometimes, a nut or hex placed at the lip of the crack can help your rope feed more smoothly, or a piece of gear to one side can guide the rope away from the crack. Another option is to belay immediately after the roof if sufficient gear exists.

Extending rock climbing gear with a quickdraw or sling

VDiff trad climbing book

Cross-Loading
In some situations, carabiners could be ‘cross-loaded’ over an edge. This is most common in deep horizontal placements.

A cross-loaded carabiner could be damaged or break during a fall.

Cross loaded climbing gear

The best solution is to loop a sling through the piece, then clip both ends of the sling to a carabiner.

This is better than having a cross loaded carabiner, but it reduces the strength of the sling by 50% or more.

Extending climbing gear to stop cross loading

Warning: Girth-Hitching
If you girth-hitch a sling on the wire loop of a nut it is likely to damage or break the sling in a fall.

Cross loaded climbing gear

Attaching to the Anchor – Slings, Daisy Chains and Common Mistakes

'Slings, Daisy Chains and Common Mistakes' is part of the book - Sport Climbing Basics.

VDiff learn to sport climb e-book book

Attaching to the Anchor: The Top Shelf

To free up space at the central point, you can clip in to the ‘top shelf’ of the cordelette. This is useful when:
- Belaying in guide mode
- Using a redirected belay
- There will be more than one other climber attaching to the central point

Step 1
Cinch the cordelette tight and attach a screwgate to the central point. This ensures the knot cannot roll.


Step 2
Clip each individual loop of the cordelette with another screwgate.

top shelf climbing anchor

Step 3
Attach yourself to the screwgate.

cordelette top shelf climbing anchor

Warning
Make sure you have clipped through each cordelette strand individually.

top shelf of a cordelette

It is dangerous to clip around the strands as shown.

clipping the top shelf climbing anchor

If one part of the anchor fails, you will become completely detached.

clipping the top shelf of a cordelette

VDiff sport climbing book

Attaching to the Anchor: Slings, PAS and Daisy Chains

Slings
Slings are designed to be used with a dynamic rope in the system to lessen the impact on them.

Much higher forces can be generated when they are used alone.

rock climbing sling

Personal Anchor Systems
A Personal Anchor System (PAS) is a series of very short sewn slings connected in a chain-link-style. They are designed as an idiot-proof anchor attachment. Once girth hitched to your harness, any part of the PAS can be clipped to an anchor to provide a full strength attachment.

personal anchor system climbing

Attaching to the Anchor
It's only safe to attach yourself to an anchor with a sling or a PAS if you won't be moving above it (such as when setting up an abseil).

If you fall when above an anchor (even if you are only a foot above), unusually large forces will be generated. This is because slings do not absorb much energy – think of it as similar to falling when attached to a length of steel cable. You can damage internal organs with just a 10kN force – falling onto a sling directly is likely to be much higher than this.

It could also break the sling, or the anchor. If there is any chance that you will move sideways or above the anchor, make sure to attach to it with the rope.

attaching to a climbing anchor with slings

Daisy Chains
Daisy chains look and function in a similar way to the PAS, but they are only full strength when clipped end-to-end.

daisy chain climbing

The stitching between loops on daisy chains is very low strength.

If you connect to an anchor by clipping a carabiner through two consecutive loops, the stitching could break, causing you to become completely detached from the anchor.

how not to use daisy chains climbing

Adjustable daisy chains are not full strength (usually rated to around 5kN) and should never be used as your primary anchor attachment.

adjustable daisy chain

Attaching to the Anchor: Common Mistakes

Tying Clovehitches on Snapgates
Part of the clovehitch could easily snap through the gate, making the knot useless. Never tie clovehitches on snapgate carabiners. Use a screwgate, or two opposite and opposed snapgates (see below) instead.

clove hitch rock climbing

Too Many Knots on one Carabiner
This is bad because:
- If the blue rope is weighted, it will be impossible to remove the green rope.
- If the green rope is a climber’s attachment point and you open the gate to remove the blue rope, the climber will only be attached by an open carabiner – this is very dangerous.

If you need to attach more than one knot to an anchor, use a separate screwgate for each.

clovehitches climbing

Non-Equalized Anchor Attachment
If one bolt fails, everything will swing onto the other bolt. This presents a real danger of losing control of the belay.

It is much safer to equalize the anchor as shown here.

bolted anchor climbing

Clipping Snapgates Together
A slight twist can cause the carabiner’s gate to open.

Instead, use a quickdraw, sling or screwgate carabiner depending on the situation.

clipping snapgate carabiners together

Attaching to the Anchor: No Screwgates?

If you need a screwgate but don’t have one, you can use two ‘opposite and opposed’ snapgates instead. This is useful in situations such as attaching to an anchor.

opposed carabiners

This is a common incorrect carabiner alignment. If one carabiner flips around, both gates could be pushed open at the same time.

opposite and opposed carabiners

Nylon or Dyneema Slings?

'Nylon or Dyneema Slings?' is part of the book - Trad Climbing Basics.

VDiff learn to trad climb e-book book

Nylon Climbing Slings

Usually around 16-20mm wide, nylon climbing slings are much bulkier (and more durable) than lightweight 6-14mm Dyneema slings.

This makes them the best choice for situations such as extending a belay device, replacing anchor webbing or attaching yourself to an anchor before abseiling.

Nylon webbing is cheap and easy to buy in bulk. It holds knots better and doesn’t melt as quickly as Dyneema. Nylon will also stretch much more than Dyneema to help absorb forces, thereby dynamically absorbing the energy of a falling climber.

Nylon climbing sling for rock climbing

Dyneema Climbing Slings

Dyneema (also known as Spectra or Dynex) is incredibly strong for its weight and is more abrasion and cut-resistant than nylon. Dyneema can't be dyed, so slings are always white, often with a coloured thread running through them too – this is a nylon ‘filler’ that is used to help hold the sling together.

Dyneema folds up very small so racking them is easy, especially 60cm slings racked as extendable quickdraws. Due to their thin diameter, they can be threaded through small gaps where nylon slings are too fat to fit, and are great for tying-off pitons.

Dyneema doesn't absorb much water, making them a smarter choice for winter climbing where your nylon slings will freeze stiff.

Dyneema climbing slings for rock climbing

VDiff trad climbing book

Drawbacks of Dyneema Climbing Slings

If Dyneema is the same strength as nylon, but much lighter, smaller and more abrasion and water resistant, why would you ever get nylon slings?

Before you throw out your nylon slings, consider the drawbacks of Dyneema:
- Dynamic absorption
- Durability
- Cost
- Melting point
- Slickness

Dynamic Absorption
Dyneema only stretches three to five percent, so there will be minimal dynamic absorption of falls through the sling – it's all reliant on your rope.

If you fall without a rope in the system (e.g: when attached directly to an anchor with a sling), the resulting fall will be as abrupt as if you were attached by a length of steel cable.

Durability
The repeated flexing of Dyneema degrades the fibers much quicker than nylon, especially when knots are tied in it. Dyneema quickdraws, slings and cam slings need to be replaced more frequently than the nylon equivalent.

Cost
Dyneema is almost always more expensive than good old-fashioned nylon. Buying nylon helps you save money for more important things like climbing road trips.

Melting Point
The lack of stretch means that energy is dissipated as heat rather than movement. As Dyneema has quite a low melting point compared to nylon, the heat generated can damage the material, causing it to fail.

This effect is more apparent when knots are tied in the sling as the strands rub over themselves. Knots in thin slings are also incredibly hard to unfasten if heavily loaded.

Slickness
Dyneema is much slicker than nylon. You can buy nylon cord and webbing off the spool in most climbing shops, and tie it together to create your own cordelette, prusik or sling of the desired length.

Dyneema webbing, however, is only available in finished, sewn products. One reason for this is because a knot tied in Dyneema tends to pull through itself under load.

The exception is Dyneema cord, which you can buy in raw lengths.

Be careful though – the weakness in this super strong material is the knot that you use to tie it together. We recommend using a triple fisherman’s bend with long tails.

triple fishermans bend

The most important part of this knot is how well you fasten it – make it neat, tie it very tight and check it before each use.

The same knot can be used if you must cut and retie your sewn Dyneema slings, such as threading a sling around a feature to back up an abseil anchor.

While a water knot is the preferred choice for tying nylon webbing together, the triple fisherman’s bend is better for thin Dyneema. Because Dyneema is so slick, water knots pull through themselves at a lower force than the triple fisherman’s.

water knot

Nylon or Dyneema Slings - Static Falls

Because of the poor dynamic absorption of Dyneema, it is not suitable for use in situations where the sling or daisy chain alone must hold the full force of a fall, or when there’s very little rope in the system. Examples include:

Falling on the First Piece of Gear
When there is little rope in the system to soften a fall (such as falling on your first piece of gear), you can reduce the force on that piece (slightly) by using a nylon extender rather than Dyneema.

As you climb higher and reduce the fall factor, it doesn’t really matter which material you use.

buy nylon or dyneema slings for climbing

Falling Directly on the Anchor
If you fall when attached directly to an anchor with a Dyneema sling or cordelette, the resulting fall will put higher forces on the anchor than if you were attached with a nylon sling.

Depending on the severity of the fall, this could cause internal injuries, break the sling or break your anchor.

A much better alternative is to attach to the anchor with the rope. If this is not possible (such as when abseiling), make sure not to put yourself in a position where you could fall and shock-load the anchor, even if you are attached with a nylon sling.

buy nylon or dyneema slings for rock climbing

Daisy Chain Fall
When aid climbing, it’s possible to take a static fall on a daisy chain if your next piece of gear fails.

A nylon daisy chain will stretch more than Dyneema to absorb forces in this situation, but a much better solution is to improve your aid technique so that you are never in a situation where you will shock-load your daisy chain.

nylon or dyneema climbing slings

Should You Buy Nylon or Dyneema Climbing Slings?

For most situations, you should focus on using the sling correctly, rather than worrying about what material you should use.

There are no definite rules for when to use either material. Both are good when used in the right way, but neither are perfect. Having a mixture of both on your rack keeps your options open.

The key is understanding the advantages and limitations of each and using your knowledge to select the best type for the situation.

The Water (Tape) Knot

'How To Tie a Water Knot' is part of the book - Trad Climbing Basics.

VDiff learn to trad climb e-book book

The water (tape) knot is useful for joining flat or tubular webbing of equal width.

how to tie climbing slings together

How To Tie the Water Knot

Step 1
Tie a loose overhand knot near one end of the webbing.

how to tie climbing webbing together

Step 2
Thread the other end into the knot as shown.

tie climbing webbing together tape knot water knot

Step 3
Retrace the original knot, making sure it lies flat at all times.

how to tie a tape knot

Step 4
Cinch the knot tight. The tails should be at least 10cm long.

how to tie a water knot

VDiff trad climbing book

Warning!
The water knot should never be used to join:
- Dyneema webbing
- Any webbing of unequal width
- Rope/cord to webbing

In these cases, the knot is very weak and prone to slipping.

The water knot can untie itself over time with repeated loading and unloading. Make sure the knot is tight and the tails are at least 10cm long each time you use it.

Some climbers duck-tape the tails to keep them neat and to help prevent creeping. If you do this, leave the ends of the webbing in view so you can see them.