Crevasse Rescue – Snow Anchors

This article about Crevasse Rescue Anchors is part of the book - Glacier Travel and Crevasse Rescue.

VDiff glacier travel crevasse rescue book

You will need to make an anchor on the glacier when:
- Performing a crevasse rescue
- Belaying/ abseiling across a crevasse or other tricky ground


Note
The anchors described in this section are made using equipment that you already have with you – ice axe, rucksack or ice screws. Anchors can also be made from gear which is designed as lead protection in snow, such as pickets or flukes. However, it is assumed that you do not have these more specialized items with you.

climbers crossing glacier

Snow Quality
The strength of a snow anchor varies dramatically depending on the snow type. For example; an ice axe buried in powder snow will be useless, whereas the same axe buried in hard snow will be bomber. With good judgement of the snowpack, the anchors described in this article will be sufficient for their intended use. However, this judgement is only developed with plenty of practice and experimentation in a safe environment.


Surface Area
Generally, anchors with a bigger surface area are stronger. An ice axe can work well in hard snow, but will not provide sufficient surface area for a secure anchor in soft, unconsolidated snow. A better alternative in this case is to bury a rucksack or a ski.


Be Precise
Precision is everything with snow anchors. A precise and well constructed anchor can be quite strong, with a sloppy one in the same snow being weak. It’s better to take a little longer making a good anchor that works, rather than rush one which fails halfway through a rescue.

Crevasse Rescue Anchors - Ice Axe Anchor

Step 1
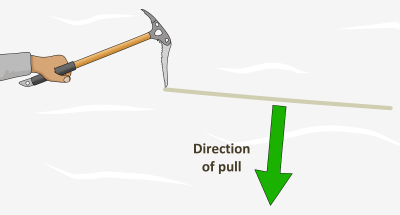
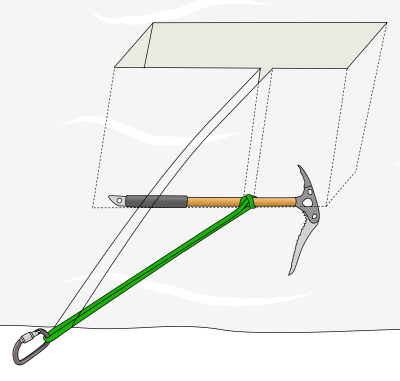
Use your pick to score a horizontal line in the snow exactly perpendicular to the direction of pull and slightly longer than the length of your ice axe. It is important not to disturb the snow in the area immediately in front of your anchor as this is where its strength comes from.

crevasse rescue anchors

Step 2
Cut out a slot in the snow, using the initial scored line as a guide. 30cm is the minimum depth in firm, consolidated snow. If the snow is soft, you may need to dig deeper to find more consolidated snow.

how to make an ice axe anchor

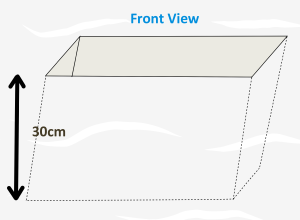
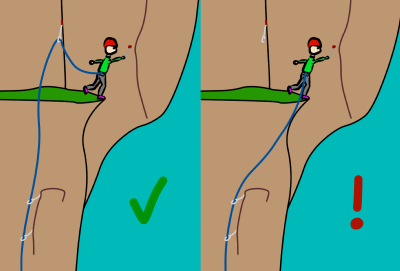
Make the front face of the slot uniform and slightly incut in relation to the direction of pull. This helps the axe to pull into the snow when weighted, rather than up and out.

buried ice axe anchor

Step 3
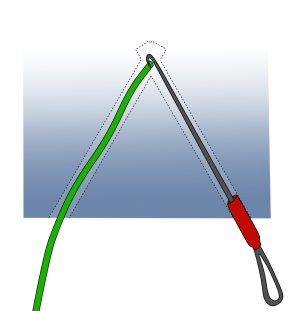
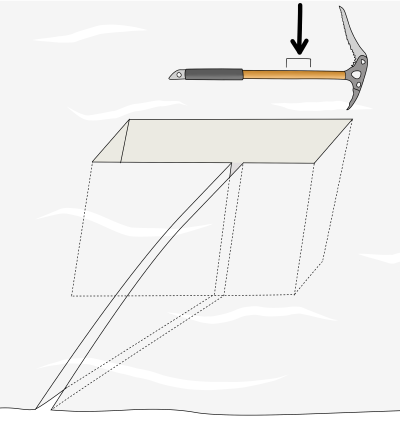
Find the centre of mass on the ice axe. Not the middle of the axe, but the middle of the surface area. This is typically about of ⅔ the way along the shaft, towards the head. Mark where this point would be on the slot you have cut in the snow. Cut a narrow slot at this point using the pick and spike of the axe.

This slot only needs to be wide enough for a fabric sling, but deep enough so that it reaches to the very base of the horizontal slot. It must also be long enough so that when the sling is attached, the angle created pulls the axe into the snow, not upwards.

ice axe anchor on glacier

Step 4
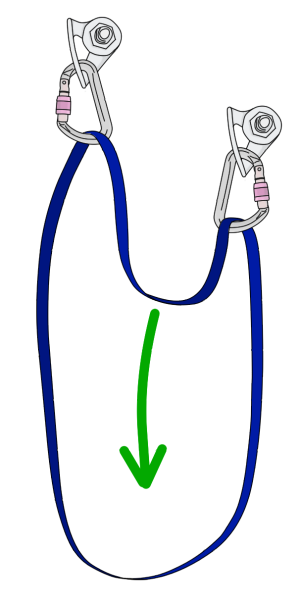
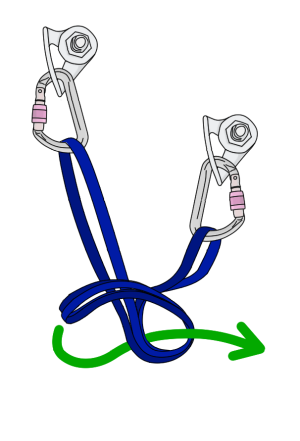
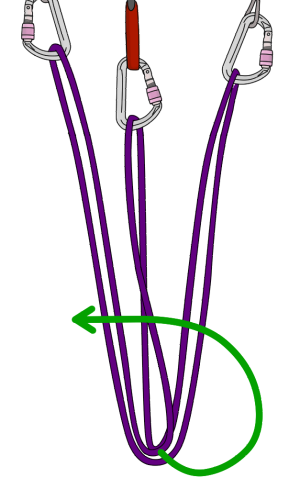
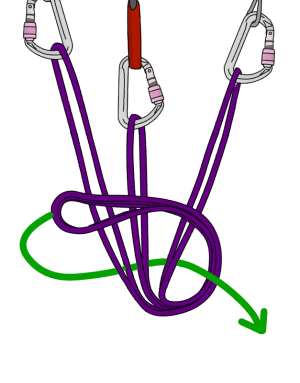
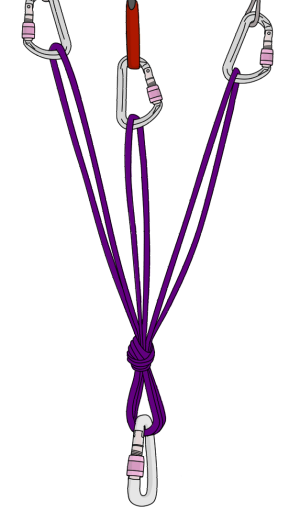
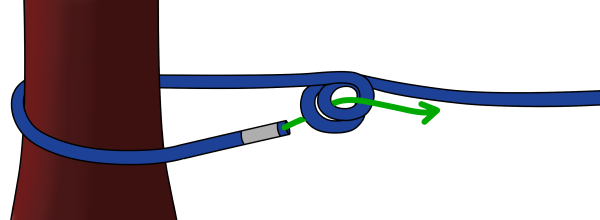
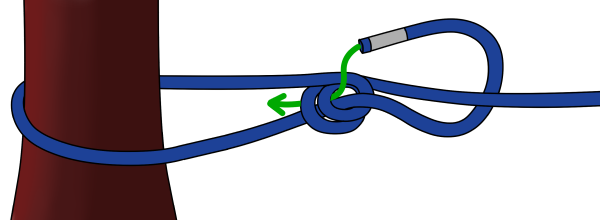
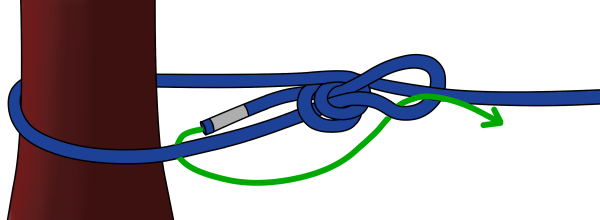
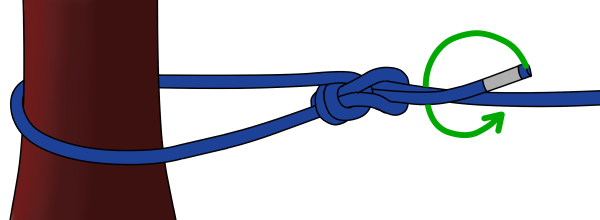
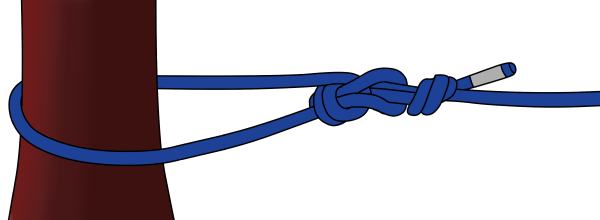
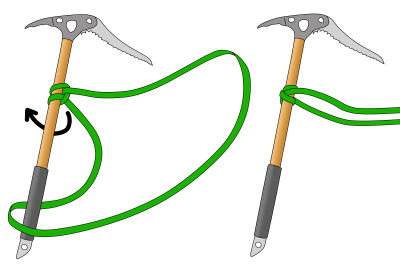
Clovehitch a 120cm sling around the shaft of the axe at the previously identified point.

Then flip one strand of the sling over the shaft as shown. This causes the clovehitch to tighten up around the shaft when weighted.
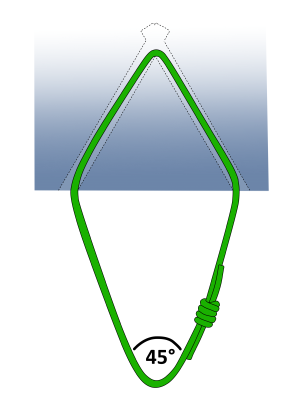
glacier axe anchor

Step 5
Place the axe in the slot horizontally, with the pick facing down and the shaft securely up against the front face at the very base of the slot. Make sure the sling runs through the narrow slot.

Step 6
Backfill the slot with snow and compact it down. Be careful not to disturb the snow in front of the anchor. In some snow types this adds considerable strength to the anchor.

Step 7
Use the anchor with caution and avoid shock loading.

how to make a belay on glacier

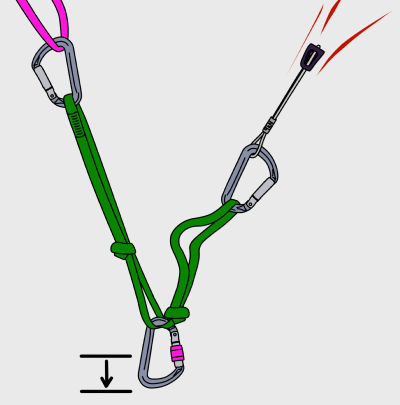
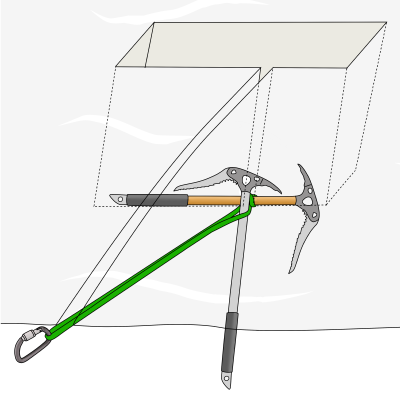
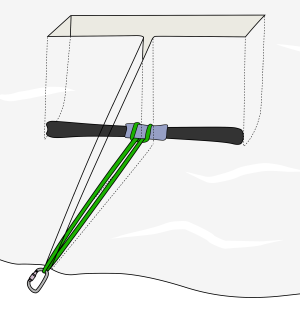
Reinforced Buried Axe
If you have a second axe available, you can slide it in front of the other axe, between the sling’s strands to reinforce it. This adds more surface area and improves the anchor’s strength.

reinforced buried ice axe anchor

VDiff glacier travel book

Crevasse Rescue Anchors in Softer Snow

Anchors which are more suitable in softer snow include a buried rucksack or horizontal ski, with a sling girth-hitched around it.

snow anchor belay crevasse rescue anchors

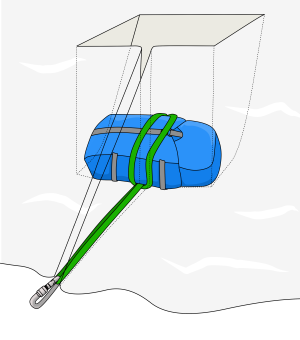
The principles of these anchors are the same as for burying an ice axe, but the item must be buried deeper.

crevasse rescue anchors using ski

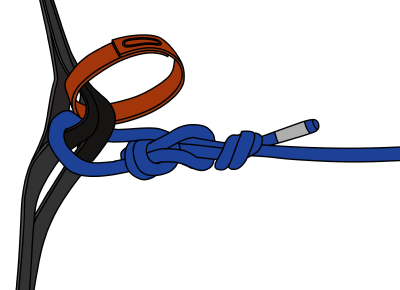
If you are using a ski, be careful to protect the sling from the ski’s sharp edges – these could cut the sling. Position the base of the ski against the front face of the horizontal slot as shown below, and pad the sling with something if possible.
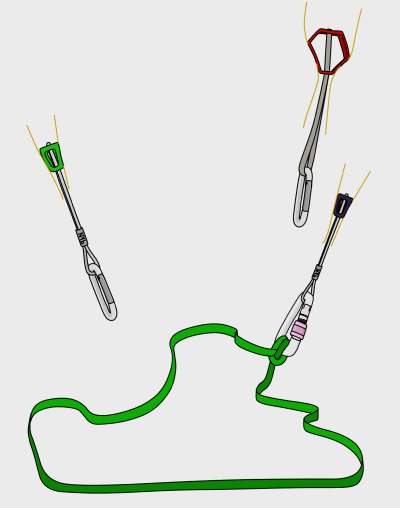
ski belay on glacier

Snow Bollard

A snow bollard is simple a snow anchor that can be used for abseiling. It would be the last choice when a rock or ice anchor is unavailable.


Step 1
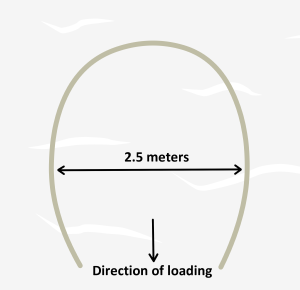
Scribe out a horseshoe shape in the snow, with the opening pointing directly in the line of pull. It is usually best to make this about 2.5m at its widest point, but the size depends on the strength of the snow. In very hard snow, the bollard may only need to be 1.5m wide. Whereas in very soft snow it might need to be 3m. It is obviously better to make it too big rather than too small.

Be careful to make it a horseshoe shape, not a teardrop. A lot of the strength comes from the opening as it joins the snowpack. You are not aiming to make an isolated shape.
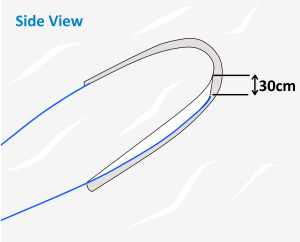
snow bollard climbing anchor

Step 2
Using the adze of your axe, cut a slot along the scribed line to form a horseshoe shaped trench. This trench should be a minimum of 30cm deep and should be in the firmest layer of snow. Be careful if digging deeper into softer snow because there is the danger that the rope could cut through the soft layer under the bollard.
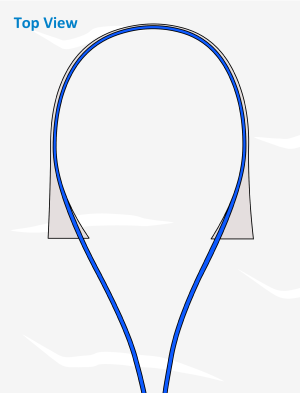
snow bollard climbing

Step 3
Put the rope over the bollard, making sure it sits well at the bottom of the trench. Check carefully that when the rope is weighted, it remains at the bottom of the trench all the way around and does not lift at all.


Step 4
Try to test the bollard by committing your weight to it before the situation is consequential.


Step 5
Be very cautious when abseiling, particularly at the start. It is important to stay very low as the rope must not accidentally be pulled in a more upwards direction. It is often best to start the abseil on your knees or slither on your side to keep the load angle as low as possible.

abseil from snow

Important
- Do not disturb the snow in the bollard or immediately in front of it.
- The horseshoe shape should be a smooth curve – sharp angles are weak points.
- It is important that the bollard is slightly incut to prevent the rope rolling up and off.


Frozen Rope
The rope can occasionally become stuck around the bollard if it freezes or becomes buried in spindrift snow. The last person to abseil must check this.
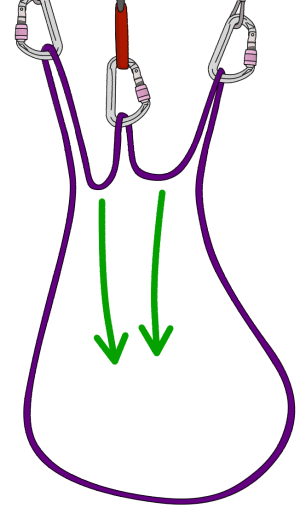
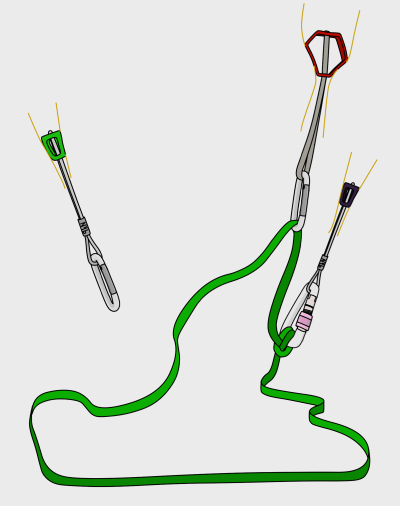
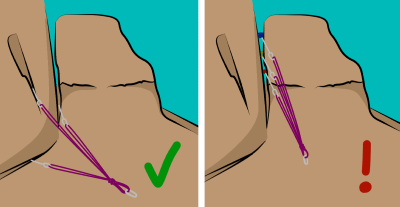
Multiple People
If multiple people are weighting the anchor, it should be reinforced. Slot one or two axes vertically between the rope and the bollard. If only one axe is available, it should be at the back of the bollard. With two axes, place them at 10 o’clock and 2 o’clock as shown on the right. This reinforcement can then be removed by the last person to use the anchor.

abseil from snow bollard on glacier

Crevasse Rescue – Ice Anchors

This article about how to place ice screws is part of the book - Glacier Travel and Crevasse Rescue.

VDiff glacier travel crevasse rescue book

How To Place Ice Screws

You can place ice screws to make an anchor on a dry glacier, or you might be able to dig through snow on a wet glacier to reach ice.


Step 1 – Clear
Clear away any surface snow and aerated surface ice and get down to good solid glacial ice.


Step 2 – Position
Position the screw perpendicular to the surface of the ice, or slightly towards the direction of loading. Push the screw against the surface while turning it a few times with your wrist until it bites.


Step 3 – Insert
Using the handle, wind the screw all the way into the ice.

how to place ice screws

Placement Quality
You will get feedback about the quality of the placement as the screw is winding into the ice. Here are some things to consider:

- Feel the resistance of the screw cutting through the ice. Has it gone into an air pocket?

- Look at the core of ice coming out of the back of the screw. In good glacier ice this should come out looking like a crumpled ice cigar! Poorer quality placements will have snow, slush or nothing at all coming out of the hole.

- Look at the surface of the ice around the screw. Is it cracking? Some small surface cracks are okay but large sections of the ice cracking are not good.

how to place ice climbing screws

Step 4 – Loading Direction
You need to finish with the hanger pointing in the direction of pull. Do not force the hanger around – it is better to unwind slightly to get the hanger pointing in the correct direction. Forcing it would start to strip the threads of the ice screw placement.

placing ice screws for climbing

Step 5 – Double Up
A 16cm screw in good ice will hold around 10kN – the same as an average cam in good rock. If possible, place two screws at least 30cm apart and offset. Equalize them with a sling to create an anchor.

placing ice climbing screws

Abalakov Thread (V-Thread)

A V-thread is an ice anchor that is often used for abseiling.

You Will Need
- a long ice screw (21cm)
- a length of 7mm cord
- a V-thread tool

Abalakov v thread tool

Step 1
Clear the surface so you get to solid ice. Place the ice screw perpendicular to the ice, but at a 60 degree angle sideways. Pay attention to the quality of the ice as the screw is being placed. It needs to be good.


Step 2
Remove the screw.

how to do an ice screw v thread

Step 3
Make a second hole at a distance approximately equal to the length of the screw so that you end up with an equilateral triangle.

It helps to look down the first hole to aim the second screw placement.

v thread with ice screw

Step 4
Clean out the holes with your V-thread tool. With the tool at the bottom of the first hole, poke the cord into the second hole.

As the cord passes through into the first hole, hook it with the tool and pull it out.

how to use Abalakov v thread tool

Step 5
Tie both ends of the cord together using a double fisherman's bend.

Make sure the loop is not too tight – the angle when weighting the loop should be around 45 degrees.

ice climbing v thread

VDiff glacier travel book

Notes
- As with all ice anchors, the quality of the ice has a massive impact on the strength of the anchor. A well constructed V-thread in good ice will hold around 8kN.

- V-threads can be made in a horizontal or vertical plain. Some evidence shows that vertical Vthreads are slightly stronger, but many people find these to be trickier to construct accurately.

- It’s important to have an accurate construction – with the angles at 60 degrees and having the connection of the two holes at the maximum length.

- If in doubt, make two V-threads (more than 30cm apart) and link them together to make an equalised anchor.


V-Thread Without Cord
To make a V-thread anchor without cord, simply poke the climbing rope through the holes instead of the cord. If abseiling on two ropes, it is important that the joining knot is positioned a good distance away so it does not get pulled into the hole. This will create an unusual strain on the anchor. It is possible for the rope to become stuck if it freezes in place. The last person down should check that the rope slides before they abseil.

Back-Up Your Anchor
To secure the first person's descent, the V-thread can be combined with another ice screw. Connect this backup screw to the rope with a little slack so it isn’t actually weighted when the first person abseils.

Make sure there isn’t too much slack, as this would shock-load the backup screw if the V-thread failed. The last person then removes the ice screw before they descend.

ice climbing v thread for rappel abseil

The Overhand Knot

'Essential Knots: The Overhand' is part of the book - Trad Climbing Basics.

VDiff learn to trad climb e-book book

The overhand knot is useful for:
- Creating a master point in a cordelette or sling
- Joining ropes for abseiling (rappeling)

Overhand knot rock climbing

How to Tie the Overhand Knot

Step 1
Clip the sling to both bolts and pull the strands down so they are equal.

Tying an overhand knot rock climbing

Step 2
Pull the bottom of the sling around to form a loop.

tie slings rock climbing

Step 3
Push the end of the sling through the loop as shown.

fasten sling rock climbing

Step 4
Pull the knot tight and clip a screwgate carabiner to the central point.

Tying an overhand knot rock climbing

VDiff trad climbing book

The same technique can be used to join three or more strands of sling or cord together.

Pull each strand down evenly.

tie overhand knot

Pull the bottom of the sling around to form a loop.

tie Overhand knot rock climbing

Push the end of the sling through the loop.

Overhand knot

Pull the knot tight and clip a screwgate carabiner to the central point. You could also clip into the top shelf to free up space at the central point.

How to tie the overhand knot rock climbing

The same knot is commonly used to join ropes for abseiling.

Abseil rappel with overhand knot

Sport Anchors – Part 1 of 4 – Introduction

These articles about sport climbing anchors are part of the book - Sport Climbing Basics.

VDiff learn to sport climb e-book

Many climbs have bolted 'sport anchors' at the top. This is the standard for sport climbs worldwide, but is also common at many North American trad climbing venues.

These bolted anchors will usually be equipped with mallions (quick links) or lowering rings, sometimes connected with chains. You won’t be able to simply clip your rope through this type of anchor like you would at the gym. Instead, you’ll need untie from the rope and thread it through. After that, you can either abseil, or have your partner lower you down.

It’s important to learn how to do this in the correct order. If you thread an anchor incorrectly, you could drop your rope and be ‘stranded’ at the anchor, or even become completely detached from the bolts.

Sport anchors lowering chains

Sport Anchors: Lower, Abseil or Walk Off?

There are basically three ways to descend; walk off, lower or abseil (rappel). You will either lower or abseil to get down from most sport routes. Your choice largely depends on the type of anchor, how it is positioned and what you plan to do after the climb.

Lowering from a sport anchor is quicker than abseiling. It’s also much easier to retrieve gear on your way down when lowering. However, abseiling puts much less wear on the rings and your rope. This could be the best option if the rings are already showing signs of wear.

If the next climber is going to top-rope the route, you should make an anchor from your own gear and lower down from that.

If you are the last person to climb the route, you’ll need to clean all your gear from the anchor before you descend.

For anchors which are in a poor position for lowering or abseiling (e.g: far back across a ledge), it is much better to belay your partner from the top of the climb. You can then walk off.

Each of these scenarios requires a different anchor setup. These are described in the following articles.

Sport Anchors – Part 2 of 4 – Setting Up a Top Rope

'Sport Anchors - Setting Up a Top Rope' is part of the book - Sport Climbing Basics.

VDiff learn to sport climb ebook

With the security of an anchored rope above, top-roping is the safest way to climb. A top-roped climber can rest on the rope whenever they are too tired to continue, safe in the knowledge that they will only fall a few inches. Top-roping is great for beginners, large groups or for experienced climbers who want to push their physical limits.

You Will Need:
* Four screwgate carabiners
* A cordelette/ long sling

Best Situation To Use this Method
- If the next climber will top rope the route

Step 1
After leading up to the anchor, clip a screwgate carabiner directly into each bolt. They will usually be better orientated if you clip them underneath the lowering rings.

Sport climbing top rope anchor

Step 2
Clip the sling or cordelette to both carabiners. Pull it down in the middle so both strands of sling are equal.

Sport climbing top rope cordelete anchor

Step 3
Tie an overhand knot in it.

Sport climbing top rope

This creates a central point.

Sport climbing top rope belay

Step 4
Clip two screwgate carabiners into the central point with their gates facing in opposite directions.

Sport climbing top roping

Step 5
Clip the rope through the carabiners from the back so the rope is coming out towards you.


Step 6
Ask your belayer to take you tight. You are now ready to lower and the top rope is set.

A more advanced, but often better, alternative is to use the quad anchor.

How to make a sport climbing top rope anchor

VDiff sport climbing book

Setting Up a Top Rope from Above

At some crags it is possible to set up a top-rope by walking to the top and equalizing anchor bolts or trees. Be careful when walking around the top of a crag un-roped. You may need to make an anchor further back from the cliff edge and then be put on belay while you set up the top-rope anchor.

If the bolts are set back on a ledge, or situated in a place which causes the rope to rub over an edge, you should extend the anchor and pad the edge.

Make sure to double up the slings or cordelettes which extend the anchor over the edge. An old piece of carpet, foam pads or garden hose pipes (without metal lining) make good padding.

How to make a top rope anchor climbing

Even if your anchor is bomber, extended and well padded, it is wise to check it periodically if it is being used repeatedly. Setting up a trad anchor using trees or other trad gear is explained here.

Sport Anchors – Part 3 of 4 – Cleaning the Anchor

This 'Clean a Sport Anchor' article is part of the book - Sport Climbing Basics.

VDiff learn to sport climb book

Cleaning a sport anchor means removing all of your gear from it. Three of the main ways to do this are described below.

Which you choose depends on the type of anchor and whether you plan to lower or abseil.

Types of climbing anchor

How To Clean a Sport Anchor For Lowering – Method 1

This method is suitable for anchors with a central point which is big enough to feed a bight of rope through. You will remain ‘on belay’ during the whole setup.

You will need:
* Two spare quickdraws
* One screwgate carabiner

Step 1
Clip your rope through a quickdraw on one of the anchor bolts.

How to clean a bolted sport climbing anchor

Step 2
Clip another quickdraw into the other anchor bolt and clip it directly to your belay loop. Rest your weight on this quickdraw.

clean a bolted sport climbing anchor

Step 3
Pull up a little slack and push a bight of the rope through the main anchor point as shown.

thread a bolted sport climbing anchor

Step 4
Tie a figure-8 on the bight and clip this to your belay loop with a screwgate carabiner.

How to thread the rope through a bolted sport climbing anchor

Step 5
Untie from the end of the rope.

How to clean a bolted anchor

Step 6
Pull the end of the rope through the main anchor point.

How to clean a bolted sport anchor

Step 7
Remove the quickdraw which isn’t holding your weight. Ask your belayer to take you tight.

How to clean a sport climbing anchor

Step 8
Rest your weight on the rope, then remove the other quickdraw. You are now ready to lower.

How to clean a sport anchor

How To Clean a Sport Anchor For Lowering – Method 2

Sometimes, you won’t be able to push a bight of rope through the anchor. This depends on the thickness of your rope and the type of anchor. In this case, you must use a slightly different method. As with method 1, you will remain ‘on belay’ during the whole setup.

You will need:
* Two spare quickdraws
* One screwgate carabiner

sport climbing anchor chains and bolts

Step 1
Clip two quickdraws into the anchor bolts; one clipped through the rope and the other clipped directly into your belay loop, just the same as method 1.

Rest your weight on the quickdraw.

How to clean a sport anchor

Step 2
Pull up some slack rope and tie a figure-8 on a bight. Clip this to your belay loop with a screwgate carabiner.

What to do at the top of a sport rock climb

Step 3
Untie from the end of the rope.

What to do at the top of a sport climb

Step 4
Feed the end of the rope through the main anchor point(s).

What to do at the top of a rock climb

Step 5
Tie in to the end of the rope.

threading rope through climbing anchor

Step 6
Remove the screwgate carabiner and untie the figure-8 on a bight.

threading rope through sport anchor

Step 7
Remove the quickdraw which isn’t holding your weight. Ask your belayer to take you tight.

How to clean a sport route

Step 8
Rest your weight on the rope, then remove the other quickdraw. You are now ready to lower.

How to clean a sport route anchor

VDiff sport climbing book

How To Clean a Sport Anchor For Abseiling (Rappelling)

In most cases that you clean a sport anchor, you will lower down - this is much quicker than abseiling. It’s also much easier to retrieve gear on your way down when lowering. However, abseiling puts much less wear on the rings. This could be the best option if the rings are already showing signs of wear.

You will need:
* A belay device with a screwgate carabiner
* A prusik cord with a screwgate carabiner
* Three spare carabiners (two of these must be screwgates)
* Two 60cm slings

Step 1
Girth-hitch both slings through your belay loop and attach them to the anchor bolts with screwgate carabiners.

You can now tell your belayer that you are ‘off belay’.

abseil from sport climb

Step 2
Pull up some slack and tie the rope to a carabiner. Clip this to your belay loop. You don’t necessarily need to use a screwgate carabiner here, and it doesn’t matter too much what knot you use. The point of this is so you can’t accidentally drop the rope during the following steps.

Some climbers clip this to a gear loop, since it will not be weighted. This is okay, but it’s possible to break your gear loop if the rope gets stuck on something, meaning that you would end up ‘stranded’ at the top of the climb without a rope.

rappel from a sport climb anchor

Step 3
Untie from the end of the rope.

How to abseil from climbing anchor

Step 4
Feed the end of the rope through the main anchor points.

Tying a knot in the end of the rope stops it from zipping through the anchor if you accidentally let go of it during the next step.

How to rappel from a sport anchor

Step 5
Remove the carabiner from your belay loop and untie the knot. Pull the rope down so that both ends are on the ground. Some ropes have a convenient middle marker to make this easier.

Ask your belayer to confirm that the ends are down. If the ends are only just down, or if you’re abseiling to an exposed ledge, you should tie knots in both ends of the rope. These knots stop you from accidentally abseiling off the end of the rope.

How to abseil from a sport anchor

Step 6
Attach your belay device and prusik to the rope.

How to rappel from a sport route anchor

Step 7
Weight your belay device to check the setup. Then remove the slings. You are now ready to abseil.

How to abseil from a sport route anchor

Cleaning Sport Anchors – Top Tips

* Always double-check the setup before you untie each knot. A mistake could be fatal.

* Make sure to communicate with your partner so they know if you plan to lower or abseil. If you plan to lower but your partner thinks you will abseil, they will take you off belay! Be clear about what you are doing.

* Look out for sharp edges beneath the anchor. Consider abseiling, rather than lowering, if your rope could run over a sharp edge.

* It’s important that you don’t add wear on the anchor rings by top-roping off them. Make sure to use your own screwgates and slings for top-roping so any wear is on your own gear rather than the rings.

* Always inspect the quality of the anchors and the rock around them before trusting your life to them.

* Never thread a rope directly through a bolt hanger. The square edges are likely to damage or cut your rope. Only thread your rope through round-edged metal.

Sport Anchors – Part 4 of 4 – Belaying from the Top

'Sport Climbing Anchors - Belaying from the Top' is part of the book - Sport Climbing Basics.

VDiff sport climbing book

For most sport climbs, you will belay from the bottom – just like you would at the indoor gym. However, you should belay from the top of the route when the anchor is in a poor position to lower from or abseil, or if you intend to walk off the top.


Step 1 - Equalize
Attach a cordelette to the anchor in the same way as if you were setting up a top rope.

How to set up sport climbing anchors

Step 2 - Attach
You'll need to attach yourself to the anchor in a way that you can see your partner as they follow the pitch and brace yourself if they fall. Once you are tight to the anchor, make sure you are positioned in a straight line between the central anchor point and the climber. You shouldn’t be pulled sideways if the climber falls.

You'll often need to extend your anchor to get into the optimal belay position. There are many ways to do this, each with their own advantages and limitations. The most common attachment and belay methods are described below.

belay position for sport climbing anchors

Step 3 - Choose a Belay Method
Pull up all the slack rope in the system until it's tight on your partner, then choose a method to belay them.

Three of the most common belaying methods are described below. It's important to understand the advantages and limitations of each, and be able to adapt these methods to suit any situation.


VDiff sport climbing book

Attaching to Sport Climbing Anchors

Method 1 - Clip Directly
Clip your belay loop into the central point directly with a screwgate carabiner.

Advantages
- Simple

Disadvantages
- No dynamic aspect to the anchor (using the rope is much better. See methods 2-4)
- Very difficult to adjust belay position

Best Situation to Use this Method
If extending the anchor with the rope would put you in a bad position to belay.

How to belay sport climbing

Method 2 - Tie to the Central Point
Tie your rope to the central point using a clovehitch. Then fine-tune your belay position by adjusting the clovehitch; just shuffle rope through and pull it tight. The rope between you and the central point will need to be fairly tight.

Advantages
- Only uses a small amount of rope

Disadvantages
- Belay position must be close to the central point

Best Situation to Use this Method
If the central point is within reasonable reach of your belay position (up to 2 meters or so).

How to attach to a climbing anchor

Method 3 - Loop Through the Central Point
Clip the rope through the screwgate on the central point, then walk to your belay position. Attach a screwgate to your rope loop and then clovehitch the rope to it.

Advantages
- You can fine-tune your belay position without moving back to the anchor.

Disadvantages
- Uses more rope and one extra screwgate than method 2

Best Situation to Use this Method
If the central point is out of reach from your belay position.

How to clip to a sport climbing anchor

Method 4 - Attaching Directly to the Bolts
Clovehitch the rope to both bolts, leaving a little slack between the two. Then clovehitch the rope to your rope loop with another screwgate.

Advantages
- Equalizes two points
- Doesn’t require using a cordelette

Disadvantages
- Must be close to the anchor in order to fine-tune your belay position.
- The central point is created at your belay loop. This means that you must belay directly from your harness (you can't use guide mode).

Best Situation to Use this Method
If you forget to bring a sling/cordelette.

How to clip to a climbing anchor

Sport Climbing Anchors: Belaying from the Top

Method 1 - Redirected Belay
Clip another screwgate carabiner to the central point and run your partners rope through this, then down to your belay device. You'll be able to belay as you normally would on a top rope.

Your belay device will need to be at least 1.5 meters away from the central point. This reduces the chance of you being sucked into it if your partner falls.

Also, make sure that the rope isn't rubbing against your attachment knot at the central point.

Advantages
- Most of the weight of a falling climber is transferred to the anchor, not your harness.

Disadvantages
- It's possible to get pulled into the central point if your partner falls, particularly if they are heavier than you. In this case, there is a real danger of losing control of the brake rope.

Best Situation to Use this Method
When you have a nice ledge to stand on and the central point is just above your head.

Indirect belaying redirected belay

Method 2 - Belay Directly from your Harness
Attach your belay device to either your belay loop or rope loop. This can be set up so the brake rope comes out of either the top or bottom of the belay device – choose whichever way is easier to lock off the brake rope.

In most situations, the weight of a falling climber will pull down from you, not up. Because of this, you will need to lock off upwards not downwards.

Advantages
- You can use this method for almost every belay situation.

Disadvantages
- If your partner falls, it's possible that their weight will pull uncomfortably on your harness or over your legs.

Best Situation to Use This Method
If you have used your rope to equalize the anchor.

Belaying directly from harness

Method 3 - Guide Mode
Some belay devices have a 'guide mode' function - they can be set up in a way which locks automatically if a climber falls. They can be used as a normal belay device too. Guide mode often works well on sport climbing anchors.

Read our article about how to use guide mode.

How to use guide mode climbing

Where to Put the Spare Rope

There are basically two options. Either stack it into a neat pile somewhere or stack it through a sling.

For the sling method, start by pushing a long loop of rope through the sling. Continue doing this, making smaller loops each time (bigger loops are more likely to get tangled into each other when you are belaying the leader on the next pitch).

However you choose to stack the rope, make sure it is within reach and that you can do it one-handed; you'll need to belay at the same time!

How to use guide mode climbing

Rope Loop or Belay Loop?

You can belay either from your belay loop or from your rope loop.

In some situations, using the rope loop can be more comfortable - it allows you to transfer the weight of a fallen climber onto the anchor, rather than having their weight pulling on your harness.

If you are unsure, just use your belay loop.

Belaying directly from harness

Advanced Trad Anchors > Part 1 of 5 > Getting Perfect Equalization

'Advanced Trad Anchors' is part of the book - The Trad Climber's Guide To Problem Solving.

VDiff trad climbing self rescue book

In Trad Climbing Basics, we introduced various methods of creating belay master points by tying an overhand knot in a sling or cordelette.

These methods are safe, simple and perfect for most situations that a beginner trad climber would find themselves in. However, they have drawbacks in more complicated belay setups.

The main problem with the overhand knot is that it does not spread the load equally between the pieces, especially if one strand is short, or if the loading direction changes.

This uneven distribution of force could mean that all of the force is applied to the poorest piece of the anchor.

Advanced Trad Anchors - Loading Direction

When loaded directly downwards, each piece of this anchor will take 33.3% of the load.

Advanced Trad Anchors climbing anchor

If the loading direction changes (e.g; the climber moves to one side and then falls), 100% of the force will go onto one piece.

This could cause that piece to fail.

trad climbing advanced trad anchors

Advanced Trad Anchors - Strand Length

If one strand of the cordelette is much shorter than the others, more force will be applied to the short strand when weighted.

This is because a short strand reaches maximum stretch before a longer strand.

These concepts are easier to understand if you imagine how elastic bands would stretch in these situations.

how to equalize trad climbing anchor

The same is true for dynamic rope. More force is applied to the top bolt in this case.

using rope in trad anchor

VDiff climbing self rescue book

Advanced Trad Anchors - Number of Strands

A double strand of cord (or rope) stretches less than a single strand when weighted.

While this is a good method of equalizing pieces which are far apart, more force is applied to the right piece in this anchor.

advanced trad anchors equalizing cordelettes

In this anchor, the strand of cord on the center piece has been doubled up to keep the master point higher.

Because of this, more force will be applied to the center piece when weighted.

equalizing cordelettes trad climbing anchor

Similarly, more force is applied to the upper two pieces in this anchor.

using rope in advanced trad anchors

Getting perfect equalization is not so important for most situations when each piece of the belay is bomber.

In most cases, the variations of the overhand knot method described here are fine. However, in more tenuous or complicated belay setups, a self-equalizing method could be much safer.

Advanced Trad Anchors > Part 2 of 5 > The Sliding-X

This article about the sliding-X knot is part of the book - The Trad Climber's Guide To Problem Solving.

VDiff trad climbing self rescue book

Advantages
The main advantage of using a self-equalizing anchor is that it continues to distribute the load equally between the anchor pieces as the loading direction changes. This maintains a lower force on each piece, therefore decreasing the likelihood of anchor point failure. This is especially useful when equalizing marginal pieces of lead protection.

Disadvantages
The main disadvantage of using self-equalizing knots at the anchor is that if one piece fails, the whole belay shifts. This shift is barely noticeable on a well set up anchor. However, with some setups the sudden jolt could cause you to lose control of your belay device. Be careful where you use self-equalizing anchors and make sure to tie appropriate extension-limiting knots to reduce the possible sudden shift in belay position.

Example
If two micro nuts are equalized with an overhand knot as shown, it is likely that one of them would take most of the force of a leader fall.

This could be due to a slightly off-centre adjustment of the knot, or a slightly different loading direction (you may not fall directly downwards). If the fall generates 4kN of force, it will cause the 3kN piece on the right to fail.

equalize climbing anchor

This will put 100% of the force on the remaining piece, which will most likely cause that to fail too.

equalise climbing anchor

If the same two micro nuts were equalized with a sliding-X, the knot would self-equalize during the fall and distribute 50% of the force (2kN) onto each nut. The nuts would then be much more likely to hold the fall.

sliding-x climbing knot

The Sliding-X

The sliding-X is useful for:

- Equalizing two pieces of trad gear as part of a more complicated anchor
- Equalizing two pieces of lead protection
- Equalizing a two-bolt anchor for top roping

Step 1
Clip a sling through two pieces of gear.

Make sure the sewn section of the sling is near the top of one of the pieces so it doesn’t interfere with the sliding-X knot.


Step 2
Twist the sling 180 degrees and then attach a carabiner to it. The central point will now be equalized even when the pull comes from different directions.

sliding-x equalizing climbing anchor

Step 3
Position the central point where you want it. Unclip the sling from one piece and tie an overhand knot near to the central point.

This is known as an extension-limiting knot. The closer to the central point you tie them, the less the anchor will extend if one piece fails.


Step 4
Clip the sling back into the piece.

equalize climbing anchor sliding x

Step 5
Repeat steps 3 and 4 with the other side.

You can now adjust the overhand knots so they are as far down as possible while still allowing the central point to move freely where it needs to.

sliding-x trad climbing anchor

If one piece fails, the central point will shift as shown.

how to tie a sliding x climbing anchor

Warning!
1) It’s essential that you twist the sling in step 2. If you don’t, the central point can become completely detached from the anchor if one piece fails.

how not to tie a sliding x climbing anchor

2) It can be difficult to clip another carabiner into the main point of a sliding-X when it is weighted. If you must do so, make sure you have clipped the carabiner through the sling in exactly the same way as the original carabiner. A much better alternative is to use the quad anchor.

Sliding-X Variations

There are many ways of incorporating the sliding-X into an anchor. However you do it, make sure that if any piece failed, the resulting anchor shift:
- Is minimal
- Causes the remaining pieces to re-equalize
- Will not cause you to lose control of the belay

The following arrangement uses one double-length sling to equalize three pieces.

Step 1
Clovehitch a double-length sling to the lower right piece.

how to tie a sliding-x climbing anchor

Step 2
Clip the sling through the upper right piece.

how to tie a sliding x climbing anchor

Step 3
Add two extension-limiting knots.

how to tie a sliding-x climbing anchor

Step 4
Clip the sling into the left piece.

Adjust the knots so they limit extension while allowing for some directional movement.

how to tie a sliding x climbing anchor

Step 5
Put a 180 degree twist in one of the master point strands and clip a carabiner through both loops as shown.

how to tie a sliding x climbing anchor

VDiff climbing self rescue book

You could also equalize four pieces by clovehitching another piece on the left.

You may need to adjust the extension-limiting knots after adding the fourth piece.

how to tie a sliding x climbing anchor

If your belay consists of one bomber piece (the bolt) and four mediocre pieces (the micro nuts), you could use an arrangement like this.

This method equalizes the pieces so the bolt takes 50% of the load and the four micro nuts take 12.5% each.

how to tie a sliding x climbing anchor

Advanced Trad Anchors > Part 3 of 5 > The Quad Anchor

The 'Quad Anchor' is an anchor system which self-adjusts to keep an equal force on each anchor point. It can be better than other methods of equalizing in certain situations.

Self equalizing quad anchor

Advantages

- Distributes the load equally between the anchor pieces. This puts less force on each piece, therefore decreasing the likelihood of anchor point failure.

- Provides two independent attachment points for the belayer and climber. This helps to prevent carabiners from jamming up at the same master point.

- The two attachment points adjust laterally, meaning that the anchor remains equalized even when different directions of pull are applied at the same time. This is useful during multi-pitch belay changeovers, or if the route traverses in or out from the belay.

- On multi-pitch routes where you have bolted anchors that are approximately the same, you can speed up your anchor building by keeping the quad tied.


Disadvantages

- The quad will extend slightly should either anchor point fail. This can shock-load the remaining piece(s).

- Since the quad needs to be doubled up, it is difficult to equalize anchors where the placements are far apart.


Best Situation To Use The Quad Anchor

To equalize two bomber anchor points such as a two-bolt anchor.

How To Tie The Quad Anchor

You Will Need:
* 2, 3 or 4 solid anchor points
* A cordelette
* 3-5 screwgate carabiners

Step 1
Double over a cordelette so there are four strands of cord. Make sure the double fisherman’s knot of the cordelette is near one end.

Climbing cordelette

Step 2
Tie a ‘load-limiting’ knot on one side of the cordelette. This can be either an overhand knot or a figure-8 (The figure-8 is easier to untie after loading. The overhand uses slightly less cord).

Climbing cordelette

Step 3
Tie another load-limiting knot on the other side and clip both ends of the cordelette to the anchor points with screwgate carabiners. Make sure the knots are fairly even when the anchor is weighted in the direction of loading. The four-strand ‘master point’ should normally be around 12 inches long.

These load-limiting knots minimize the distance the cordelette drops if one anchor point fails. The closer you tie these knots to the master point, the less shock-loading is applied to the remaining anchor point.

If the strength of your anchor points are difficult to assess (e.g: older bolts), you should move the overhand knots closer together. However, this also reduces the lateral range over which the quad self-equalizes.

Climbing quad anchor

Step 4
Separate the four strands of the master point into two doubled strands.

Climbing quad equalizing anchor

Step 5
Attach yourself to two of the master point strands (using a clovehitch on a screwgate carabiner).

If belaying in guide mode, attach your belay device to the other two master point strands.

Belaying in guide mode with a quad anchor

Warning!
It is important to only clip into two of the master point strands. If you clip into all four, you could become completely detached from the anchor if one point fails.

Dangers of the quad anchor climbing

VDiff self rescue course

Equalizing 3 or 4 Anchor Points

To equalize three anchor points, simply split one of the double-loops, attaching one loop into each piece. You will need to re-tie the load-limiting knots to equalize these pieces since they will probably be at varying heights.

Do the same with the other side to equalize four points.

Quad anchor rock climbing

Sometimes it can be difficult to equalize three or four points correctly, as this uses up a lot of cordelette. In this case, consider equalizing the furthest away pieces with a sling to create two anchor points. Then attach your quad to those.

Quad anchor with slings and cordelette rock climbing

Using The Quad as a Top Rope Anchor

You can use the quad anchor to set up a top rope. This is useful if you want to top rope two different routes which are immediately next to each other, but share the same anchor. The quad will self-equalize for both of them without needing any adjustment.

As always, make sure your anchor meets the requirements of the six point rule before you set up a top rope.

Step 1
Clip a screwgate carabiner into two of the master point strands.

How to make the quad anchor rock climbing

Step 2
Clip another screwgate into the other two master point strands.

How to equalize rock climbing anchors

Step 3
Clip the rope through the screwgates and fasten them.

It is important not to clip a carabiner through all four strands (see above).

Self-equalizing anchor rock climbing top rope

Advanced Trad Anchors > Part 4 of 5 > The Equalizing Figure-8

This article about the 'Equalizing Figure-8' is part of the book - The Trad Climber's Guide To Problem Solving.

VDiff trad climbing self rescue book

In Trad Climbing Basics, we described methods of building an equalized anchor without the use of slings or a cordelette – great if you’ve used them all during the pitch. Many variations are possible. Two simple methods are shown below, along with the more advanced equalizing figure-8. These methods use up quite a lot of rope, so you might not have enough on those long pitches.

Rope Anchors – Simple Methods

Advantages
- Can equalize pieces which are very far apart.

Disadvantages
- Often uses a lot of rope.
- Must belay directly from harness.
- Difficult to get perfect equalization.
- Very difficult or impossible to escape the belay in an emergency situation.
- Not great for multi-pitch belays if the same person is leading every pitch. To attach to the anchor, the belayer will have to clip each piece in the same way as the leader did. This is time consuming and can be a bit awkward.

using rope in trad anchor

Tying an alpine butterfly knot as shown will use less rope, but still has the same disadvantages as the previous method.

trad anchor using rope

VDiff climbing self rescue book

Rope Anchors – The Equalizing Figure-8

The ‘equalizing figure-8’ is a rarely used knot which could be useful in some belay setups.

Advantages
- Creates a master point in the rope so you can belay directly from the anchor in guide mode.
- Much easier to escape the belay than the previous two methods.

Disadvantages
- Difficult to equalize anchor points which are very far apart.
- Difficult to adjust belay position once set up.
- The equalizing figure-8 is not redundant. If one piece fails, the whole anchor shifts down. Only use this method with bomber gear, such as bolts
- In the unlikely event that one rope loop is cut, the whole anchor could fail.

equalize rope in trad anchor

How To Tie the Equalizing Figure-8

Step 1
Tie a figure-8 with a large loop.

using rope to equalize trad anchor

Step 2
Pass the loop back through the figure-8 as shown.

equalizing figure 8 trad anchor

Step 3
This creates three new loops. Clip each loop into an anchor piece and adjust them as necessary.

equalizing figure 8 knot climbing

Alternatively, collapse one loop for clipping into two pieces.

equalizing figure 8 knot trad anchor

Step 4
To create a master point, tie a figure-8 loop in the rope just below the equalizing figure-8.

You can belay in guide mode directly from this.

equalizing figure 8 knot

Advanced Trad Anchors > Part 5 of 5 > Minimal Gear Anchors

'Minimal Gear Anchors' is part of the book - The Trad Climber's Guide To Problem Solving.

VDiff trad climbing self rescue book

The following minimal gear anchors are great to know in case you reach the top of a pitch without a cordelette, only a meter of rope to spare and not quite enough slings to create a self-equalizing anchor.

Endless variations and combinations are possible depending on the equipment you have and where the gear placements are. A few examples are given below.

It’s hard to get any of these anchors equalized perfectly, but if you’re short on slings and rope, these are probably your best options.

Example 1

A double-length sling equalizes the two pieces on the left.

An overhand knot is tied in the shoulder-length sling on the right to equalize it with the others.

Trad anchors with minimal gear anchors

Example 2

A double-length sling can join three pieces, if two of them are in line with each other.

Simply tie an overhand knot in the sling above the lower piece.

Building trad anchors with minimal gear

Example 3

The upper cam is clipped through the sling of the lower cam. This isn’t ideal, but it’s better than just having one cam.

Often you can slide cams up or down a placement to fine tune their position.

Trad anchors with no gear


Example 4

The upper two pieces are equalized with a double-length sling.

The overhand knot is adjusted so the lower piece can contribute to the anchor.

minimal gear anchors how to make trad climbing anchor

Top Tip – Minor Adjustments

You can wrap a sling two or more times through a carabiner to shorten it slightly. Keep the wraps close together and away from the gate if possible.

If you need to shorten a sling more, it’s better to tie an overhand knot as shown in example 1.

rock climbing sling and carabiner

Advanced Trad Anchors - Summary

There isn’t a ‘best’ method of equalizing anchors, since every trad anchor situation is different. Understanding the advantages and limitations of a wide range of anchor systems gives you more options. Use your knowledge to select the best method for each unique situation.

Trad Anchors – Part 1 of 4 > Introduction

This 'Trad Anchors' article is part of the book - Trad Climbing Basics.

VDiff learn to trad climb e-book book

Trad Anchors: Gear Placements

The climb isn't over when you reach the top. You still need to make an anchor to attach yourself and belay your partner from. You should produce an anchor with at least two (preferably three) good pieces of gear. Gear placements are sometimes obvious and close together, and sometimes not so obvious and far apart.

making a trad climbing anchor

If you can't find enough gear to make a secure anchor, you'll have to go somewhere else! Try a little further back or along the crag top. On a multi-pitch, you may have to climb up a bit higher, or down-climb if you've just passed a suitable place. It is essential that you find a place to make a solid anchor. Never accept that an anchor is poor quality. There are always other options.

Trad Anchors: The Central Point

Your gear placements need to be equalized together to form a central point. This is where you attach yourself and belay from. How you create the central point will depend on what gear is available, how spaced it is, if you have one rope or two, and whether the climb is a single or a multi-pitch.

It's essential to know each technique and be able to adapt your anchor building skills for each unique situation.

trad climbing anchor

Top Tip
Once you've got one piece of gear in, clip the rope through it as if you're still climbing. This will protect you if you slip while building the rest of your anchor. You can unclip this later when you are safely attached to the anchor.

how to set up a trad belay anchor

Trad Anchors: The Six-Point Rule

You should create an anchor which is worth at least 6 points. Only experience can teach you how many points your piece of gear is really worth. As a guideline, points are awarded as follows:

3 points: A new bolt or a sling around a large tree.

rock climbing bolt trad anchors

2 points: A well placed piece of trad gear.

rock climbing cam

1 point: A well placed micro nut or micro cam.

rock climbing micro nut

0 points: Any suspect gear which is either placed incorrectly or in bad rock.

bad rock climbing gear

Warning! Loose Features
Don't place all of the anchor pieces behind the same feature (especially with flakes or blocks). If that feature is loose, your entire anchor will fall out when weighted!

For this reason, it’s better to place gear in different cracks and features.

rock climbing trad anchors

VDiff trad climbing book

Trad Anchors: Belay Plan

When you've found enough good gear placements for the anchor, you'll need to make a belay plan. Your plan will include:

1) How you will equalize the gear together.
2) Exactly where you will sit or stand to belay.
3) How you will attach yourself to the anchor.
4) Which belay technique you will use.
5) Where you will put the extra rope.

When your plan is complete, you can start making the anchor. Each part of the belay plan is explained in the following articles.

Trad Anchors – Part 2 of 4 > Equalizing Gear

This 'Equalize Trad Anchors' article is part of the book - Trad Climbing Basics.

VDiff learn to trad climb e-book book

Equalizing Trad Anchors - The Basics

Let's assume you've got two incredibly good pieces of gear or two bolts at the anchor. The easiest way to equalize them together is by using a long (120cm or 240cm) sling, or a cordelette (a loop of 7 or 8mm cord).

Step 1
Clip the sling or cordelette to both pieces of gear, using screwgate carabiners. Pull it down in the middle so both strands of sling are equal.

trad climbing anchor equalized

Step 2
Tie an overhand knot in it. This creates a central point.

equalize climbing gear overhand knot in sling

Step 3
Clip a screwgate carabiner into the central point.

trad climbing anchor equalized

An overhand knot in your sling will equalize the anchor pieces in a basic sense. However, it must be tied in a way which meets the following three criteria:

1) Each piece of gear only takes around 50% of the total weight of the belay.
2) The anchor is set up for the direction that the 'pull' will come from.
3) If one piece of gear was to fail, the other would not be shock loaded.

These criteria are explained below.


VDiff trad climbing book

Criteria 1: The V-Angle

In theory, if you have two pieces of gear with 100kg hanging from them, each will take 50kg, right? Unfortunately not. This depends on the angle the sling makes just above the overhand knot (the V-angle). The smaller the V-angle, the smaller the force on each piece of gear.

You don't need to know how to calculate these numbers, but an angle of anything up to 60 degrees is acceptable. At this point, 58% of the total weight of the belay (the weight of both climbers) will go onto each piece. This is good.

trad climbing bolted anchor equalized

At 90 degrees, 71% of the force will go onto each piece. This isn't too good.

climbing bolted anchor equalized

At 120 degrees, each piece of gear takes 100% of the force! Never equalize gear with such a large angle.

trad climbing bolted anchor equalizing

You can decrease the V-angle by using a longer sling or cordelette. If you don't have one, you can extend a piece with a short sling.

trad climbing bolted anchor equalize

Criteria 2: Direction of Pull

Your gear needs to be equalized together in the 'direction of pull'. This is the direction that it would be weighted if your partner falls.

If you've climbed straight up to an anchor and will be standing or sitting directly below it, this will be straight down. But if you've traversed in to a ledge and the rope is running off to the side, the pull will be in that direction. You'll need to place and equalize the gear to suit that.

When you're setting the anchor up, think about the direction that the pull will be in. Tie your overhand knot accordingly, then test it by pulling hard in that direction. Are both strands of the sling taking the weight? If one is slack, then adjust your knot accordingly.

equalizing bolts with cordelette

Criteria 3: Shock Loading

Imagine hanging a heavy shopping bag from a nail on your kitchen wall. If you place it there gently, the nail might strain a bit, but it'll hold.

Now imagine extending that shopping bag with a piece of string. Hold it up high, then drop it. What happens? The increased force will likely break either the nail, string or bag, dumping your shopping in an untidy pile of broken eggs and plasterboard.

This principle is exactly the same at a belay. If one piece fails and the anchor isn't equalized correctly, all the weight of you and your partner will 'fall' onto the other piece, shock loading it. The extra force caused by shock loading could pull out or break the remaining piece.

There should be no slack in any part of your anchor, so that if any piece failed, there would be no movement or shock loading.

shock load climbing anchor

How To Equalize Three or More Pieces

The previous example explained how to equalize an anchor with only two pieces of gear. This is fine if both pieces of gear are absolutely bomber (such as a new bolt or a sling around a big, sturdy tree).

However, in most cases you'll be building trad anchors out of regular trad gear – nuts, hexes and cams. These are not as strong as bolts or massive trees, so you'll need to use more of them.

If you're not sure how many pieces of gear to use, see
The 6 Point Rule.

To equalize three pieces of gear, simply use a longer sling or cordelette. Pull two loops down and tie one big overhand knot in it. Then clip a screwgate through all three loops. You may need to fiddle with the knot slightly to get all strands to pull equally tight – often the middle one can go a little slack as you tie it.

three piece climbing anchor

If you have two pieces of gear close together but the other one far away, it can help to use two slings. First, use one sling to equalize the two pieces which are close together. Next, equalize the central point of that with the third piece of gear using another sling.

You may need more than three pieces of gear to make a secure anchor. Use the same method to equalize as many pieces together as you need.

If you don't have enough slings, you can use the rope as part of the anchor (this is explained in the next article).

trad climbing anchor equalized with slings

Cordelette Craft

If equalizing the anchor with a cordelette, it is typically better to create the central point at head to chest level. This provides a convenient workstation to attach yourself and belay your partner from.

The following methods describe a few ways to adjust the height of the central point.

trad climbing belay equalized with cordelette

Cordelette Craft: Keeping the Central Point High

Double Up
One or more strands can be doubled up. The double loops don’t stretch as much, so they may give the higher piece more than it’s share of the load.

Consider this when equalizing the pieces together.

trad climbing anchor equalized with cordelette

Tie a Knot
Tie an overhand in the cordelette to shorten it.

trad climbing anchor equalized with cordelette

Figure 8
Tie a figure 8 instead of an overhand at the central point. Or wrap the cord around itself one more time to create a figure 9.

When using any of these methods to adjust the height of the central point, make sure your V-angle does not exceed 90 degrees.

trad climbing anchor equalized with cordelette

Cordelette Craft: Extending the Central Point

If you would prefer to use a cordelette to equalize the anchor (rather than the rope), but it isn’t long enough, try extending the furthest away piece with a sling.

Alternatively, unfasten the double-fisherman’s bend and tie a figure-8 loop in each end of the cordelette. Clip the ends into the furthest away pieces and equalize with an overhand knot.

The disadvantages of this setup are a reduced strength on the outer pieces (one strand of cordelette is weaker than two) and there is no top shelf.

trad climbing anchor equalized with cordelette

Trad Anchors – Part 3 of 4 > Attaching to the Anchor

This 'Trad Anchor' article is part of the book - Trad Climbing Basics.

VDiff learn to trad climb e-book book

You'll need to attach yourself to the anchor in a way that you can see your partner as they follow the pitch and brace yourself if they fall.

Make sure you are positioned in a straight line between the anchor and the climber. You shouldn’t be pulled sideways if the climber falls. You may need to extend your anchor to get into the optimal belay position. There are many ways to do this, each with their own advantages and limitations.

Some of the most common methods are described below. With practise, you should develop the ability to adapt and combine these methods to suit every belay situation.

trad anchor belay position

Method 1: Clip Directly

Clip your belay loop into the central point directly with a screwgate carabiner.

Advantages
- Simple

Disadvantages
- No dynamic aspect to the anchor (using the rope is much better. See methods 2-5 below)
- Very difficult to adjust belay position

Best Situation to Use This Method
If extending the anchor with the rope would put you in a bad position to belay.

attach to climbing trad anchor

Method 2: Tie to the Central Point

Tie your rope to the central point using a clovehitch. Then fine-tune your belay position by adjusting the clovehitch; just shuffle rope through and pull it tight. The rope between you and the central point will need to be fairly tight.

Advantages
- Only uses a small amount of rope

Disadvantages
- Belay position must be close to the central point

Best Situation to Use This Method
If the central point is within reasonable reach of your belay position (up to 2 meters or so).

attach to climbing anchor rope

VDiff trad climbing book

Method 3: Loop Through the Central Point

Clip the rope through the screwgate on the central point, then walk to your belay position. Attach a screwgate to your rope loop and then clovehitch the rope to it.

Advantages
- You can fine-tune your belay position without moving back to the anchor.

Disadvantages
- Uses more rope and one extra screwgate than method 2

Best Situation to Use This Method
If the central point is out of reach from your belay position.

attach to climbing anchor with two central points

Method 4: Attaching to Two Points

Attach the rope to the nearest anchor point with a clovehitch. Then clovehitch the rope to the other anchor point, leaving a little slack between the two. Next, clovehitch the rope to your rope loop with another screwgate.

Advantages
- Equalizes two points
- Uses less rope than method 5

Disadvantages
- Must be close to the first anchor point in order to fine-tune your belay position.
- The central point is created at your belay loop. This means that you must belay directly from your harness (you can't use guide mode).

Best Situation to Use This Method
If you have two anchor points which are too far apart to equalize with a sling/cordelette.

attach to climbing anchor using the rope

Method 5: Attaching to Three or More Points

Step 1
Clip the rope through the furthest away point, then walk to your belay position. Attach a screwgate to your rope loop and then clovehitch the rope to it, just the same as method 3.

Step 2
Repeat this step with the second point.

Step 3
Tie your rope to the third point using a clovehitch, as described in method 2.

You can fine-tune the clovehitches to equalize the three points. This is a good method if you arrive at a belay with no slings or cordelette.

Advantages
- You can use this method to equalize as many points as you need. Just keep repeating step 1 until you've equalized all your pieces.

Disadvantages
- Uses up a lot of rope.
- You must belay directly from your harness.

Best Situation to Use This Method
If you arrive at a belay with no slings or cordelette.

attach to many climbing anchors with rope

Tree Anchors

Walking around a large tree and clipping the rope back to your rope loop is a quick way to make an anchor with only one screwgate carabiner. The clovehitch or figure-8 on a bight are good knots to use. It is only suitable to do this with very large trees. Watch out for tree sap.

climbing belay from tree

Attaching to a Trad Anchor with Half Ropes

When climbing with half ropes, you can use any of the previously described methods with either one or both ropes.

attach to climbing anchor with two ropes

Attaching to a Trad Anchor with a Sling

Slings are designed to be used with a dynamic rope in the system to lessen the impact on them. It's only safe to attach yourself to an anchor with a sling if you won't be moving above it (such as when setting up an abseil).

If you fall when above an anchor (even if you are only a foot above), unusually large forces will be generated.

You can damage internal organs with just a 10kN force - falling onto a sling directly is likely to be much higher than this. It could also break the sling, or the anchor.

If there is any chance that you will move sideways or above the anchor, make sure to attach to it with the rope.

clipping to climbing anchor with sling

Trad Anchor Checklist

You can use any of the previously described methods in any combination with either a single rope or half ropes. Whichever you choose, make sure:

1) Enough pieces of gear to satisfy 'the 6 point rule'
2) Each piece is placed as well as it can be
3) The rock around the gear is solid
4) The pieces of gear are equalized correctly
5) The V-angle is less than 60 degrees at each point of equalization
6) The anchor is perfectly aligned with the direction that the pull will come from
7) Each piece is independent from the others to prevent shock loading
8) You are attached to the anchor with a tight rope
9)All knots are tied neatly
10) All the screwgates are fastened up.

Once you can answer 'yes' to all of these, you can tell your partner that you are 'safe' or 'off belay'.

Trad Anchors – Part 4 of 4 > Belaying the Second

This 'Belaying the Second' article is part of the book - Trad Climbing Basics.

VDiff learn to trad climb e-book book

Belaying from an Anchor

Once you’ve climbed a pitch and built an anchor, you will need to belay your partner up. Pull up all the slack rope in the system until it's tight on your partner, then choose a method to belay them.

Three of the most common belaying methods are described below. It's important to understand the advantages and limitations of each, and be able to adapt these methods to suit any situation.

Method 1: Re-directed Belay

Clip a screwgate to the central point. Run your partner’s rope through this and down to your belay device. You'll be able to belay as you normally would on a top-rope. Your belay device will need to be at least 1.5 meters away from the central point. This reduces the chance of you being pulled into it if your partner falls. Also, make sure that the rope isn't rubbing against your attachment knot at the central point. Consider attaching to the top shelf to avoid this if possible.

Advantages
- Most of the weight of a falling climber is transferred to the anchor, not your harness.

Disadvantages
- It's possible to get pulled into the central point if your partner falls, particularly if they are heavier than you. In this case, there is a real danger of losing control of the brake rope.
- More difficult to set up when using half ropes (you'll need a separate point for each rope)

redirected belay anchor

Best Situation to Use This Method
When you have a nice ledge to stand on and the central point is just above your head.

Method 2: Belaying Directly from your Harness

Attach your belay device to either your belay loop or rope loop. This can be set up so the brake rope comes out of either the top or bottom of the belay device – choose whichever way is easier to lock off the brake rope.

In most situations, the weight of a falling climber will pull down from you, not up. Because of this, you will need to lock off upwards not downwards.

Advantages
- You can use this method for almost every belay situation.

Disadvantages
- If your partner falls, it's possible that their weight will pull uncomfortably on your harness or over your legs.

Best Situation to Use This Method
If you have used your rope to equalize the anchor.

belaying from harness at anchor

VDiff trad climbing book

Method 3: Belaying in Guide Mode

Some belay devices have a guide mode function - they can be set up in a way which locks automatically if a climber falls. They can be used as a normal belay device too.

You can set up guide mode as shown, with one rope or two.

Simply pull the brake strands through as the climber moves up. If they fall, the device will lock by itself almost instantly. Even though guide mode belay devices are auto-locking, you should always keep hold of the brake rope.

Before you use guide mode, you should understand how to lower a climber (see our guide mode article).

guide mode belay anchor

Advantages
- The weight of a falling climber isn't on your harness, which is much more comfortable!
- You can bring up two climbers at the same time (on two different ropes) - great if climbing as a team of three.
- Because you are not directly attached to your belay device, it is easier to detach yourself from the system in an emergency.

Disadvantages
- Time-consuming to lower a climber, even a short distance.

Best Situation to Use This Method
When climbing as a team of three.

Rope Loop or Belay Loop?

You can belay either from your belay loop or from your rope loop. In some situations, using the rope loop can be more comfortable - it allows you to transfer the weight of a fallen climber onto the anchor, rather than having their weight pulling on your harness.

Remember that if you used two ropes in the anchor, you'll need to belay from both rope loops. If you are unsure, just use your belay loop.

belaying from rope loop or belay loop

Where To Put the Spare Rope

There are basically two options. Either stack it into a neat pile somewhere or stack it through a sling.

For the sling method, start by pushing a long loop of rope through the sling. Continue doing this, making smaller loops each time (bigger loops are more likely to get tangled into each other when you are belaying the leader on the next pitch).

However you choose to stack the rope, make sure it is within reach and that you can do it one-handed; you'll need to belay at the same time!

stacking a climbing rope

Trad Anchors > How To Set up a Top Rope

This 'Top Roping' article is part of the book - Trad Climbing Basics.

VDiff learn to trad climb e-book book

With the security of an anchored rope above, top-roping is the safest way to climb. A top-roped climber can rest on the rope whenever they are too tired to continue, safe in the knowledge that they will only fall a few inches. Top-roping is great for beginners, large groups or for experienced climbers who want to push their physical limits.


Forces
Forces on gear when top-roping are much less than forces on gear during a leader fall. However, with a little slack in the system, the force at the anchor could exceed several times the combined weight of the climber and belayer. The anchor needs to be bomber.


Lowering
When belaying from the top, the climber is often lowered down and then climbs out. If possible, it can be much better to belay directly from the anchor. This keeps the climber’s weight off the belayer’s harness.

If lowering is impractical (e.g: it could damage the rope or it’s difficult to communicate when to stop being lowered), the climber could abseil down instead. This could be on the same rope, or a separate one. Plan logistics well before descending.

Top or Bottom?
Depending on the terrain, the length of your rope and the anchor arrangement, you may choose to belay from the top or the bottom of the crag.

Belaying from the bottom:
- Makes it easier to switch between climbing and belaying.
- Generally creates a more social setting.
- Makes communication clearer.

Belaying from the top can be better if:
- The bottom of the crag is difficult or impossible to access (e.g: the last pitch of a tall cliff).
- There is a chance of a climber knocking rocks on the belayer.
- The crag is higher than half a rope length.


Setting Up the Anchor
Be careful when walking around the top of a crag un-roped. You may need to make an anchor further back from the cliff edge and then be put on belay while you set up the top-rope anchor.

how to top rope climb

Top Roping > How To Set Up the Anchor

Step 1
Find enough good gear placements directly above the route to make an anchor, making sure they meet the requirements of the six point rule.


Step 2
Equalize them together with slings, cordelettes or a section of static rope to create a central point which fulfils the criteria in the anchor check list.

Remember that the top roping anchor will be out of sight and not consistently weighted while you are climbing. This means you will have to build it with gear that cannot wiggle out of position with movements in the rope.


Step 3
Extend the central point over the edge of the crag, if it isn't already. Static rope is the best for this, but you can also use nylon slings or a thick cordelette. Make sure to double up the slings or static rope which extend the anchor over the edge.

how to set up a top roping anchor climbing

Step 4
Place a rope protector over any rough edges. An old piece of carpet, foam pads or garden hose pipes (without metal lining) make good rope protectors.


Step 5
Clip the middle of the rope to the central point with two screwgates. Make sure the screwgates are opposite and opposed (they are facing opposite ways and the screws twist downwards to fasten them).

how to set up a top rope anchor climbing

VDiff trad climbing book

The Double Bowline

'Essential Knots: The Double Bowline' is part of the book - Sport Climbing Basics.

VDiff learn to sport climb e-book book

The double bowline is commonly used to secure the end of a rope around a large object such as a tree. It can also be used to tie the rope into your harness.

How to Tie the Double Bowline

Step 1
Wrap the end of the rope around a tree or other suitable object. Form two loops in the rope as shown.

Double bowline climbing knot

Step 2
Push the end of the rope up through the two loops and around the back of the main strand. Then push the end of the rope back down through the loops.

Double bowline climbing knot

Step 3
Pass the end around the back of the knot and push it up through the new loop as shown.

Double bowline climbing knot

Step 4
The double bowline is now tied, but needs a stopper knot to be complete. Tie a half fisherman's by passing the end of the rope around the main strand twice.

Double bowline climbing knot

Step 5
Finish the stopper knot to complete the knot.

Double bowline climbing knot

VDiff sport climbing book

Warning
The double bowline is great for tying around a tree or boulder as part of a top-rope anchor.

Some sport climbers also use the double bowline for tying in because it’s easy to untie after multiple falls. However, it has been known to untie itself, especially if the rope is stiff. This is due to lots of movement in the rope as you climb. We recommend the figure-8 as a much safer alternative for tying into your harness.

Double bowline climbing knot